Poha Recipe
Jan 14, 2020, Updated May 27, 2023
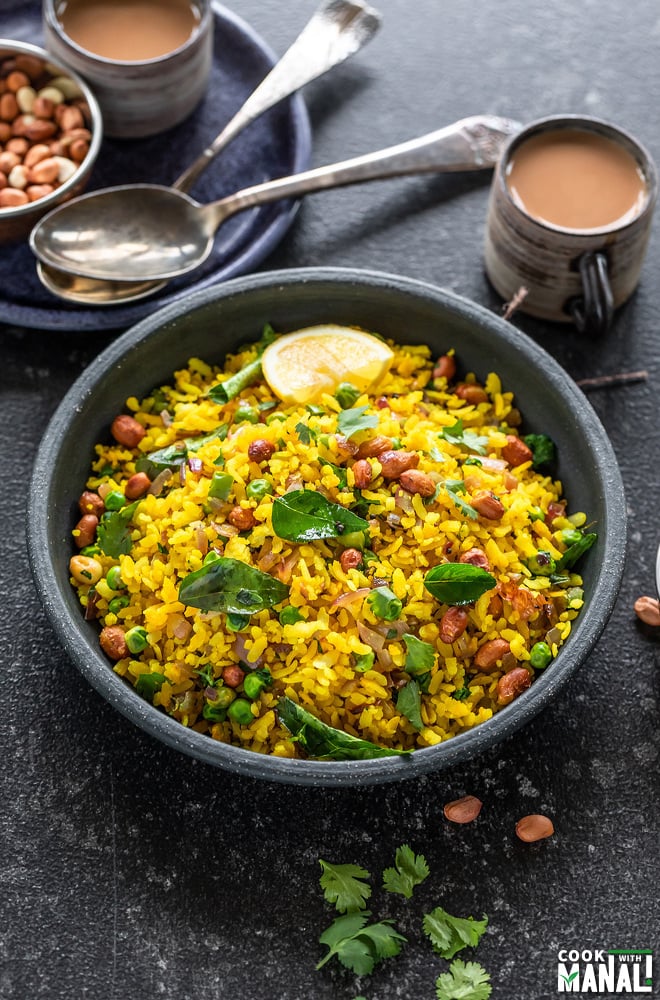
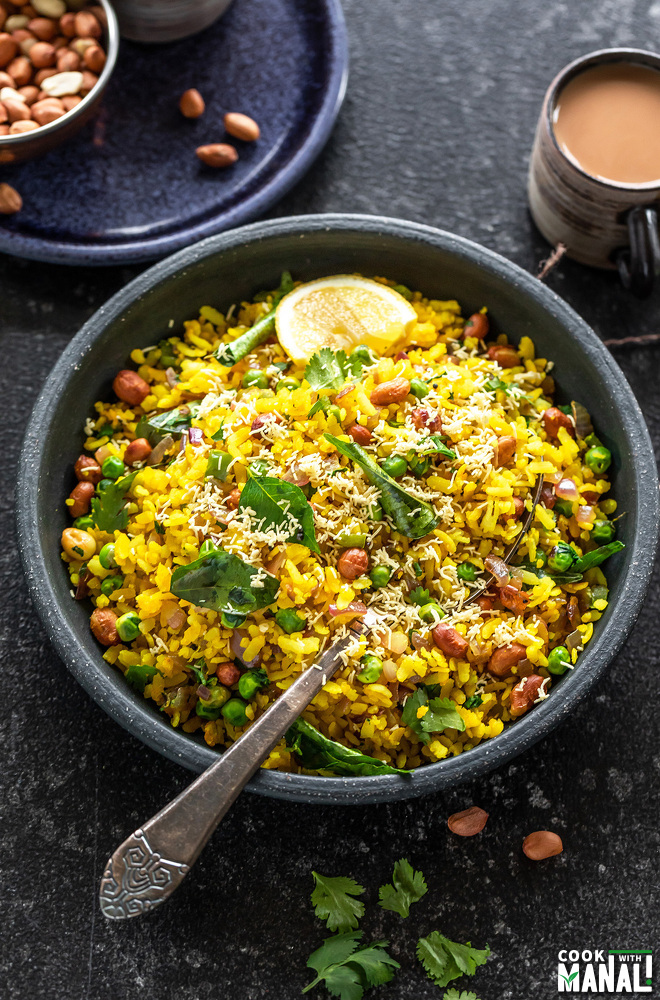
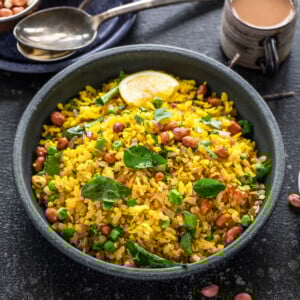
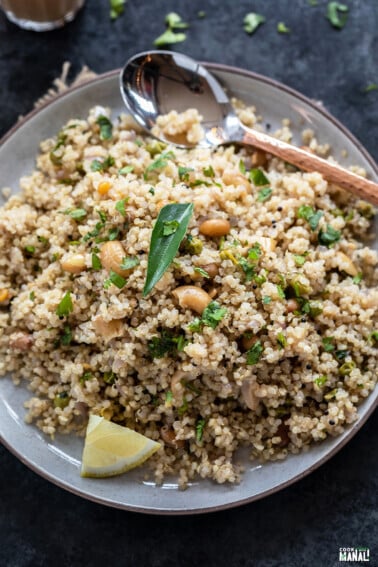
Flattened Rice tempered with onions and spices, Poha is popular breakfast across India. It is also vegan and super easy to make!
This post may contain affiliate links. Please read our disclosure policy.
Poha is one of India’s most popular breakfast (especially in North and western India).
Flattened rice is tempered with spices and onions making it the perfect way to start the day.
Disclosure: This post contains affiliate links. For more information on my Affiliate and Advertising Policy, please click here.
Growing up, I wasn’t a huge Poha fan.
I was okay with it but I would never ask mom to make it.
But of course it was made very often in my house. And the reason for that is that it’s a filling and nutritious breakfast which gets done in no time!
What is Poha
Poha (flattened rice) is typically a Western Indian breakfast recipe but it’s taste and ease of making has made it extremely popular all over India.
Poha is very easy to make, it requires almost no cooking, the flattened rice just need to be rinsed till it’s softened and that’s about it.
You don’t need to cook it like any other grain.
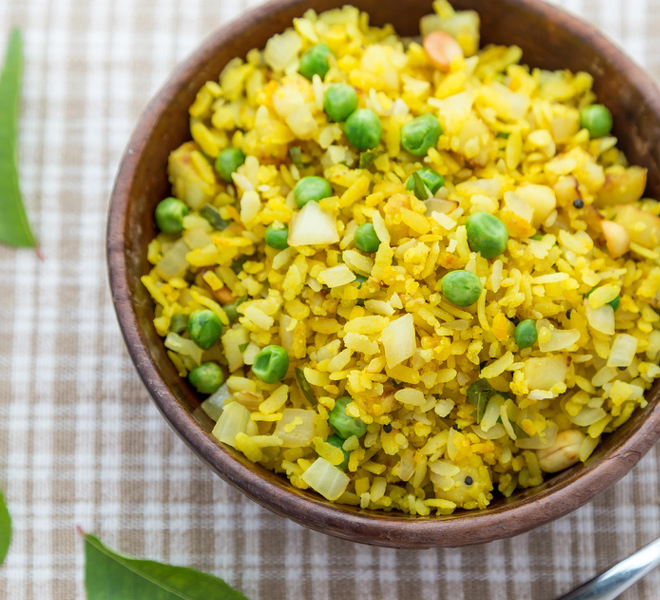
Traditionally in the state of Maharasthra, it is known as “kanda poha” (kanda=onion) where poha is made with only onions and I prefer that version too.
I know a lot of people add lot of veggies to their poha which you can definitely do but I like it simple with only onions at green peas.
When I first started making poha, it never turned out good.
In fact, I would always ask Sarvesh to make it since he made it so much better.
Mine would always turn out mushy or too dry.
But then over the years, as I started making poha frequently for breakfast, I learned the little things which help in making the perfect poha!
Tips to Make Good Poha
Rinse the poha in a strainer until it turns soft. You can check if it’s done by taking a flake and pressing it between your thumb and index finger. It should break easily.
This step makes sure the poha doesn’t turn mush when you add it to the pan.
I also add salt and turmeric into the strainer once the poha is soft, however you may add them directly to the pan too.
Add lots of peanuts as they give a nice texture to the poha.
After you add the rinsed poha to the pan, toss it and then take a flake and taste test it. If it tastes dry, sprinkle some water over the poha (just sprinkle, and add more as needed).
I usually have to sprinkle some water since the poha dries out a little in the strainer as you make the tempering in the pan.
After sprinkling water, I usually cover it for a minute or two on low heat.
Add little sugar to balance the flavors, just a little bit really helps in balancing the flavors of the poha. It’s optional though.
Finish with fresh cilantro and lemon juice, it adds so much flavor. I cannot have my poha without a good squeeze of lemon juice.
Garnish with sev! So just before you serve the poha, top it with sev and then dig right in. Oh it’s so good with sev on top!
If you don’t have sev, other namkeens like aloo bhujia, chivda would also do.
For those who don’t know what sev is, it is a kind of savory snack made with chickpea flour. It’s deep fried and usually enjoyed with chai.
Adding Veggies to Poha
My poha recipe only has onions and green peas but you may add more vegetables.
I sometimes add potatoes, if you want to do that, dice them very small so that they cook quickly. Add them after the onions are done and cook them first before adding the poha to the pan.
My mother-in-law adds carrots and cauliflower to her poha. Again, she chops them very fine.
So the most important thing to remember here is chop the veggies very fine. Yon can then add whatever veggies you want to your poha.
Method
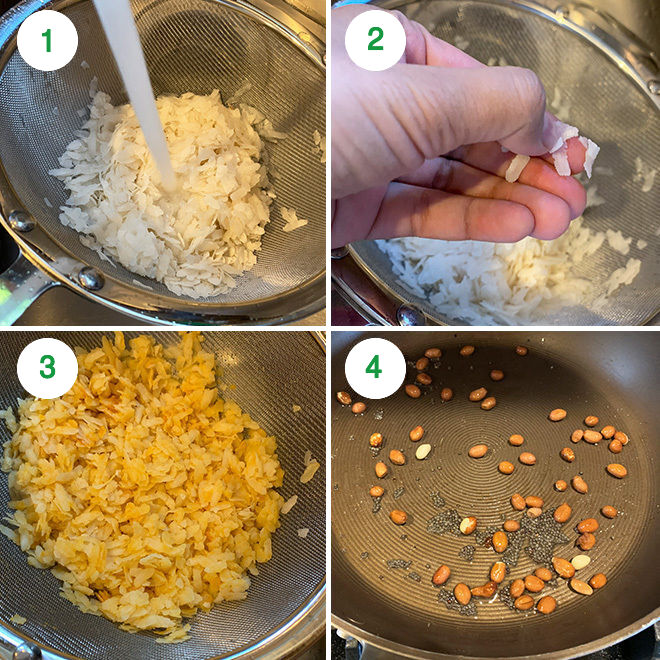
1- To a strainer, add flattened rice (poha). Rinse it under running water until it turns soft.
2- To check if it’s done, press a flake between your thumb and index finger, it should break easily.
3- Add turmeric and 1/2 teaspoon salt to the poha and toss to combine. Set it aside while you make the tempering in the pan.
4- Heat oil in a pan on medium heat. Once the oil is hot, add the mustard seeds and let them pop.
Then add the peanuts and saute for a minute or two until they start turning brown.
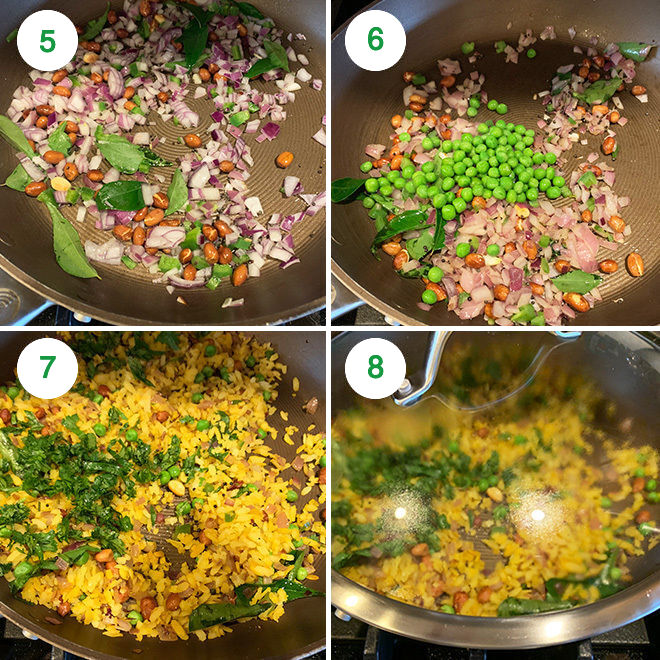
5- Then add the chopped onion, green chili and curry leaves. Cook for 2 minutes until the onions soften.
6- Add the green peas (which had been soaked in warm water for 10 minutes prior) and mix. Cook for 2 minutes until raw smell of peas goes away.
7- Then add in the rinsed poha and toss to combine. Taste test some poha and if it feels dry, sprinkle little water all over (I usually do that). Cook for 1-2 minutes. Also tastes test and add more salt as needed at this point (I added around 1/8 teaspoon).
Also add the sugar (if using) and cilantro.
8- And then cover the pan with a lid and turn heat to low. Let it be like that for 2 minutes. Then turn off the heat.
Squeeze in some fresh lemon juice. Garnish poha with more cilantro and sev and serve with a cuppa chai.
Other Popular Indian Breakfast
If you’ve tried this Poha Recipe then don’t forget to rate the recipe! You can also follow me on Facebook, Instagram to see what’s latest in my kitchen!
This post has been updated from the recipe archives, first published in August 2014.
Poha Recipe
Ingredients
- 1.5 cups poha 114 grams, use thick poha
- 1/4 teaspoon turmeric
- 1/2 teaspoon + 1/8 teaspoon salt divided, adjust to taste
- 1/3 cup green peas I used frozen, soaked in warm water for 10 minutes
- 2 teaspoons oil 10 ml, I used avocado oil
- 1/2 teaspoon mustard seeds
- 1.5 tablespoons raw peanuts
- 1 small red onion chopped
- 1 green chili chopped
- 10-12 curry leaves
- 1/4 teaspoon sugar optional
- 1 tablespoon chopped cilantro + more to garnish
- 1/2 lemon juice of
- sev to garnish
Instructions
- To a strainer, add flattened rice (poha). Rinse it under running water until it turns soft. To check if it's done, press a flake between your thumb and index finger, it should break easily.
- Add turmeric and 1/2 teaspoon salt to the poha and toss to combine. Set it aside while you make the tempering in the pan.
- Heat oil in a pan on medium heat. Once the oil is hot, add the mustard seeds and let them pop.
- Then add the peanuts and saute for a minute or two until they start turning brown.
- Then add the chopped onion, green chili and curry leaves. Cook for 2 minutes until the onions soften.
- Add the green peas (which had been soaked in warm water for 10 minutes prior) and mix. Cook for 2 minutes until raw smell of peas goes away.
- Then add in the rinsed poha and toss to combine. Taste test some poha and if it feels dry, sprinkle little water all over (I usually do that). Cook for 1-2 minutes. Also tastes test and add more salt as needed at this point (I added around 1/8 teaspoon).Also add the sugar (if using) and cilantro.
- And then cover the pan with a lid and turn heat to low. Let it be like that for 2 minutes. Then turn off the heat.
- Squeeze in some fresh lemon juice. Garnish poha with more cilantro and sev and serve with a cuppa chai.
Notes
- You may also garnish the poha with freshly grated coconut, tastes great.
- Make sure to use thick poha here. The thin poha doesn't work for this recipe.
Nutrition
Nutrition information is automatically calculated, so should only be used as an approximation.


Really great recipe, Thanks for sharing!
glad you liked it, thanks for trying!
I follow your recipes quite keenly and a lot of what I turn out these days, stuck at home, thanks to this pandemic are your recipes – simply because they are awesome in taste and a breeze to cook. Thanks a ton. Today was “poha day” and I am very proud of what I cooked up.
I am glad to hear that Anupam!
Hi Manali! Is it possible to make this without curry leaves and use bay leaves instead? Where I live none of the local Indian shops or even big box stores have curry leaves stock!
yeah skip the curry leaves, if that’s your only option. Don’t use bay leaves.
Curry leaves can be bought fresh over the ‘net. try Shopindian.com if you like. I have no affiliation with them, just have found the selection to be very good.
As a student this was a really easy recipe to make and follow through! I would request you to please add the measures of the ingredients to the steps so as it’s easy to read through. It can be a task to scroll up and look at the measures and then follow the step!
Hi Shourya, glad you liked the recipe. This is how most recipes are written, you will find them in similar format on most blogs and also in cookbooks. You are supposed to gather the ingredients first and then cook by following the instructions.
But I think this format was from cookbooks where all the info is on the same page. Most of us use our phones now and have to keep scrolling up and down just to see the quantities. It would be helpful to have the quantity in the recipe as well.
Collecting all the ingredients before cooking is fine but prepping them for the correct quantity means we end up having to wash more plates/bowls etc so no one does it other than chefs and bloggers.
here’s a tip for you if you don’t want to prep the ingredients first, press the print button on top of the page. that will open the recipe in another window where everything is on one page. Hope that helps.
This recipe is fab! I was introduced to poha last summer when I travelled solo across (western) India. It was a common breakfast meal and I loved it from the very beginning. At the end of my trip I was sad that it was something I likely wouldn’t be able to have again or recreate for myself, unless/until I visited again.
Lucky for me I recently moved to a bigger country where there are more options on Amazon, and I came across your website. I used dried curry leaves and unfortunately didn’t have any sev, but otherwise followed your directions as written. It tastes just like the poha I had in India and I’ll definitely be making it over and over again! Thank you!!
Great recipe I also added Corn with the peas and removed the onions to make it Jain.. Quick and easy..
Hi, loved the recipe and all the flavours it had. But my peanuts got soggy and when I added soaked poha to the pan with everything in it- some of it got stuck to the pan. What to do about these too
not sure what happened. You have to cook the peanuts until they turn brown, they remain crispy until the end. I cook poha every other week and never had this problem.
Thank you for this recipe! I love Poha! My adopted son, who is an India doctor, makes this for me when I go stay with him and the family. Now I can make it! Thanks again!
I will try this at home.
Great recipe. I love poha. Please do check out my poha recipe on my blog foodielogs as well
U missed the peas in the ingredient list. Lol
Anyway me gonna have to make without them, finished my stock :/
Oops, thanks for pointing it out! will correct it now!
Also Sugar, When to add it? Will be cooking tomorrow 😀
add when you add the poha back into the pan