Ginger Garlic Paste Recipe
Apr 04, 2023, Updated May 07, 2023
Ginger Garlic Paste is a staple in Indian cooking and easy to make at home. The homemade version is so much better than store bought. It can be made in bulk and frozen for months to be used in recipes!
This post may contain affiliate links. Please read our disclosure policy.
Ginger Garlic Paste is a staple in Indian cooking. While I often use freshly chopped ginger and garlic in my recipes, having homemade ginger garlic paste in the refrigerator works like a charm on busy days. You can easily find this paste at Indian grocery stores but once you make a batch at home, you will realize that homemade tastes so much better (and fresher) and imparts a much better flavor to your dish. With this easy recipe, you can make ginger garlic paste within minutes and store it for months. Use it while making chole, rajma and more!
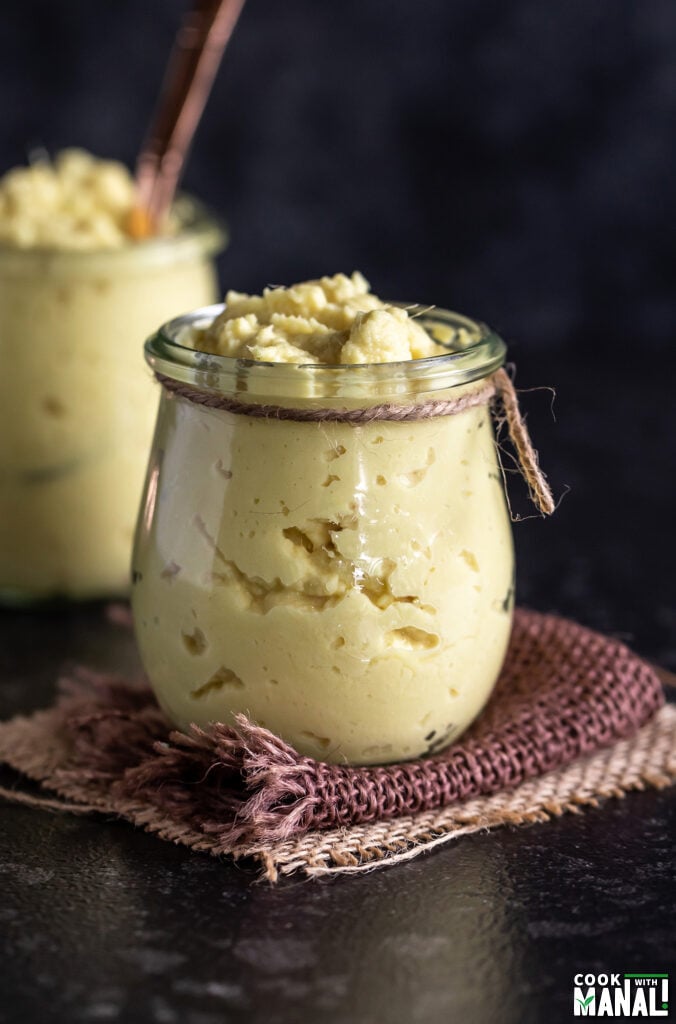
Table of contents
What is Ginger Garlic Paste
In simple words, ginger garlic paste is a paste made with ginger and garlic. The ratio of ginger to garlic can vary from recipe to recipe, but usually it consists of 50% ginger and 50% garlic.
When I first started cooking, I always got this paste from Indian grocery stores, but now I make it at home. Homemade ginger garlic paste is not only economical, it also tastes so much better. If you have added fresh ginger and garlic paste to a recipe then you would know how much aroma and flavor it imparts compared to the one that you buy from stores. It is also great for meal prep and makes cooking easier on busy days.
Store bought ginger garlic paste doesn’t taste fresh and it also has added preservatives. This homemade version is made with just 3 things- ginger, garlic and oil (as a preservative). Some people also add salt as a preservative but I just add the oil and it seems to do the job.
Step by Step Instructions – How To Make Ginger Garlic Paste
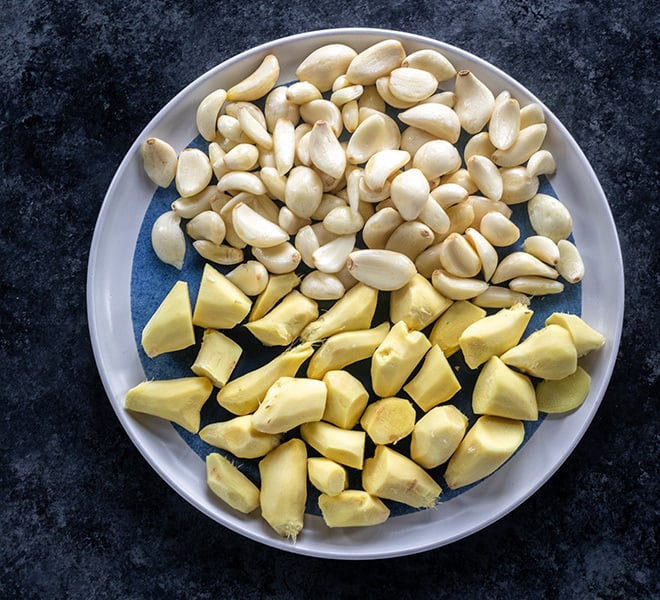
Wash the ginger knobs and then dry and peel them. You don’t have to peel them, I know a lot of people use ginger with the skin in paste. But I like peeling them. Once you have peeled the ginger, cut it into small slices/cubes.
Remove the garlic peel, now this process can be tedious. But think of it this way, it is this extra work that will save you tons of time while cooking in the next few months. You can also find peeled garlic at grocery stores now, so that’s a hack that you can use. Although, I find peeled garlic to not have the same flavor as fresh unpeeled garlic.
Once both ginger and garlic are ready, weigh them using a kitchen scale. This was 250 grams of ginger and 250 grams of garlic after removing the skin. So, keep in mind that they will weigh more with the skin.
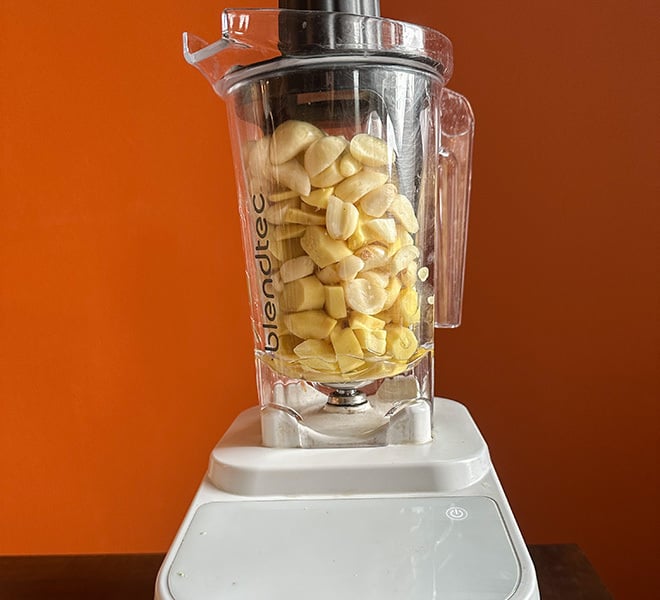
Transfer the ginger and garlic to a high speed blender or a food processor. Also add 2 to 2 & 1/2 tablespoons of oil. The oil acts as a preservative and so it needs to be added to this recipe. You can use any of choice like avocado oil, olive oil, vegetable oil etc.
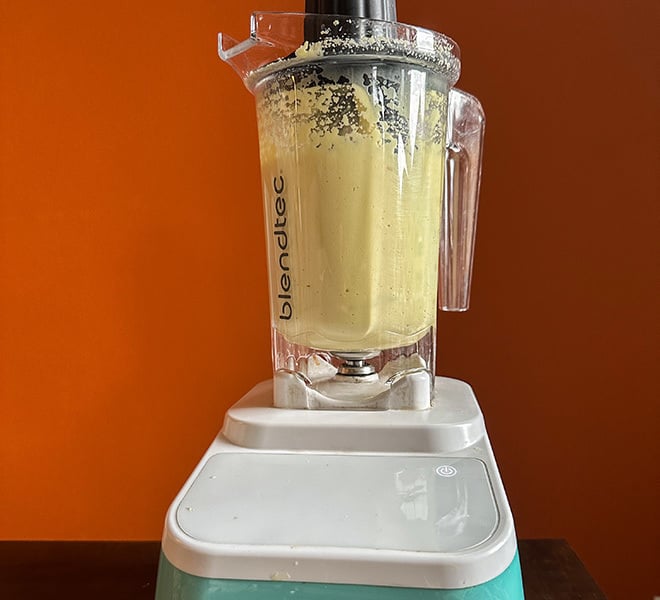
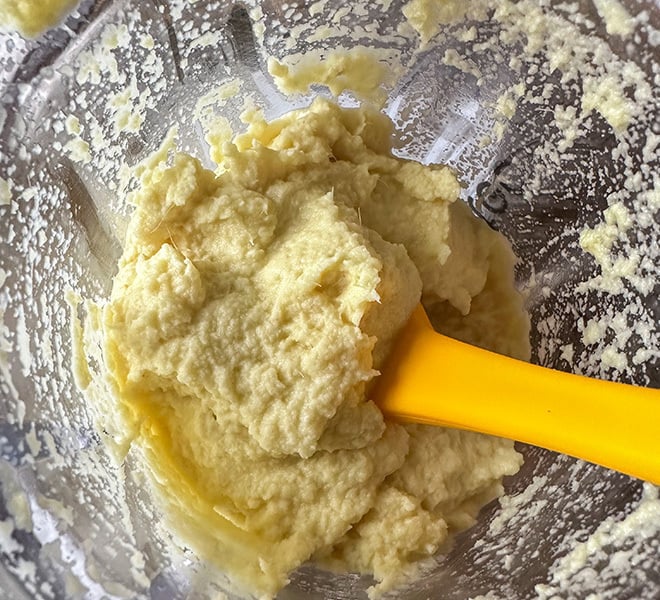
Blend for 1 to 2 minutes on high speed, scraping the sides as needed until you have a smooth paste. It’s okay if your paste isn’t super smooth, that depends on the type of blender or processor you are using.
Once done, you will have 2 cups or 500 grams of homemade ginger garlic paste ready to be used in your recipes!
How to Store Ginger Garlic Paste & Freezing Options
Once the paste is done, now comes the part of storing it. This recipe makes a lot of ginger garlic paste, more than I can consume within 4 weeks. And so, I like storing this paste in 2 ways:
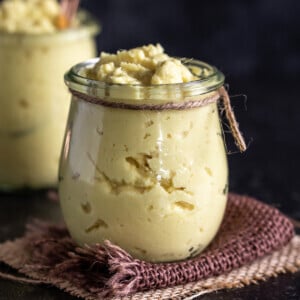
- In the refrigerator: I take some amount of the paste which I think I will use in a few weeks and place it in a clean glass container (make sure the container is dry and free from any moisture). Secure the lid tightly and keep this container refrigerated. The ginger and garlic paste stored in your refrigerator will last up to 4 weeks.
- In the freezer: Freezing the ginger garlic paste is a great way to extend its shelf-life. I like to take an ice cube tray and then place 1 to 2 tablespoons of ginger garlic paste in each compartment. Measuring the amount and then freezing the paste makes it much easier to use the paste in recipes later. Cover with a lid and let it chill for 2 to 3 hours or until frozen.
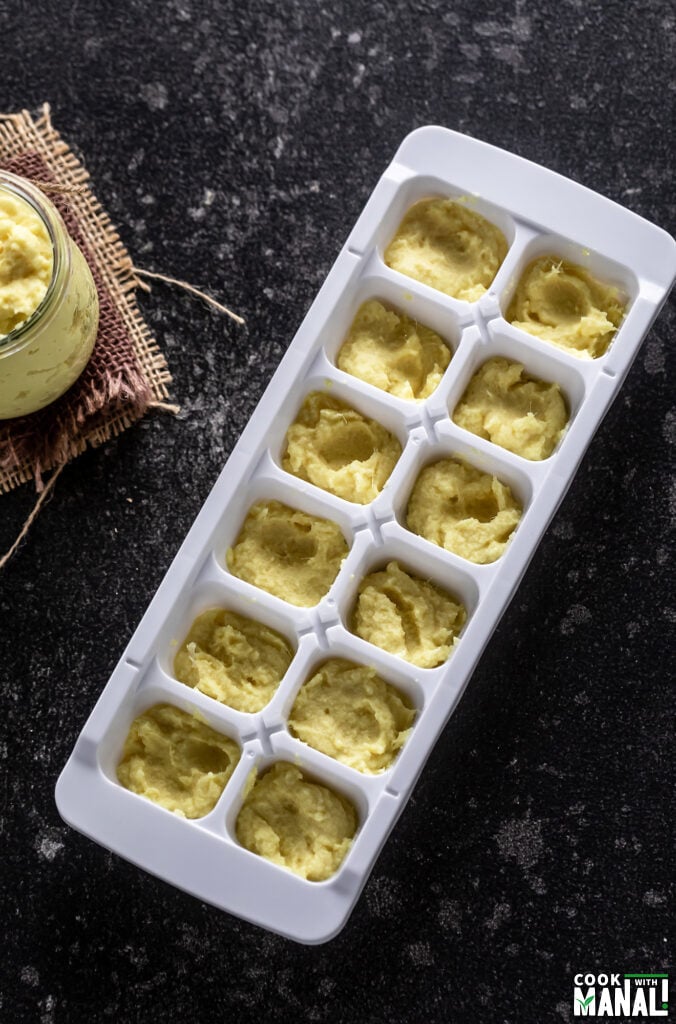
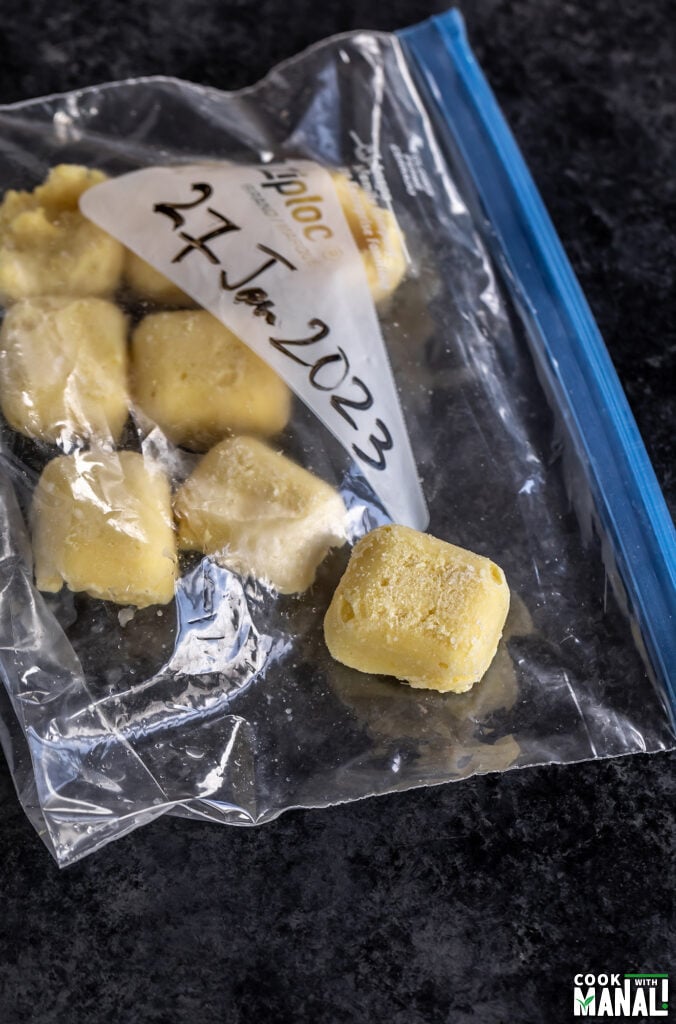
Once the paste is frozen, remove the cubes of ginger garlic paste from the tray and transfer the cubes to a freezer safe bag. I also like to write the date on top of the bag so that I can remember when I froze the paste. Now, simply place the freezer bag in the freezer. Once frozen, the ginger garlic paste should be good for up to 3 months.
How to Use Ginger Garlic Paste in Recipes
Now, you have the paste ready but how do you use this paste in recipes?
A lot of Indian gravy recipes like Rajma, Chole or rice recipes like Biryani call for ginger garlic paste. You can straight away use the paste from the refrigerator or freezer in these recipes. You can thaw the frozen paste but it’s not needed especially when it’s a gravy based dish. You just add the frozen cube to the dish. But remember this is raw ginger and garlic so you would need to cook this for a few minutes for the flavor and aroma.
Another question you may have is about when to add the ginger garlic paste while cooking? Usually ginger garlic paste is added after the onions are sautéed. But you can also add it along with the onions and cook the onions and the paste together.
You can use this paste in so many Indian and Indian inspired recipes like Tawa Pulao, Aloo Matar, Masala Macaroni, Achari Bhindi, Kadai Paneer, Mushroom Tikka, Paneer Tikka and many more!
Important Tips & Notes
- Whenever you are taking out ginger garlic paste from the refrigerator, make sure to use a clean dry spoon. Don’t use a wet spoon, that can cause the paste to spoil.
- Don’t skip the oil in this paste. It acts as a preservative and you need it. You can also add salt if you like, I don’t add salt to keep it simple. Some people also add turmeric powder.
- This recipe uses a 1:1 ratio of ginger and garlic. You can definitely use 2 parts garlic to 1 part ginger or 2 parts ginger to 1 part garlic as per your preference. Sometimes the ginger is too strong, in that case it makes sense to use only 1 part of ginger.
Frequently Asked Questions
The shelf life is up to 4 weeks in the refrigerator and 3 months in the freezer.
Garlic can react with acidic ingredients like vinegar, salt etc. and change color to green. It can also change color due to change in temperature. But even if the ginger garlic paste becomes green in color, it is completely safe to use it.
If the recipe calls for 1 teaspoon chopped ginger and 1 teaspoon chopped garlic, you can use 1 to 1 & 1/2 tablespoon of this ginger garlic paste in place.
If you’ve tried this Recipe then don’t forget to rate the recipe! You can also follow me on Facebook, Instagram to see what’s latest in my kitchen and on YouTube to watch my latest videos.
Ginger Garlic Paste
Ingredients
- 250 grams ginger measured after removing the skin
- 250 grams garlic measured after removing the skin
- 2 to 2 & 1/2 tablespoons oil I used avocado oil but any oil is fine
Instructions
- Wash and peel the ginger. Pat dry it and then cut it into slices. Peel all the garlic. The total weight for ginger and garlic was 250 grams each, after removing the skins.
- Transfer the prepared ginger and garlic to a high speed blender along with the oil and blend for 1 to 2 minutes until you have a smooth paste.
- Transfer the paste into a clean glass container and refrigerate. It will be good for up to 4 weeks. You can also freeze the last to make it last longer (refer to the post for instructions on how to freeze the paste). Use in Indian dishes as needed.
Notes
- The nutritional value is an estimate for 1 cup of ginger garlic paste.
- Use a clean dry spoon while taking out this homemade ginger garlic paste from the refrigerator. Using a wet spoon will spoil it.
Nutrition
Nutrition information is automatically calculated, so should only be used as an approximation.

Hi Manali,
Thanks for this well explained method to make the ginger garlic paste. Also, nice of you to explain how to substitute measurements for the fresh ginger, garlic amounts. Your recipes are awesome as well.
:).
Cette recette est fabuleuse !!!
Avant je faisais une pâte avec un mélange d’ail et gingembre, le soucis, c’est que cela ne se garder pas longtemps. Depuis que j’ai trouvé cette recette, je suis les consignes à la lettre et c’est fantastique !!! Merci Manali
you are welcome, thanks for trying!
I do something similar but I make garlic paste and ginger paste separately then freeze them. Regular ice cube trays work but I really like the silicon ones because it’s easier to get the purees out of them (the long skinny “cubes” are my favorite because they will defrost in the pan faster).
If you’re going to freeze them anyway, is there a reason to use the oil? I have tried it both ways and, while adding oil sometimes helps to get a smoother paste, I find it makes the frozen cubes harder to get out of the trays and they are more likely to stick together once transfered to a bag. I use oil when cooking them, unless it’s something like adding a bit of ginger to ice cream mix or a smoothie.
Thanks for the recipe! I appreciate seeing the process for this very common ingredient.
Oil acts as a preservative and helps prolong the shelf life of the paste. I put them in tray and once frozen I actually transfer to a ziplock bag. I have never had a problem with them sticking together. You can skip the oil, but usually salt or oil is added as a preservative. Some people also use little bit of lemon.
Cut one whole medium size with rind lime in small pieces and grind along with the garlic and ginger ,the ground paste will not loose its colour ,acts as a preservative and enhance the synergistic quality of the paste.
thanks for sharing!