Roasted Poha Chivda
Oct 23, 2019
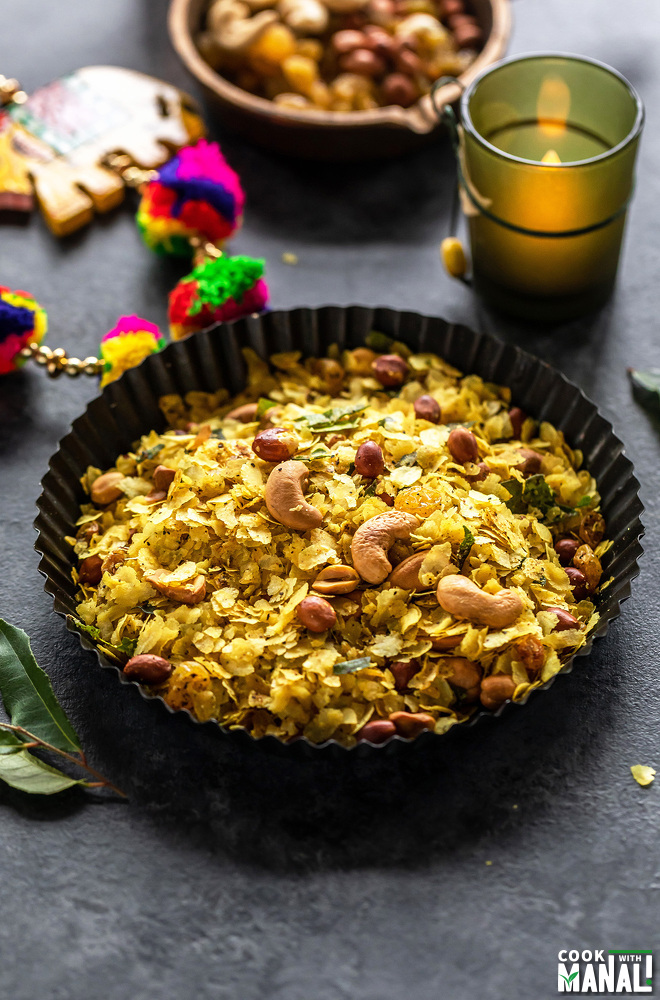
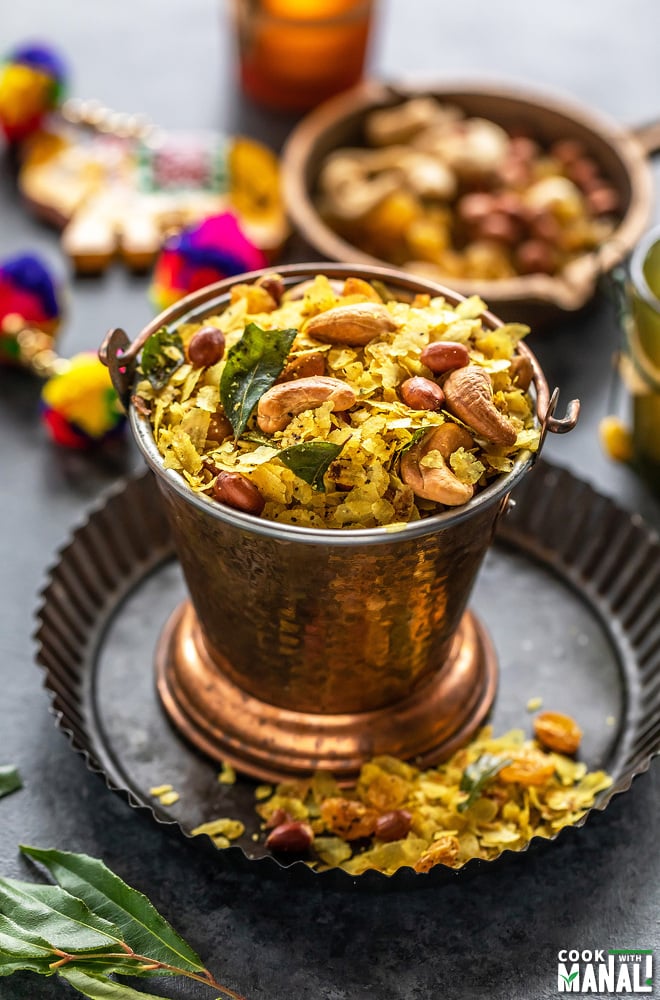
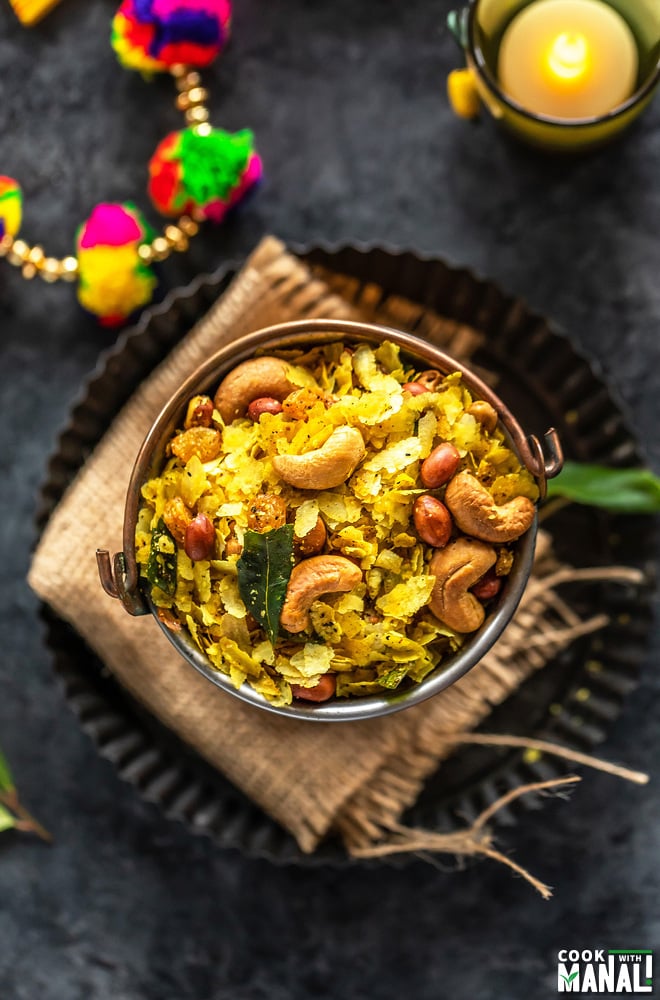
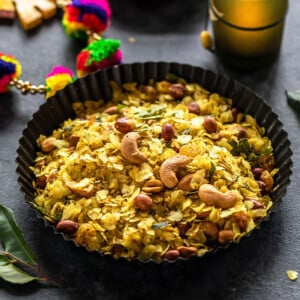
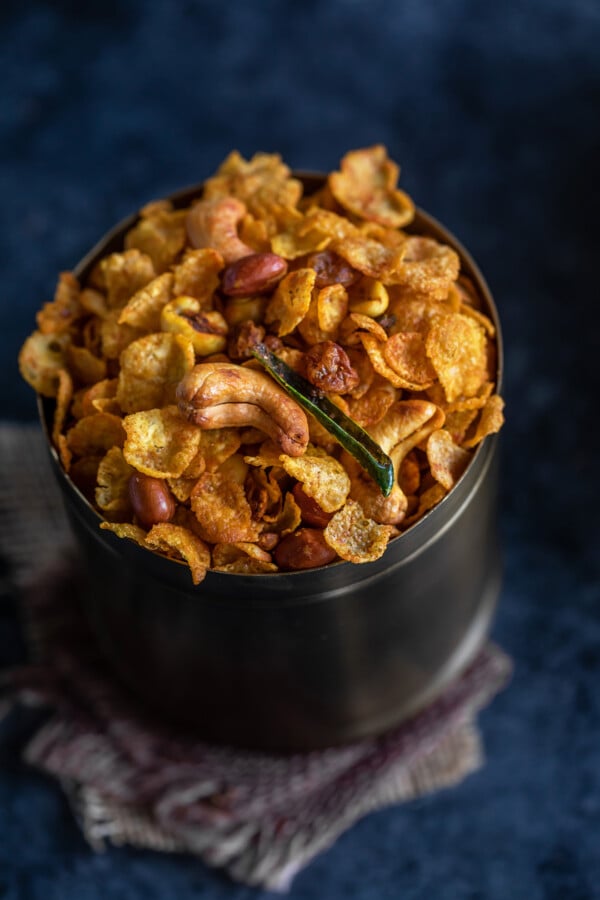
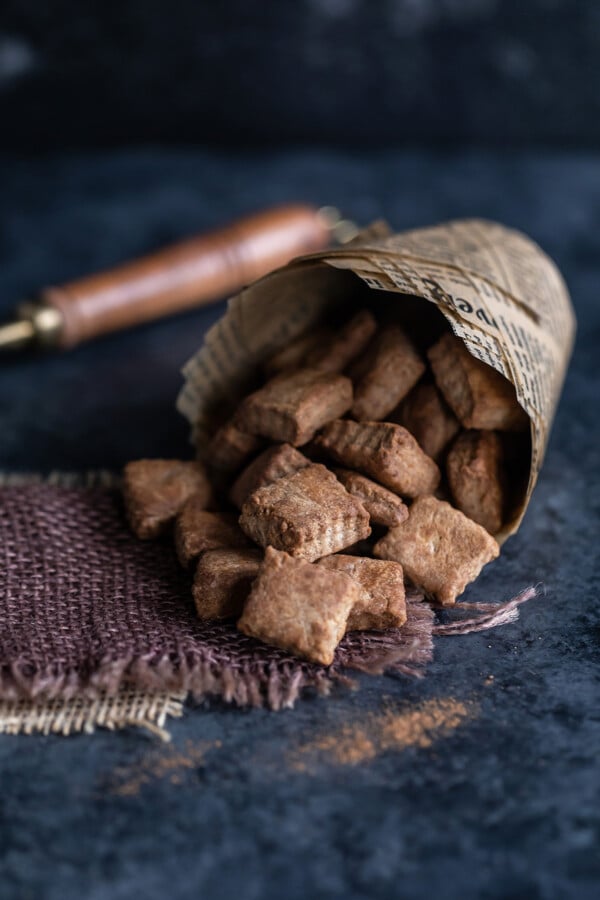
Indian snack mix made with flattened rice, nuts and spices. This roasted poha chivda is healthier than the store bought one and makes the perfect chai time snack!
This post may contain affiliate links. Please read our disclosure policy.
Quick and easy, this Poha Chivda is one of my favorite snacks. This snack mix is made with flattened rice (poha), nuts and spices.
I oven roast the rice flakes and nuts to make it little healthier. These are great to munch on with Chai!
As much as I love making sweets during Diwali, I also make a lot of savory stuff.
Like these baked methi mathri or namak pare or this Roasted Poha Chivda!
Chivda in India refers to a snack mix often made with poha (flattened rice), sev, nuts among many other things.
It is a common chai time accompaniment.
While you can easily find it at Indian grocery stores, the homemade version is so much better and healthier!
This version includes poha, cashews, peanut and few spices.
This Roasted Poha Chivda
✓ is healthier than store bought
✓ the poha and nuts are oven roasted to minimize the use of oil
✓ is easy to make
✓ makes the perfect tea time snack
For this roasted poha chivda recipe, I have used thin poha.
It is very important to keep this in mind, do not use thick poha for this recipe.
The thick one will not roast up in the oven for the time given in the recipe.
So, use only thin poha for this recipe. It roasts up nicely in the oven without any oil.
For this recipe, I roast the poha and nuts (cashews, peanuts) in the oven.
And then make a tempering in the pan with few tablespoons of oil.
A lot of times chivda is made by deep frying everything. My mom made it every year for Diwali and Holi and it was always deep fried.
While I don’t mind deep frying for festivals, I actually find this version even better than the fried one and so I stick to it.
I don’t use a ton of ingredients here, it is all pretty basic and you can easily make it at home in no time.
With Diwali just a few days away, I have already prepared a big batch of this poha chivda.
Hope you guys would also give it a try!
Method
Pre-heat oven to 350 F degrees.
1- Place thin poha in a single layer on a baking sheet lined with parchment paper.
Roast at 350 F degrees for 15 minutes until crispy, stir once in between. The color of the poha will not change, it will just roast and crisp up.
Once roasted, transfer to a large bowl.
2- To the same baking sheet, now add peanuts and cashews.
Roast at 350 F degrees for 11 to 13 minutes, stirring once in between until the nuts are golden brown in color.
3- Transfer nuts to the same bowl as the poha and set aside.
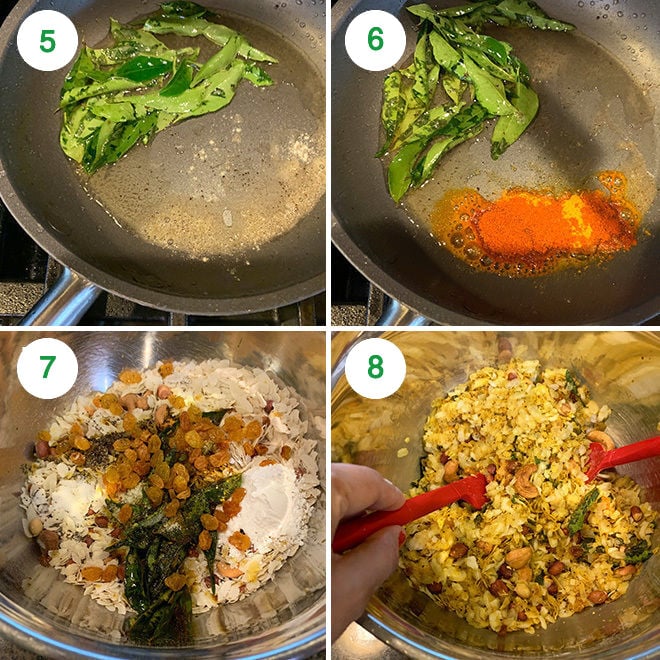
4- Now heat 2.5 tablespoons of oil in a pan on medium heat. Once the oil is hot, add the raisins and fry for 1 minute until the raisins swell up.
Remove on a paper towel.

5- Lower the heat to low and add the curry leaves and stir for 1-2 minutes. Push them to the side and add the hing and stir.
6- Add the turmeric and red chili powder and stir. Curry leaves should be completely crisp by now.
7- Transfer tempering to the bowl of roasted poha and nuts. Add salt, pepper, sugar and the fried raisins.
8- Mix everything using a spatula, slightly crush the curry leaves as you mix.
Store the roasted poha chivda in an airtight container and enjoy with chai!
If you’ve tried this Roasted Poha Chivda Recipe then don’t forget to rate the recipe! You can also follow me on Facebook, Instagram to see what’s latest in my kitchen!
Roasted Poha Chivda
Ingredients
- 3 cups thin poha flattened rice, 200 grams
- 3 tablespoons peanuts raw, 50 grams
- 3 tablespoons whole cashews raw, 50 grams
- 2.5 tablespoons oil 37 ml
- 2 tablespoons golden raisins
- 15-20 curry leaves
- generous pinch hing
- 1/2 teaspoon turmeric powder
- 1/4 + 1/8 teaspoon red chili powder or more to taste
- 1/2-3/4 teaspoon salt adjust to taste
- 1/4 + 1/8 teaspoon black pepper or to taste
- 2 teaspoons powdered sugar or to taste
Instructions
- Pre-heat oven to 350 F degrees.
- Place thin poha in a single layer on a baking sheet lined with parchment paper.Roast at 350 F degrees for 15 minutes until crispy, stir once in between. The color of the poha will not change, it will just roast and crisp up.Once roasted, transfer to a large bowl.
- To the same baking sheet, now add peanuts and cashews.Roast at 350 F degrees for 11 to 13 minutes, stirring once in between until the nuts are golden brown in color. Transfer nuts to the same bowl as the poha and set aside.
- Now heat 2.5 tablespoons of oil in a pan on medium heat. Once the oil is hot, add the raisins and fry for 1 minute until the raisins swell up.Remove on a paper towel
- Lower the heat to low and add the curry leaves and stir for 1-2 minutes. Push them to the side and add the hing and stir.
- Add the turmeric and red chili powder and stir. Curry leaves should be completely crisp by now.
- Transfer tempering to the bowl of roasted poha and nuts. Add salt, pepper, sugar and the fried raisins.
- Mix everything using a spatula, slightly crush the curry leaves as you mix.
Notes
- The nutrition estimate is rough estimate for 1 cup of this roasted poha chivda.
- You can also add chana dal (fry it first) or dried coconut slices to this chivda. You can even add store bought sev.
- Skip hing (or use gluten-free hing) to make the chivda gluten-free.
Nutrition
Nutrition information is automatically calculated, so should only be used as an approximation.


Would maize poha work for this recipe. If not, do you have any suggestions on using it? Thank you!
yes of course it will work, please go through the post. I have mentioned about it 🙂
Thank you for the recipe…came out really good. My 4 year liked it very much.
glad to know
I’ve made this a few times now it turns out great every time! Rice is crispy at 15 min in the oven, no guessing when it’s done. The seasoning is simple, easy to adjust per taste (spicier, sweeter). I often add sweetened thick cut dry coconut while roasting the nuts. I’ve gotten many compliments on this great snack. Perfect for chai time. Thanks for another easy to follow and delicious recipe!
welcome Sara!
Excellent
This looks amazing, I always deep frird everything and gone… someone suggested using microwave. Only thing I wanna ask how long do you keep it open in air before sealing so it doesn’t get soggy?
let cool completely then store
Hi do you have air fryer recipes for Indian dishes? I’m planning to make pakoras in air fryer instead of deep frying and wondering whether there are any recipes
Hi I don’t have an air fryer yet so no recipes
I am not sure how to add the salt, my salt never gets mixed with the mixture and always find it at the bottom of the mixture, sometimes I have to sieve so that I dont eat a very salty chivda…Do we mix in water and add or at what stage do we add so that it coats the chivda and does not settle at the bottom?
I have always added it just like what I mention and never had any issues. My mom always did the same too, there was never any water involved. Maybe try adding salt along with the spices when making the tempering and see if that works.
I made this with puffed rice and it tasted great. However the salt & other spices didnt “stick” to the murmure but settled at the bottom. I had to toss it frequently. What did I do wrong?
maybe it is the puffed rice, haven’t had this problem at all with poha
Tried this recipe . It turned out awesome ! Love love love it !! Thank you so much ? so easy quick & yummy ??
awesome!
Soooo loved it. My daughter has celiac,so we are gluten free. Loved how easy and fast it was for me to make it in regular basis for her.
Just for tasting the outcome of roasting , i put a tbsp of medium thickness raw chivda in the otg at 175degrees centigrade . In exactly 7 minutes the chivda shrank in size and turned brownish black . Obviously the temperature was way too high .
What could have gone wrong , since the recipe says 350 degrees f for 15 minutes , and the chivda will not change colour .
I am not sure, the recipe is tested and I make it like this every time. 350 F is 180 C so it shouldn’t turn black in 7 minutes. I would suggest you check your oven temperature settings, it might be off by few degrees. Best would be to get an oven thermometer and see the actual oven temperature. And now that you know your oven is running hot, cut down on the roasting time or reduce the temperature.
Hi Manali,
What oil would you recommend for best taste for making roasted poha chivda? Peanut oil or homemade ghee?
Thanks
peanut oil will be good! or use any flavorless oil like avocado oil
Can I use thick poha instead of thin? If not, are they any alterations u suggest.
no, thick poha won’t roast in this much time and also it doesn’t taste as good in chivda. Maybe you can use murmura and makhana (fox nuts) in place then.
I have been thinking of trying this preparation. Till now I have been buying it from market. But now I will try my hands on it.
Yummy! awesome and looks heavenly. What if I don’t have thin poha? Is it possible with medium thickness too? I could give it a try with a small batch, if you haven’t given it a try.
this recipe works with thin poha, won’t work the same way with thick one.
Awesome recipe. Turned out great…My hubby couldn’t keep his hands off the jar!
Glad to know!
??