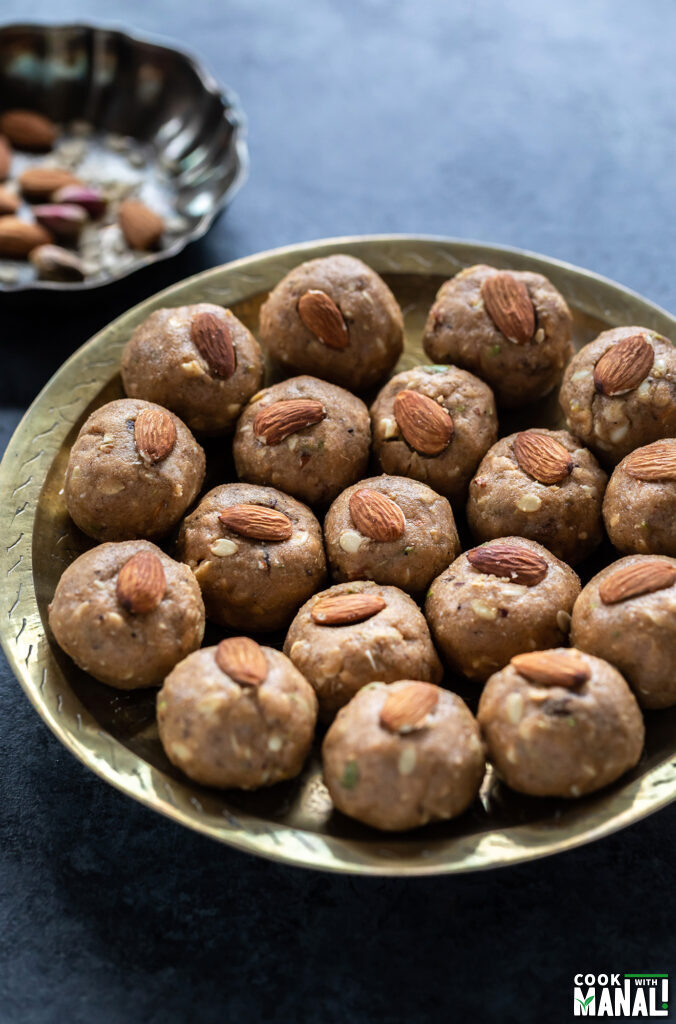
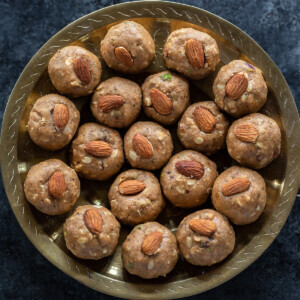
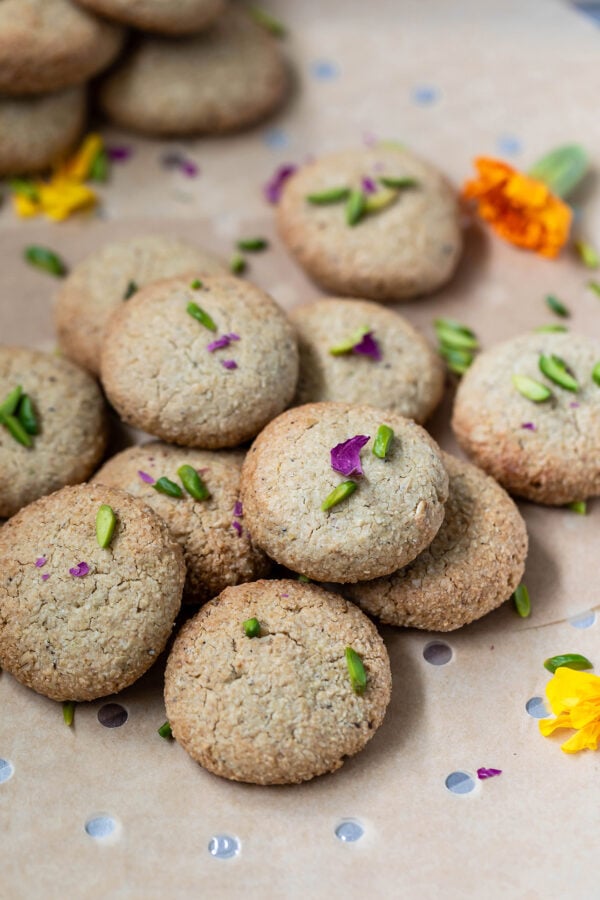
A winter favorite in northern India- these Atta Pinni (also known as atta ladoo) are flavored with warm spices like ginger, cardamom and made with whole wheat flour, ghee, edible gum which keeps you warm in cold months. Lots of nuts like cashews, pistachios, and almonds are packed in these ladoos which are truly irresistible!

These are a winter staple in Delhi and northern parts of India. Although my mom never made Atta Pinni at home (we were always more into besan ladoo !), we always got boxes of pinni from the market during the months of December and January. Sarvesh on the other hand grew up eating homemade pinni and he tells me how winter was just incomplete without these ladoos at his home.
Atta Pinni is a sweet ladoo made with atta which is whole wheat flour and the exact flour which we use in Indian cooking to make roti, parathas, halwa and more. The difference between pinni and other ladoos is that pinni is packed with nuts and warm spices and essentially made for winter months.
All the flour, nuts, ghee in the pinni is supposed to keep you warm and also provide your body with extra nutrients during the colder months and help build immunity. These have a nutty taste and crumbly texture. Pinni can be made with several ingredients like atta, urad dal, rice flour and more. The most common one though is of course Atte ki pinni.
Ingredients
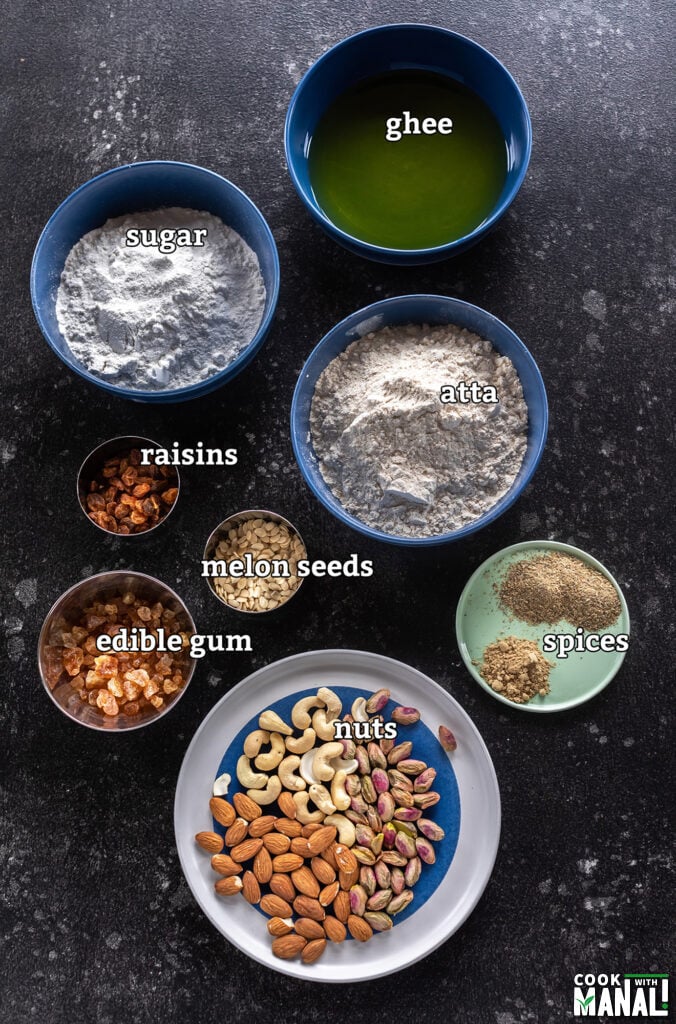
Atta: for making atte ki pinni, traditionally coarse atta is used. However, I have used just regular atta here which I had at home and which I use to make regular rotis, parathas etc.
Ghee: the taste of pinni depends a lot on the quality of ghee since there’s quite a lot of ghee in these ladoos, so use a good quality and tasting ghee.
Nuts: the atta pinni are loaded with nuts like almonds, cashews, pistachios. They also have raisins and melon seeds in them. You can also add things like desiccated coconut, sesame seeds, fennel seeds to add more flavor to your pinni.
Edible gum: I love using gond (edible gum) in my pinnis. It gives the ladoos a nice texture. If you don’t have it, I would recommend using some semolina in place.
Sugar: for this recipe, I have used ground granulated white sugar. I added the granulated white sugar to a blender and pulse it a few times until it was powdered and then used in the recipe. Do not confuse this with powdered sugar/icing/confectioners sugar. It is different and has added cornstarch in it. You could definitely use that as well but I would suggest powdering the white sugar and using it, the texture of the ladoos is much better this way.
Step by Step Instructions
1- To a food processor (I used a handheld food processor), add the following:
- 1/4 cup pistachios (30 grams)
- 1/4 cup cashews (30 grams)
- 1/4 cup almonds (30 grams)
Pulse a few times to chop the nuts coarsely. Do not grind them to a fine powder. Set this aside.
2- Heat 2 tablespoons of ghee (from the 1 cup ghee you are using in total for this recipe) in a pan on medium heat. Once hot, add 1/3 cup gond/edible gum (60 grams) to the pan.
3- Cook the gond for around 3 to 4 minutes until it swells and becomes translucent. Remove it on a plate. Let it cool down and then grind coarsely using a food processor and set aside.
4- To the same pan that you had cooked the gond, now add the prepared chopped nuts along with
- 1/4 cup golden raisins (30 grams) and
- 1/4 cup melon seeds/magaz (30 grams)
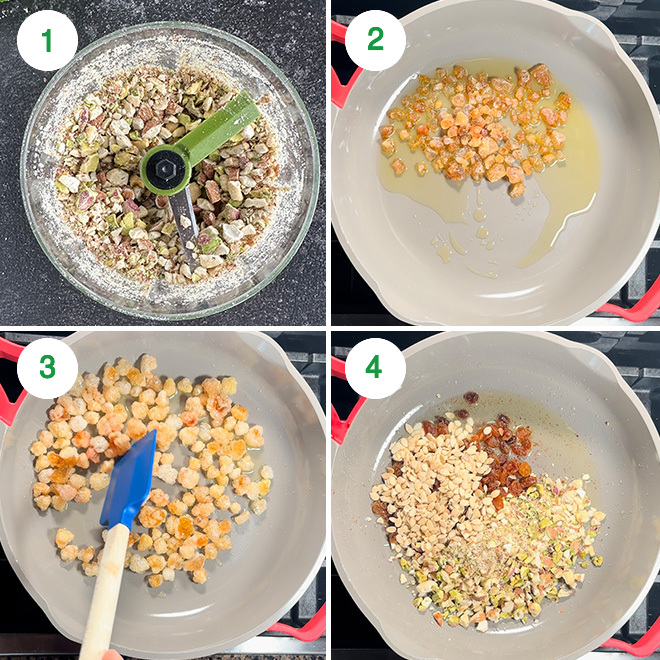
5- Cook for 1 minute until the nuts are lightly cooked and light golden in color. Remove on a plate and set aside.
6- To the same pan now add the remaining ghee. Total ghee used in this recipe 1 cup melted ghee (200 grams).
Add 250 grams atta (2 cups minus 2 teaspoons) to the ghee.
7- Mix and start cooking it. Stir continuously and keep heat on low.
8- The atta will start to loosen up in around 10 minutes. Keep heat on low and keep roasting it continuously.
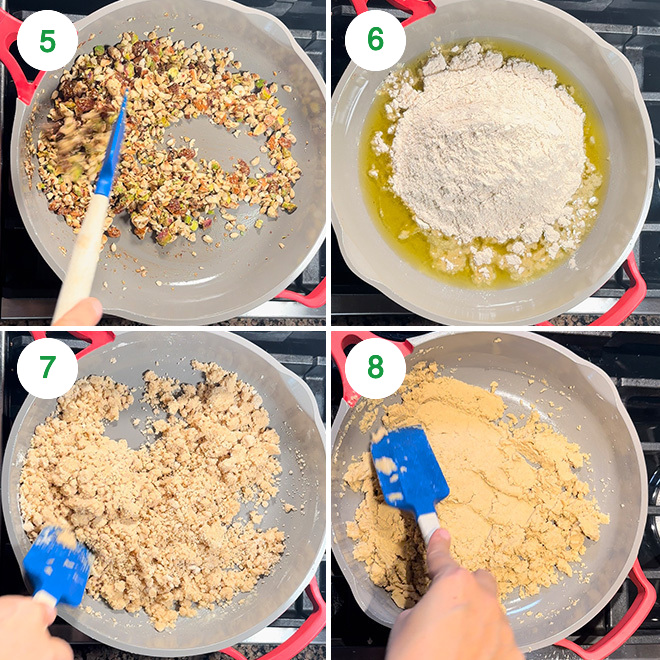
9- The atta will continue to become darker in color. At the 15 minutes mark, it is roasted (as seen in picture 9). There’s a nice aroma and it has become brown in color.
10- However, I wanted a darker color for the pinni so I continued to roast it for 10 more minutes. In total, I roasted the atta for 25 minutes on low heat. Once roasted, atta will have a nice nutty aroma, it will become pasty and liquid-y (it’s okay if doesn’t become like a total smooth paste) and you will see ghee on top and the atta will feel lighter when you stir it with a spatula. Stir constantly towards the end especially else the atta will burn. Remove on a plate and let it cool down to room temperature.
11- Once it has cooled down, transfer the atta to a large bowl or pan. Add the crushed gond/edible gum, the roasted nuts, raisins and melon seeds mixture to the pan along with the atta.
12- Then add the following:
- 1/2 teaspoon ginger powder (or more if you prefer a stronger ginger flavor)
- 1 & 1/2 teaspoons cardamom powder
- 1 cup sugar (200 grams). This is granulated white sugar which I pulsed in a blender and then used in the recipe. Do not use icing sugar/powdered sugar as it won’t give the same texture.
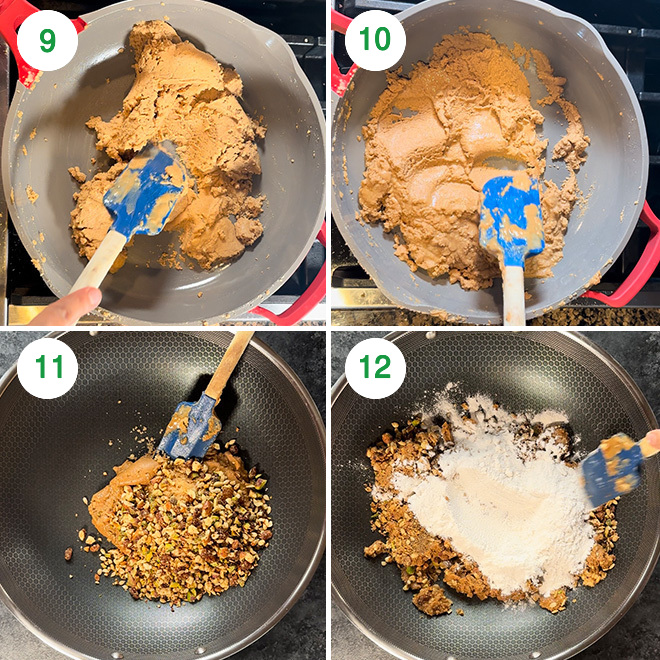
13- Using your hands, mix until everything is well combined.
14- Now, start shaping the atta pinni. Pinnis are typically shaped in 2 ways. The traditional shape is the oval shape. To make it this way, press some of the mixture between you and make a fist.
15- Open the fist, and your pinni is shaped. It will have your finger marks on it and that’s a very traditional look of homemade pinnis.
16- Or you can make them round. Garnish with almond on top. Make and shape all pinnis similarly until the entire mixture is finished. I shaped them round and got 18 pinnis, each weighing around 40 grams.

Storage
The good thing about atta pinni is that it lasts long and does not require refrigeration. Since they are made with lots of ghee and there’s no milk here, they would last up to 1 month at room temperature. Once they are cooled, store them in an airtight container at room temperature.
They will be good for 3 to 4 weeks, although I doubt that they last that long in the first place.
Important Tips
- Do not cut down on the ghee: a good atta pinni needs a good amount of ghee not only for the flavor, but also for the texture. So, if you really want to make a good atta pinni, use the amount of ghee mentioned in the recipe.
- Stir constantly on low heat: making pinni takes time and is a true labor of love. You need to roast the atta until it gets nice golden brown in color and has this nutty aroma. You need to constantly stir the atta while roasting and keep the heat on low. It can take anywhere between 15 to 25 minutes for the atta to be done. Time will vary depending on the thickness of the pan, the intensity of the heat and how brown you want your pinnis to be. During the last part of roasting, be extra careful as the atta can burn very quickly at this point and go brown to burn within seconds.
- Understand when the atta is done: all the hard work will go to waste if you do not roast the atta well. The ladoos will taste raw which will ruin the taste. You should rely on your nose and eyes to test if the atta is done. Here are a few key points: 1) once done, the atta changes color to first light brown and then golden brown. 2) the atta becomes pasty and liquid-y in consistency. 3) your kitchen will be filled with a nice nutty aroma once it’s well roasted. 3) the atta will feel lighter (like filled with air 4) you will notice some ghee on top. And as always if you are still confused, the best way is to take some atta in a bowl and let it cool down a bit and taste it. You would know if it is raw.
- To add more flavor to the pinnis, you can add desiccated coconut powder (roast it first and then add), sesame seeds (make sure they are roasted), flaxseeds, fox nuts (makhana).
- If your pinnis aren’t binding, most likely you didn’t add enough ghee. Melt some ghee and add 1 teaspoon at a time and try to bind the ladoos.
If you’ve tried this Recipe then don’t forget to rate the recipe! You can also follow me on Facebook, Instagram to see what’s latest in my kitchen and on YouTube to watch my latest videos.
Atta Pinni
Ingredients
- 1/4 cup pistachios, 30 grams
- 1/4 cup cashews, 30 grams
- 1/4 cup almonds, 30 grams
- 1 cup ghee, 200 grams, melted, divided
- 1/3 cup edible gum, gond, 60 grams
- 1/4 cup golden raisins, 30 grams
- 1/4 cup melon seeds, magaz, 30 grams
- 250 grams atta, whole wheat flour, 2 cups minus 2 teaspoons
- 1/2 teaspoon ginger powder, sonth, you can add more to taste
- 1 & 1/2 teaspoon cardamom powder
- 1 cup granulated white sugar, 200 grams, powdered using a blender, do not replace with powdered sugar/icing sugar
Instructions
- Start by coarsely chopping the nuts. To a food processor add 1/4 cup each of pistachios, cashews and almonds. Pulse few times until the nuts are coarsely chopped and set aside.
- Now, from the 1 cup (200 grams) of melted ghee, take 2 tablespoons and add to a pan on medium heat. Then to that add, 1/3 cup gond/edible gum (60 grams). Cook for 3 to 4 minutes until the gond swells up and become translucent and then remove on a plate. Once it has cooled down, pulse it in a food processor and grind it coarsely and set it aside.
- Now, to the same pan add the prepared chopped nuts along with 1/4 cup golden raisins (30 grams) and1/4 cup melon seeds (30 grams). Cook for 1 minute until the nuts are lightly toasted and them remove on a plate.
- To the same pan now add the remaining ghee (we had used only 2 tablespoons from the 1 cup before) and then add 250 grams of atta to it. Stir and mix the atta with the ghee.
- Start stirring the atta on low heat continuously and set heat on low. The mixture will be crumbly at first but will start to loosen up at around 10 minutes. Remember to stir constantly on low heat.
- The atta will continue to become darker in color. For me it was roasted at 15 minutes mark. However, I wanted a darker color for the pinni so I continued to roast it for 10 more minutes. In total, I roasted the atta for 25 minutes on low heat. Once roasted, atta will have a nice nutty aroma, it will become pasty and liquid-y (it's okay if doesn't become like a total smooth paste) and you will see ghee on top and the atta will feel lighter when you stir it with a spatula. Stir constantly towards the end especially else the atta will burn. Remove on a plate and let it cool down to room temperature.
- Once the atta has cooled down, transfer the atta to a large bowl or pan. Add the crushed gond/edible gum, the roasted nuts, raisins and melon seeds mixture to the pan along with the atta. Mix everything until combined.
- Then add 1/2 teaspoon ginger powder, 1 & 1/2 teaspoons cardamom powder and 1 cup granulated white sugar (200 grams) which was powdered in a blender before using in the recipe. I would not recommend using icing/confectioners sugar. Mix using your hands until the sugar, spices, nuts and atta are well combined with each other.
- Now, start shaping the ladoos. Pinnis are typically shaped in 2 ways. The traditional shape is the oval shape. To make it this way, press some of the mixture between you and make a fist. Open the fist, and your pinni is shaped. It will have your finger marks on it and that's a very traditional look of homemade pinnis.Or you can make them round. Garnish with almond on top.
- Make and shape all pinnis similarly until the entire mixture is finished. I shaped them round and got 18 pinnis, each weighing around 40 grams. Store in an airtight container at room temperature for 3 to 4 weeks.
Notes
- Make sure to roast the atta correctly. You don’t want your ladoos to taste raw.
- Don’t cut down on the ghee, it is what makes these pinnis so good!
- Stirring constantly on low heat is essential. The atta might burn if you are not stirring it constantly. It’s even more crucial towards the end of the roasting process.
Nutrition
Nutrition information is automatically calculated, so should only be used as an approximation.
 Your feedback is valuable!Please share your comments, ratings, and any suggestions or adaptations below to help us improve and make our recipes more successful.
I made these today and they turned out to be delicious.
Thanks Bhavna, I am glad to hear that!