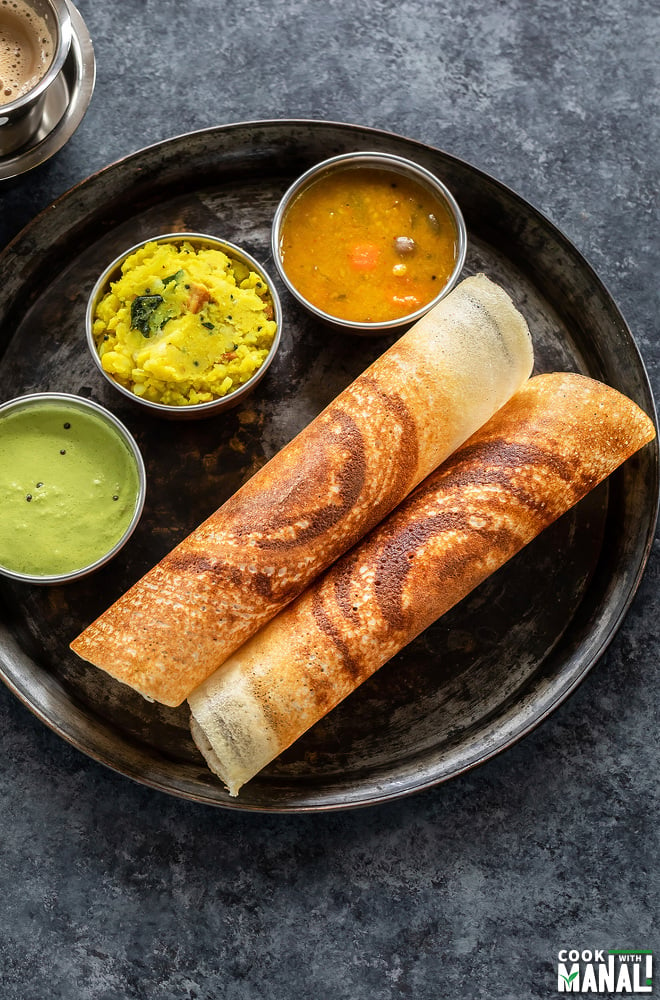
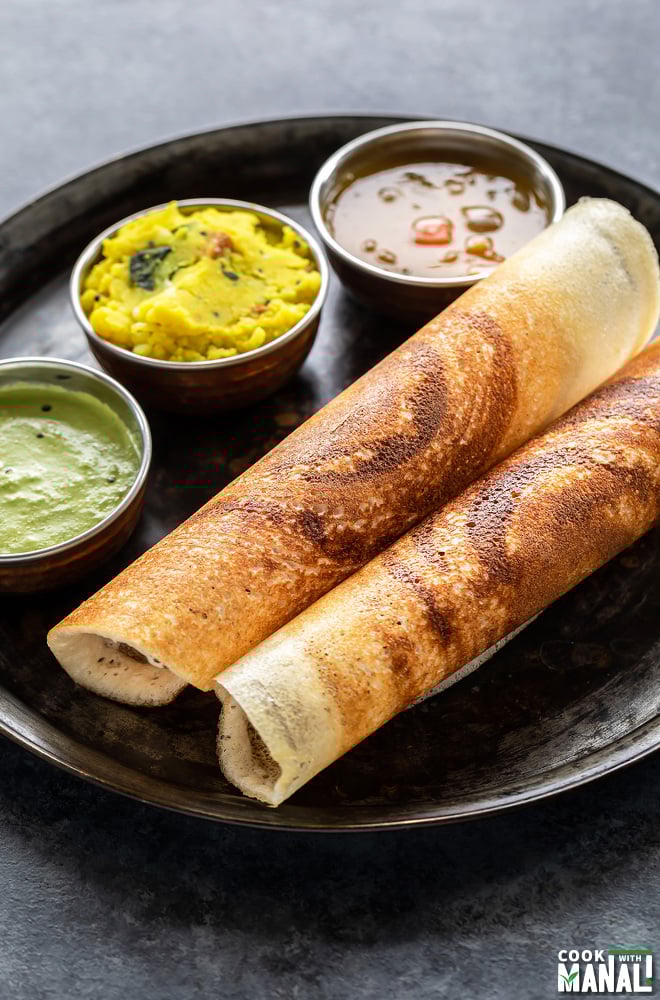
Make super crispy Masala Dosa at home with this easy dosa batter at home. It pairs perfectly well with a piping hot bowl of sambar, creamy veg kurma and coconut chutney!
This is a one bowl batter which is made using a high speed blender and then fermented in the Instant Pot.
Disclosure: This post contains affiliate links. For more information on my Affiliate and Advertising Policy, please click here.
The long awaited post is finally here. Ever since I shared my dosa batter on Instagram stories, I had so many requests from my readers to share the batter recipe on the blog.
Sorry, it took me a while guys but here it is finally here- the only recipe that you need to make crispy dosa at home!
I have already shared my go-to Idli Dosa Batter on the blog before. I often make that batter when I want to use the same batter for idlis, dosa, uttapam.
That batter makes soft idlis and crisp dosa and so many of you have achieved great results with it. Thanks for all your lovely feedback on that post, I love reading the success stories, mostly because I can relate so much!
It has taken me many years to learn how to make a good crispy dosa and soft idlis. It did not come naturally to me since I was born and brought up in North India and idli-dosa were not a part of my daily life.
After many years of failing and lot of learning, I can now say that I am good at this and I want to share my learning with you guys.
For most people, who have not made this batter from scratch, it seems like an overwhelming task.
I can totally relate to the feeling, trust me on that. But now after making dosa at home almost every week for last few years, I can safely say that it’s not as hard as it looks. On the contrary, it is really easy and once you get a hang of it, there’s no looking back.
While I make my “to-go batter” more often, this crispy dosa batter deserved a post of its own.
It really makes restaurant style crispy masala dosa and it’s all done in one bowl! Yeah, so soaking the rice and dal separately here.
Soak Lentil-Rice Separately or Together?
So, when I first started learning the process to make idli and dosa, I wondered why don’t we soak the rice and dal together.
It would just make it easier, isn’t it? However, the reason we soak them separately is because rice and dal have different textures.
You want the dal to have a fluffy texture which is important for idlis. And you can’t achieve that if you soak and grind the dal together with the rice.
For this reason, it needs to be soaked and then grind separately. But it doesn’t hold true for dosa.
I have tested and re-tested this recipe with soaking dal and rice separately and then soaking dal and rice together.
There is NO difference! Like zero! The dosa comes out great either way.
So, now I just soak them together when I am going to make dosa only.
Again, to be clear when I making the idli dosa batter, I would soak the dal and rice separately.
But if I am making this crispy dosa batter only, then I just soak them together in one bowl. Makes sense?
Tips To Make Super Crispy Dosa
Most people I know love the crispy masala dosa that they find at restaurants. If you do too, then here are some of my tips to make them perfectly at home!
Use a cast iron: I cannot stress this enough! Really guys, if you want to make nice crisp dosa, use a cast iron pan.
I know people run away from cast iron since it needs a little maintenance, but once you get a hang of it, you will not go back to any other pan for making dosa.
This is not to say that you cannot make crisp dosa on a non-stick pan. With this recipe, the dosa will be crisp even on a non-stick.
But for that perfect looking dosa, you need even heating and cast iron is the way to go!
I use one cast iron pan exclusively for making dosas. You would need a 10-inch pan at least to make good sized dosa, however I use this 14-inch cast iron pan for dosa.
Add chana dal, toor dal to the batter: now addition of these dals make your dosa extra crispy.
I do not add these in my “idli-dosa batter” but when I am making a batter exclusively for crisp dosa, then I make sure to add these.
Make sure pan is heated enough before pouring the batter: the pan needs to be heated through on medium high heat before you pour the batter onto it.
I usually sprinkle few drops of water to check if the pan if heated enough or not. The water droplets should sizzle immediately and evaporate when you sprinkle the water on the pan.
If they don’t, pan needs to be heated more.
Rub the pan with an onion dipped in oil before pouring the batter: this helps in preventing the batter from sticking to the pan. Cut an onion in half then insert a fork inside it.
Dip the cut onion in oil and then rub it onto the pan. Do this step each time after making dosa.
Frequently Asked Questions
Ratio of dal to rice: for this recipe I use a ratio of 1:3, so 1/2 cup of urad dal and 1.5 cups of rice. There also 2 additional tablespoons of dal in this batter in form of chana and toor dal.
Which rice and dal to use: for this recipe I use a combination of idli rice and sona masoori rice. You can use only sona masoori rice or idli rice too. The combination helps in making the dosa crispier I feel.
You can use any other parboiled rice too.
I have used urad dal gota (dehusked whole urad dal) here, you can also use dhuli urad dal (split urad dal) in place.
To add salt before of after fermentation: I always add salt before fermentation and mix it with clean hands into the batter. I live in a cold place and this helps in fermentation.
I use sendha namak, a non-iodide salt here. Do not use regular salt with iodine here, it might interfere in the fermentation process.
If you live in hot and humid place, don’t add the salt before fermentation. Add it once the batter is fermented.
How long it takes to ferment: it depends on where you live. For me, it takes anywhere between 12 to 14 hours. It might take you only 6 hours if you live in a warm place.
Also, you can place the batter on counter to ferment if you live in a hot place. If you live in a cold place (like me), you either put the batter inside oven with lights on.
Or do what I do- use your Instant Pot! I add batter to the pot and press the yogurt button. This gives me consistent results every time!
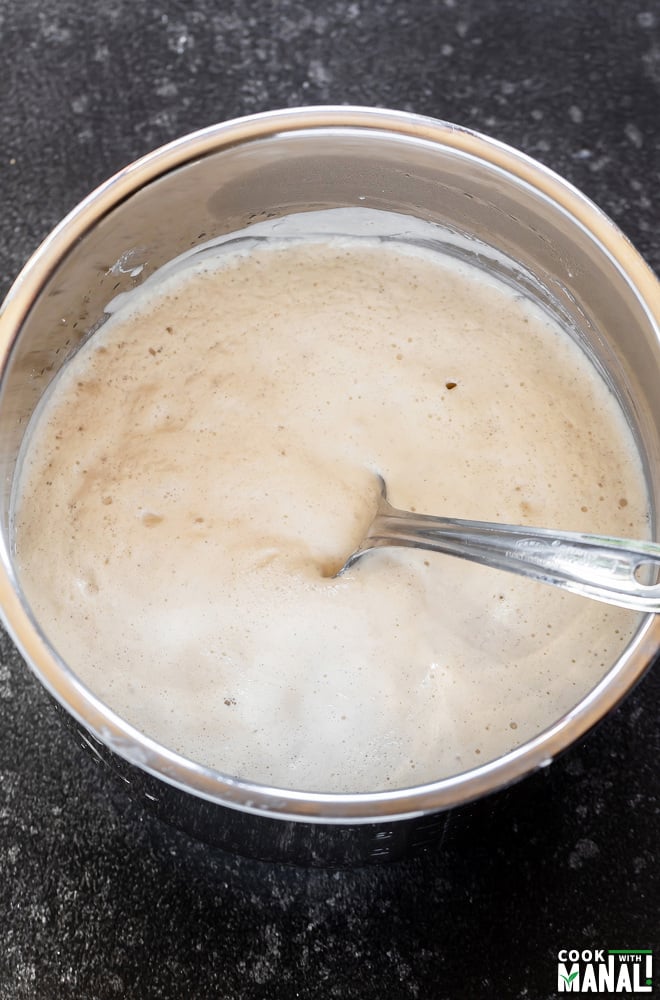
How to know if batter has fermented: the batter will increase in volume. If will be frothy on top.
A great way to check it is by dropping some of the batter in a bowl full of water. If the batter floats, it means it is fermented.
How long batter lasts in the fridge: I keep the batter in the refrigerator and it lasts fine for 5 days or so. Take the batter out of the refrigerator for 15 to 20 minutes before making the dosa.
Why is my dosa not crispy: well, follow the ratios of dal, rice and other ingredients in this recipe and use a cast iron pan to make the dosa. I guarantee you will have a nice crisp dosa!
Why is my dosa sticking to the pan: if you are using a cast iron, it’s probably because your pan isn’t seasoned well.
Oil and season your pan after each use and that way your cast iron will not stick.
Rub the pan with an onion dipped in oil each time before making dosa.
Why am I unable to spread the dosa batter: your pan might be too hot. Lower the heat, let the pan cool down a bit and then try spreading the batter again.
I use by blendtec to grind the batter and it works really well. Traditionally a wet grinder is used however a high speed blender works just fine.
Hope these tips help you to make a nice crisp masala dosa at home!
Method
Make the batter
1- To a large bowl add sona masoori rice, idli rice, urad dal gota, chana dal, toor dal and methi seeds.
2- Rinse everything and soak in around 5 cups water for 5 to 6 hours.
3- Soak poha in 1/2 cup water 20 to 30 minutes before grinding the batter.
4- Drain water from the rice, dals & poha and transfer everything to a high speed blender.

5- Add around 1 & 1/4 cups (10 oz/300 ml) + 1-2 tablespoons (15-30 ml) cold water or as needed to grind the batter to a smooth paste (total water around 315-330 ml).
The amount of water needed will depend on the type of rice/dal you use, so it might change. So start with a lesser amount and adjust accordingly.
I use the smoothie button on my blendtec or the soup button to grind the batter.
6- Now, transfer the batter to the steel bowl of your Instant Pot.
7- Add 1 teaspoon of rock salt (sendha namak) to the batter. Do not use regular iodine salt here. If you live in a warm place, you may skip the salt at this point.
8-Using your hands, mix the salt into the batter for 2 minutes. This helps in fermentation.
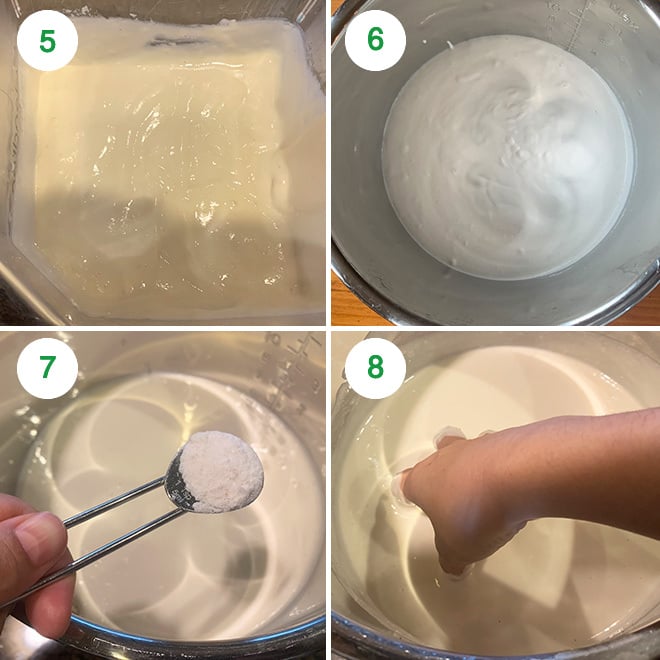
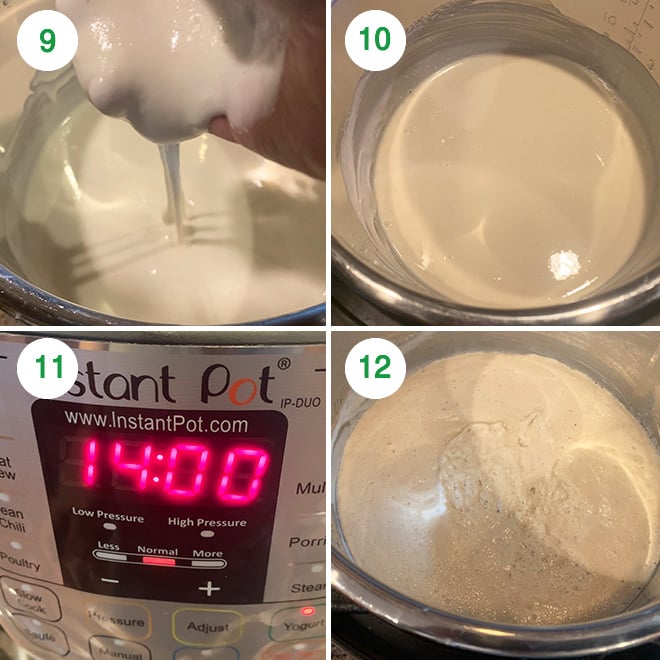
9- The consistency of the batter should be free flowing, but it shouldn’t be runny and it shouldn’t be thick either, a thick batter won’t ferment.
Now, you need to place the batter in a warm place to ferment.
If you live in a warm place, just leave the batter to ferment over the counter.
If you live in a cold place, you can either place the batter in the oven (with oven lights on, but oven switched off) or use your Instant Pot!
10- To use the Instant Pot to ferment the batter, place the batter into the steel container on the Instant Pot.
11- And then press the yogurt button. Set time to 8 to 9 hours in summer and 13 to 14 hours in winters. Cover the pot with a glass lid (do not use the IP lid here since the batter might over-ferment and that will block the lid).
This time may vary depending on where you live.
12- After 14 hours, my batter was well fermented. It had increased in volume and was frothy on top.
To check, you can drop some batter into a bowl of water, it will float which means it’s fermented. The batter is now ready to make dosas, set aside while you make the potato masala.
Make the potato masala
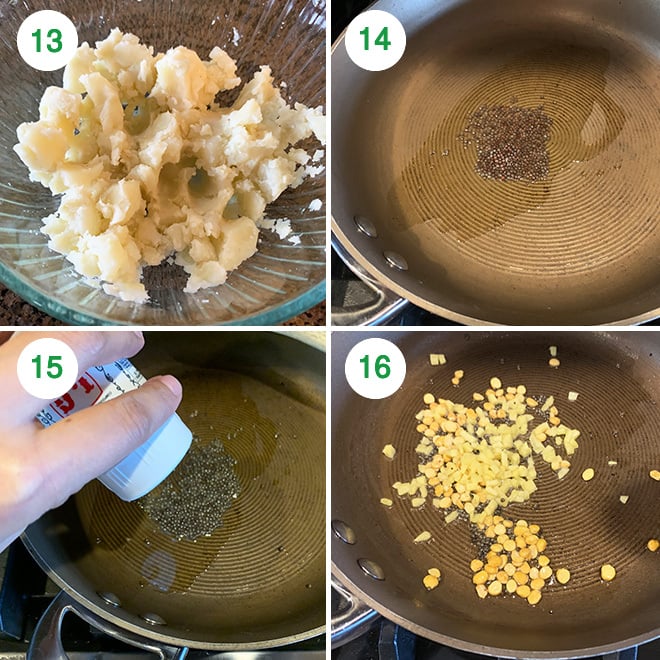
13- Boil the potatoes and then peel the skin and mash them. You can boil the potatoes using an Instant Pot (high pressure 10 minutes) or 8-9 whistles on a stove-top pressure cooker.
14- Heat 1 tablespoon oil in a pan on medium heat. Once hot, add mustard seeds and let them pop.
15- Add hing and stir.
16- Add the chana dal (I usually soak it in water for 10 minutes, drain water and then use in the recipe), cashews and chopped ginger.
Saute until chana dal, cashews and ginger start changing color.
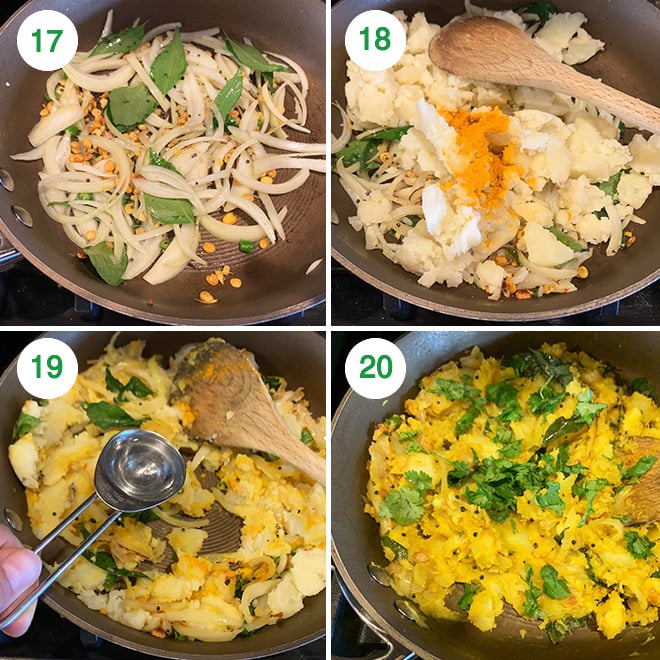
17- Then add the sliced onion, chopped green chilies and curry leaves. Cook the onions for around 2 minutes until soften.
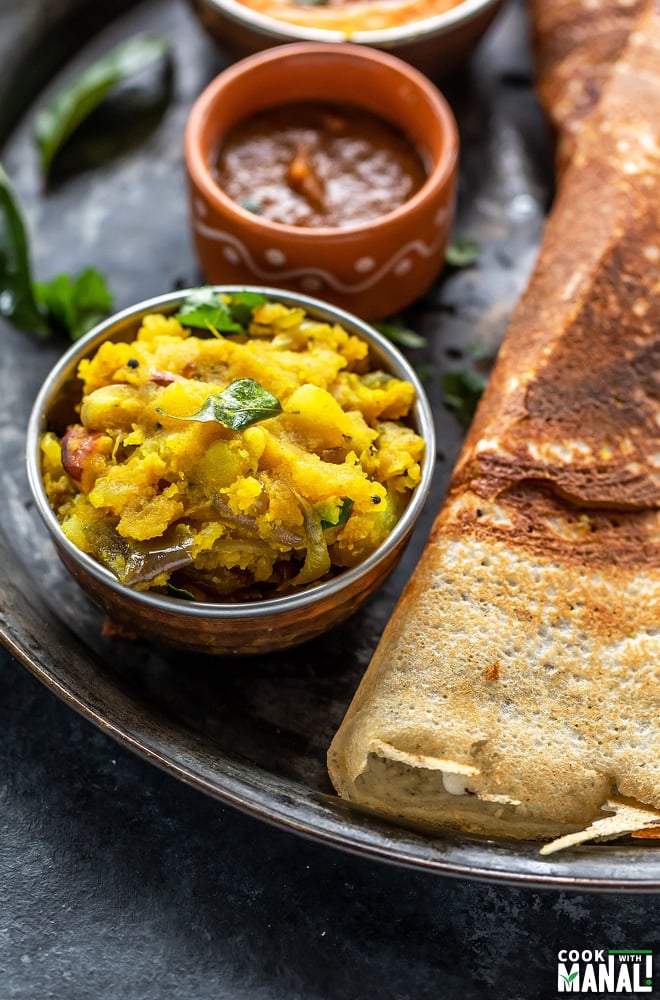
18- Add the boiled and mashed potatoes along with turmeric and salt. Mix to combine everything.
19- If the masala is too dry, you can add few teaspoons of water here to make it a little water-y. I always add some.
20 Turn off heat, add some chopped cilantro and remove pan from heat.
Make the masala dosa
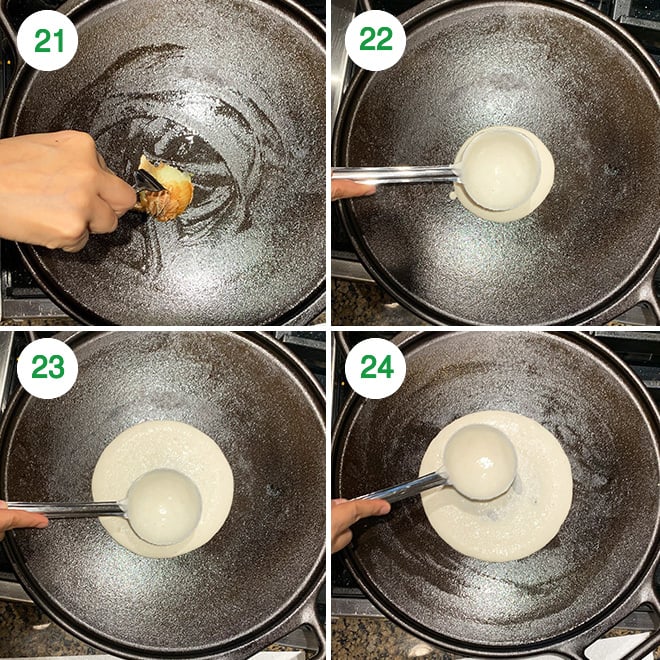
21- Heat a cast iron skillet on medium-high heat. I have used a 14-inch cast iron pan here (it is what works best for crisp dosa but you may use a non-stick pan). To check if pan is hot enough, sprinkle some water on the pan, the water should sizzle away and evaporate immediately.
Cut an onion, insert a fork in it and then dip the onion in some oil. Use than onion to rub the pan with oil.
22- Then start making the dosa. Take a ladle full of batter and pour it in the center of the pan.
23 & 24- Start spreading the batter by moving your ladle in circular motion in one direction.
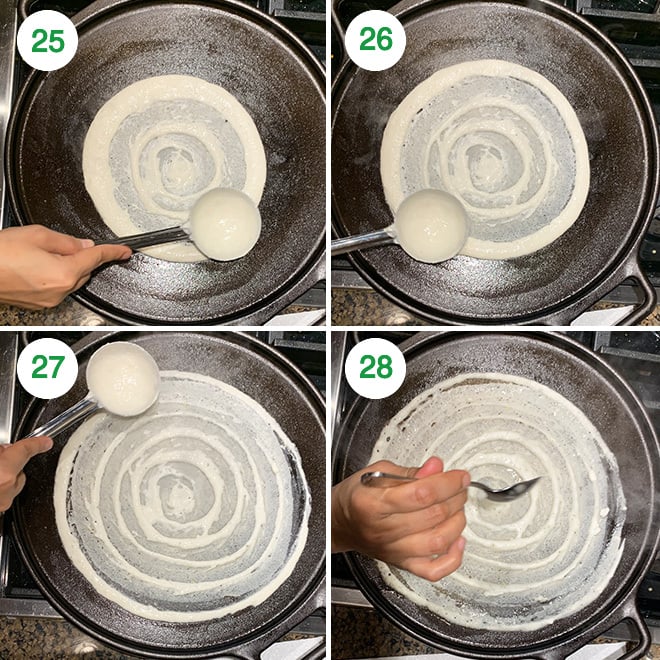
25- Start from the inside and move your ladle out in a circular motion (move the ladle in clockwise direction).
26 & 27- Keep moving the ladle in circular motion and spreading the batter until the batter is well spread. Try to spread it as thin as possible.
This comes with practice, so don’t worry if you can’t get a hang of it right away.
28- Drizzle oil or ghee all around the dosa and also in the center. Let the dosa cook for few minutes until the bottom starts appearing golden brown. You only need to cook one side of the dosa.
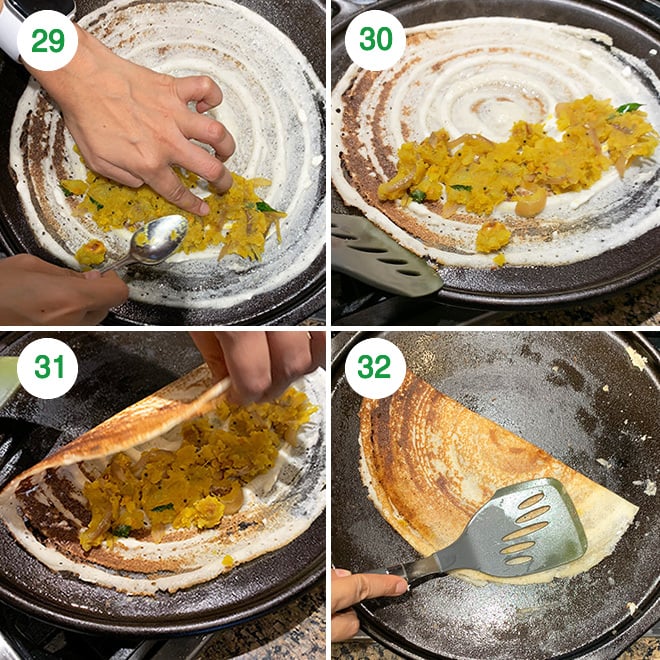
29- Add the prepared potato masala (few tablespoons of it) on one side if you wish to fold it or in the center if you want to roll the dosa.
You can also skip this step and serve masala on the side if you want.
30- Then scrape the sides of the dosa to release it from the pan.
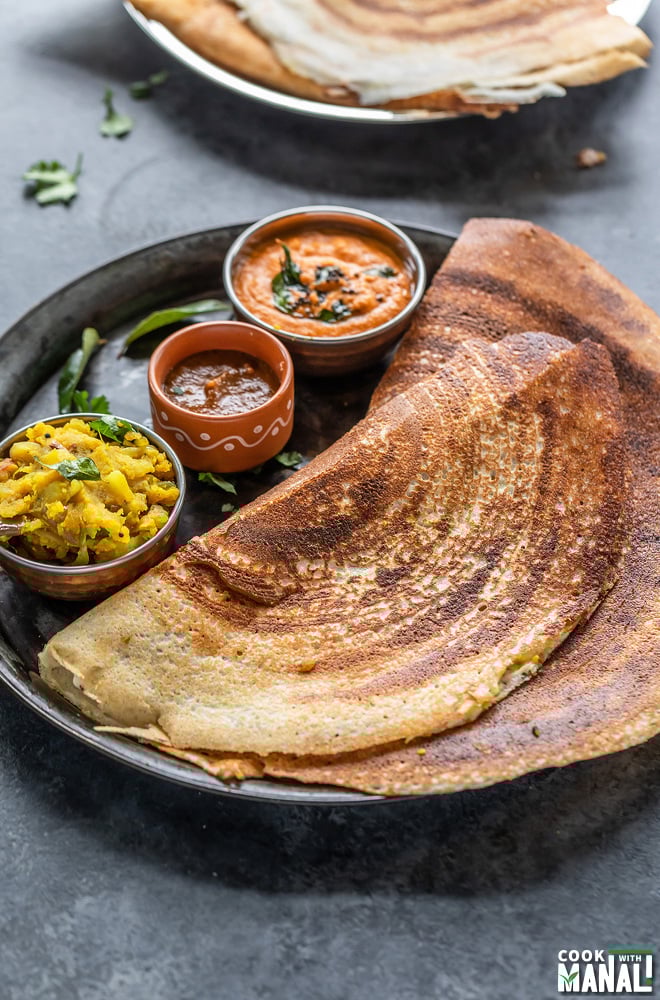
31- Fold over one side of the dosa onto the side with the potato masala. If you put the masala in the center, then roll the dosa like you would roll a paper.
32- Press with a spatula and then remove dosa from the pan. Make all dosas in the same way. You will make around 12 to 15 dosa from the batter, more or less depending on how big or small you make them.
Remember after making each dosa, wipe the pan with a damp cloth, then rub with an onion dipped in oil or lightly grease the pan and then make the next dosa.
Serve crispy masala dosa hot with sambar, cilantro coconut chutney or tomato chutney!
If you’ve tried this Crispy Masala Dosa Recipe then don’t forget to rate the recipe! You can also follow me on Facebook, Instagram to see what’s latest in my kitchen!

Crispy Masala Dosa
Ingredients
Dosa Batter
- 3/4 cup sona masoori rice, or any raw or regular rice, 150 grams
- 3/4 cup idli rice, parboiled rice, 160 grams
- 1/2 cup urad dal gota, 100 grams, dehusked whole urad dal or you can use urad dal dhuli (split urad dal)
- 1 tablespoon chana dal, 18 grams
- 1 tablespoon toor dal, 18 grams
- 1/2 teaspoon methi seeds, fenugreek seeds
- 3 tablespoons poha, flattened rice, 18 grams, soaked 20 to 30 minutes before grinding
- 1 teaspoon rock salt, non-iodide
- ghee or oil, to cook the dosa
Potato Masala
- 4 medium potatoes, 425 grams, boiled and mashed
- 1 tablespoon oil, 15 ml
- 1/2 teaspoon mustard seeds
- 1/4 teaspoon hing, asafoetida
- 1 teaspoon chana dal, soaked for 10 minutes in water
- 5-6 cashews, broken
- 1 teaspoon chopped ginger
- 1 medium onion, sliced
- 1-2 green chilies, chopped, adjust to taste
- 10-15 curry leaves
- 1/2 teaspoon turmeric powder
- 1/2 teaspoon salt, or to taste
- cilantro, to garnish
Instructions
Make the batter
- To a large bowl add sona masoori rice, idli rice, urad dal gota, chana dal, toor dal and methi seeds.Rinse everything and soak in around 5 cups water for 5 to 6 hours.
- Soak poha in 1/2 cup water 20 to 30 minutes before grinding the batter.
- Drain water from the rice, dals & poha and transfer everything to a high speed blender.
- Add around 1 & 1/4 cups (10 oz/300 ml) + 1-2 tablespoons (15-30 ml) cold water or as needed to grind the batter to a smooth paste (total water around 315-330 ml).The amount of water needed will depend on the type of rice/dal you use, so it might change. So start with a lesser amount and adjust accordingly.I use the smoothie button on my blendtec or the soup button to grind the batter.
- Now, transfer the batter to the steel bowl of your Instant Pot.
- Add 1 teaspoon of rock salt (sendha namak) to the batter. Do not use regular iodine salt here. If you live in a warm place, you may skip the salt at this point.Using your hands, mix the salt into the batter for 2 minutes. This helps in fermentation.
- The consistency of the batter should be free flowing, but it shouldn’t be runny and it shouldn't be thick either, a thick batter won't ferment.
- Now, you need to place the batter in a warm place to ferment. If you live in a warm place, just leave the batter to ferment over the counter.If you live in a cold place, you can either place the batter in the oven (with oven lights on, but oven switched off) or use your Instant Pot!
- To use the Instant Pot to ferment the batter, place the batter into the steel container on the Instant Pot.And then press the yogurt button. Set time to 8 to 9 hours in summer and 13 to 14 hours in winters. Cover the pot with a glass lid (do not use the IP lid here since the batter might over-ferment and that will block the lid). This time may vary depending on where you live.
- After 14 hours, my batter was well fermented. It had increased in volume and was frothy on top.To check, you can drop some batter into a bowl of water, it will float which means it's fermented. The batter is now ready to make dosas, set aside while you make the potato masala.
Make the potato masala
- Boil the potatoes and then peel the skin and mash them. You can boil the potatoes using an Instant Pot (high pressure 10 minutes) or 8-9 whistles on a stove-top pressure cooker.
- Heat 1 tablespoon oil in a pan on medium heat. Once hot, add mustard seeds and let them pop.Add hing and stir.
- Add the chana dal (I usually soak it in water for 10 minutes, drain water and then use in the recipe), cashews and chopped ginger.Saute until chana dal, cashews and ginger start changing color.
- Then add the sliced onion, chopped green chilies and curry leaves. Cook the onions for around 2 minutes until soften.
- Add the boiled and mashed potatoes along with turmeric and salt. Mix to combine everything.If the masala is too dry, you can add few teaspoons of water here to make it a little water-y. I always add some.
- Turn off heat, add some chopped cilantro and remove pan from heat.
Make the dosa
- Heat a cast iron skillet on medium-high heat. I have used a 14-inch cast iron pan here (it is what works best for crisp dosa but you may use a non-stick pan). To check if pan is hot enough, sprinkle some water on the pan, the water should sizzle away and evaporate immediately.Cut an onion, insert a fork in it and then dip the onion in some oil. Use than onion to rub the pan with oil.
- Then start making the dosa. Take a ladle full of batter and pour it in the center of the pan.Start spreading the batter by moving your ladle in circular motion in one direction.
- Start from the inside and move your ladle out in a circular motion (move the ladle in clockwise direction).Keep moving the ladle in circular motion and spreading the batter until the batter is well spread. Try to spread it as thin as possible. See picture above.This comes with practice, so don't worry if you can't get a hang of it right away.
- Drizzle oil or ghee all around the dosa and also in the center. Let the dosa cook for few minutes until the bottom starts appearing golden brown. You only need to cook one side of the dosa.
- Add the prepared potato masala (few tablespoons of it) on one side if you wish to fold it or in the center if you want to roll the dosa.You can also skip this step and serve masala on the side if you want.
- Then scrape the sides of the dosa to release it from the pan. Fold over one side of the dosa onto the side with the potato masala. If you put the masala in the center, then roll the dosa like you would roll a paper.
- Press with a spatula and then remove dosa from the pan. Make all dosas in the same way. You will make around 12 to 15 dosa from the batter, more or less depending on how big or small you make them.Remember after making each dosa, wipe the pan with a damp cloth, then rub with an onion dipped in oil or lightly grease the pan and then make the next dosa.
- Serve crispy masala dosa hot with sambar, cilantro coconut chutney or tomato chutney!
Notes
Nutrition
Nutrition information is automatically calculated, so should only be used as an approximation.
 Your feedback is valuable!Please share your comments, ratings, and any suggestions or adaptations below to help us improve and make our recipes more successful.

The ideas in your writing are truly innovative, adding value for the reader.
glad you find it useful Jarrett
Mine turned out perfect. I used only idli rice, and used the yoghurt function on the Instant Pot for 14 hours to ferment it. I was concerned about the batter because I thought it was too funky, but it tasted perfect after putting it on the hot skillet. I used sea salt in the batter. Thanks for the detailed recipe.
Glad you liked it Omar, thanks for trying
The water ratio in the instructions remains the same even if you make the ingredients 2 times or 3 times. Could you please maybe add water ratio in ingredients list too so we know to adjust it accordingly. I understand it’s approximate but would be nice to know rough amount.
Hi ! Sorry the recipe plugin is such, it doesn’t change the numbers in the instructions. Not much that I can do about it.
Hi,
My dosa become over crispy, wat could be the reason?
well this is a crispy dosa batter recipe. If you don’t want super crispy dosa, follow this recipe: https://www.cookwithmanali.com/idli-dosa-batter/
Can I freeze the left over batter and use it later? How long is it good in the freezer for?
Sorry I have not tried freezing my batter but I know some people do and it lasts 1 month.
Yes I froze in airtight container and used almost after 3 weeks. It was as gud as fresh.
I tried making better as shown in your recipe and dosa turned out really good. Everyone loved it .
I am glad to know!
Can I just use the premade dosa batter they have at the Indian market? I don’t have the time to make my own.
sure, this details are for those who want to make the batter at home
Hi,
I am very excited to try this, I have the batter fermenting in my Instantpot right now. I am just curious, the Urad Dal already has a strong fermented/sour smell. Is this normal?
Thanks for the recipe!
if it’s smelling a lot, it might be old!
hi thank you for this! I have been wanting to try to make these for a long time. I am unable to find the poha….will it be ok without it?
Thank you!!!
I would suggest you try this recipe: https://www.cookwithmanali.com/idli-dosa-batter/
Hi
Can we use anything else in place of coconut?
in coconut chutney? make some other chutney
Re: poha flattened rice, should I use red or white?
white
Re: potato Masala, When do you add the cashews pieces? With the channa dal? I read the recipe several times and couldn’t find that. Love your recipes!
yes with the chana dal, I will fix it. thanks
They look perfect..which high speed blender u use for this and also for grinding your idli dosa batter??
Hi Ankita, I used my blendtec
Thank you for the recipe. The dosas look perfect. Where did you get the cast iron skillet from? Can you please share the information.
from Amazon, I have already linked it, please look up in the post.
Mine didn’t didnt ferment 🙁
I kept it overnight with oven light on. No change, so I put it in the IP for 8 hours. No luck
just needs more time, it’s hard to say how much since climate plays such a big role. If the batter looks too thick, add little water, stir and press yogurt button again and let it be in the IP for 2-4 more hours. It will ferment. And even if it doesn’t ferment, you can still make dosa with it. I bet they will turn out nice!
I made dosas tor the first time a couple of month ago. Left it for almost 48 hours before it fermented, on the counter, in wintery Sweden. So depending on the climate it can take very long time. And, I’m unsure of the impact of humidity for dosas, but when I’ve done sourdoughbread then the humidity as well as temperature play a role in the proofing. So might be a thing as well?
Can u please share coconut chitney recipe too
already shared, please search using the search button.
Mine looks like smooth batter after keeping overnight in oven. Does not have bubbles or thick texture. How do I ferment it now. Also what signs of good fermentation.
if you drop some batter in a bowl of water, it should float. It means it has fermented.
Very nice nd step to step information..Soon will try..