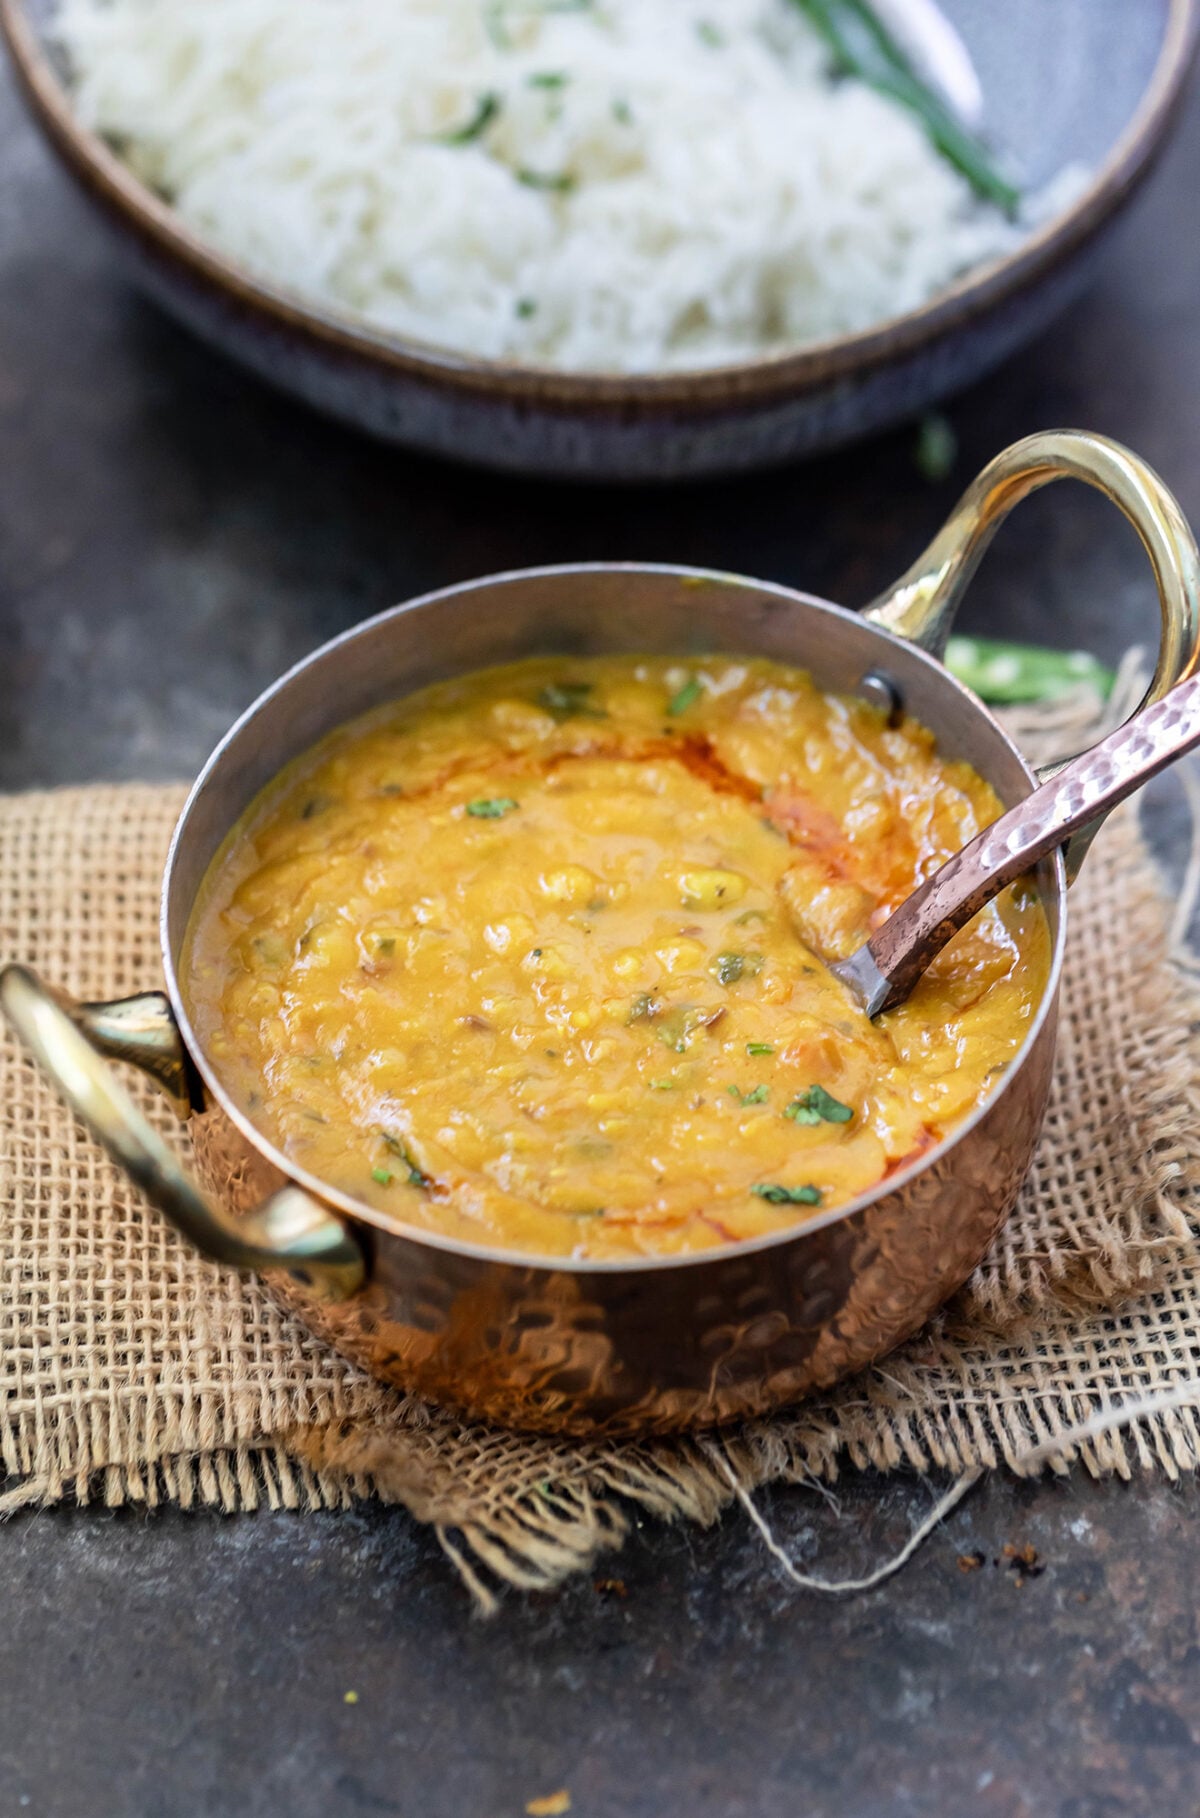
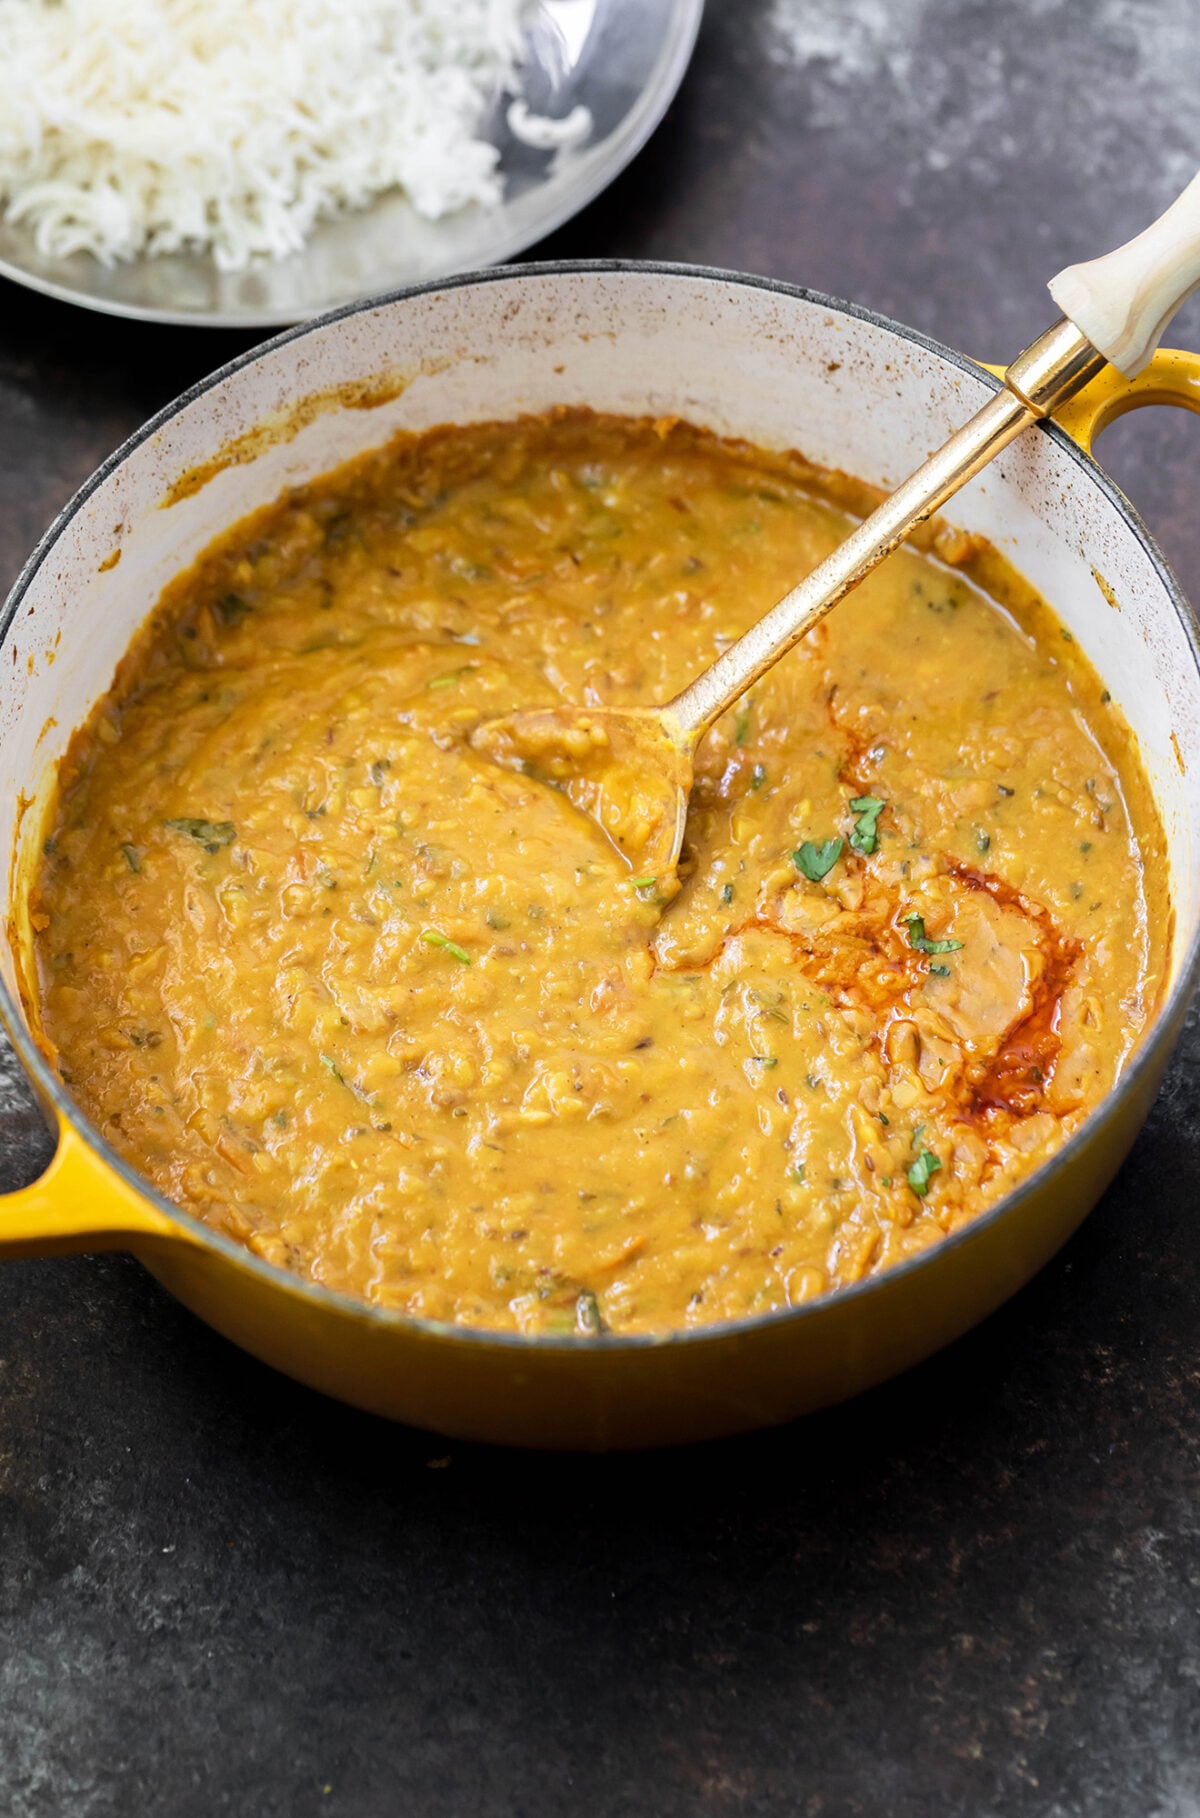
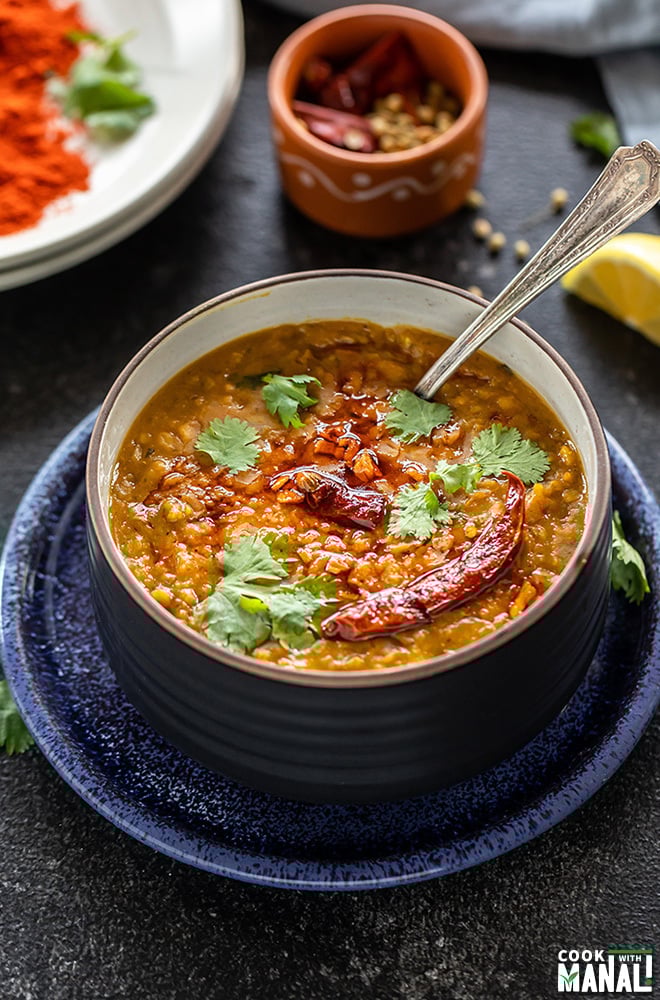
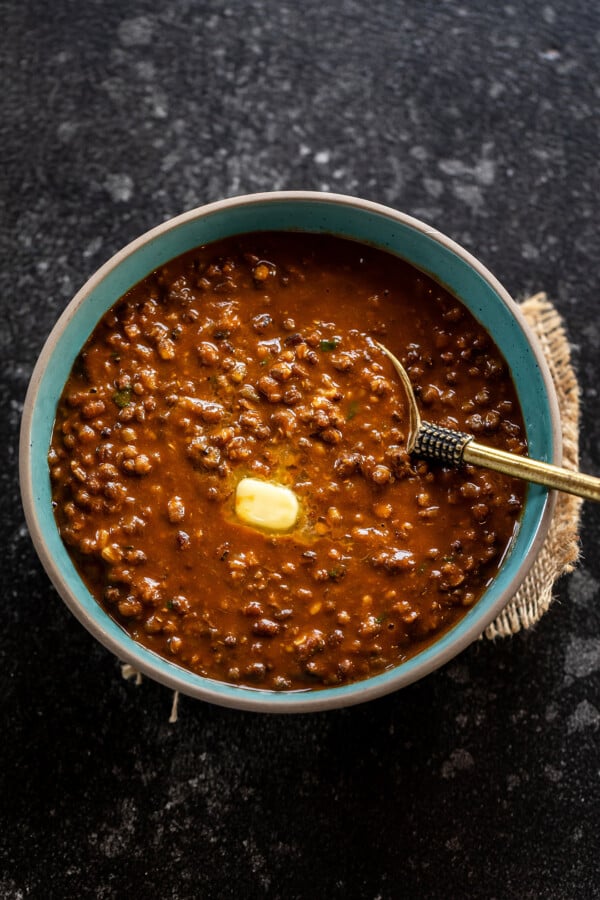
This Dal Tadka recipe has toor dal (also known as arhar dal) flavored with onions, tomatoes and tempered with spices and ghee. It is one of the most popular Indian dals also one of my absolute favorites. I grew up eating toor dal every day of my life, but that used to be a basic dal, with tadka of just ghee and cumin seeds. This restaurant-style dal is a lot more aromatic, flavorful and uses burnt charcoal for that smoky flavor which makes it even more special!
Dal (lentils) is a staple in every Indian household. Various types of lentils are used in Indian cooking on an everyday basis. Different regions of the country prepare it in different ways. The consistency of the dal, the tadka ingredients, everything changes regionally and even from one household to another.
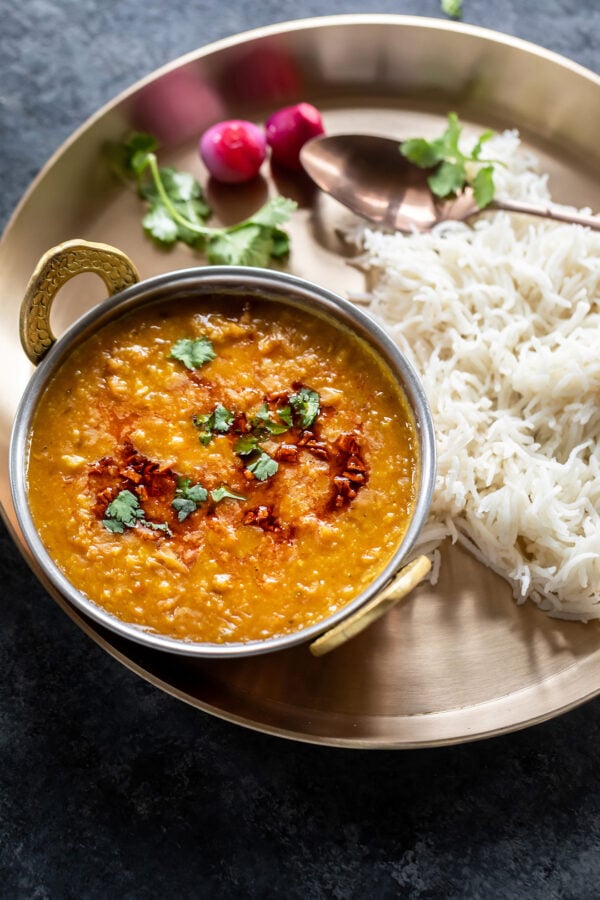
This Dal Tadka recipe is the one that’s popular in northern parts of India and one that I grew up eating. Whenever we would eat out at restaurants or dhabas (roadside restaurants in India), we would always order the dal tadka along with jeera rice, aloo gobi, tandoori roti and sirke wale pyaaz. It’s such a wholesome combination. If you are an Indian, you know what I am talking about!
The literal translation of Dal Tadka is Dal=lentil and tadka=tempering. Tadka or chaunk (in Hindi) is a term we often use in Indian cooking for the process of adding seasoning to a dish. It mostly involves blooming spices like cumin seeds, mustard seeds, garlic, chilies, curry leaves etc. in hot oil or ghee.
Over the years, I have tried and tested various versions of dal tadka. This is the version that comes closest to the one you love at your favorite Indian restaurant or dhaba.

My Tips to Make Restaurant Style Dal Tadka
While my husband is a die-hard dal makhani fan, my dad will still choose dal tadka every time. And as far as I am concerned, I love them all, including my favorite chana dal and simple masoor dal. This dal tadka can be made with a combination of lentils or a single lentil. Some recipes use a combination or masoor dal, toor dal and chana dal, while others use toor and chana dal. I use just plain toor dal for this recipe. But you can definitely mix and match the lentils and see what works for you. Here is what has worked for me to get this recipe closest to restaurant-style.
Using fresh ingredients- pound some fresh ginger and garlic in your mortar and pestle for this recipe, using store bought ginger-garlic paste is fine but it does not add as much flavor as using fresh ingredients does.
Use ghee for cooking- use ghee for cooking the masala for the dal and also for the final tadka. Ghee really imparts so much flavor to the dal.
Infuse smokey flavor to the dal through dhungar method-this is now you elevate a basic dal tadka recipe.
Dhungar method is the technique of infusing the flavors of burnt charcoal (smokey flavor) into a dish. If you are going to smoke the dal, here are a few tips to keep in mind:
- Use the non-self-igniting variety of coal. You can find it in the grilling section of grocery stores.
- Use a heatproof bowl like steel bowl to keep the hot coal in it.
- Always use a pair of tongs as the coal will be hot, so handle it carefully.

How To cook the dal- Stove-Top, Instant Pot & Pressure Cooker
Stove-top: If you are going to cook the dal in a pot, you might consider soaking the dal first for around 20-30 minutes. This is optional but it helps in getting the dal to a desired texture quicker. Add the lentil and water to a pot along with salt and turmeric and bring it to a boil, then lower the heat and cook uncovered for around 30 minutes or until the dal is very soft. If water is getting less as the dal is cooking, you can add more water, ½ cup at a time and cook until the dal is cooked to creamy, soft texture. This time may vary depending on the type of lentil you are using and the age of lentils. Older lentils took longer to cook and if you use chana dal in you recipe, that will also take longer to cook.
Pressure cooker: In my home in India, mom always cooked the dal using a stovetop pressure cooker. If you have the same traditional pressure cooker, cook the dal for 4 whistles on high heat, then lower the heat and cook for an additional 3-4 minutes. When done, the dal should be very tender.
Instant Pot: If you have an Instant pot, you are going to add the dal and water to the Instant pot, close the lid and press the pressure cook/manual button. Cook the dal on high pressure for 8 minutes with the pressure valve in sealing position and let the pressure release naturally.
Let’s Make Dal Tadka
- Cook the dal first- either in a pressure cooker/instant pot or stove-top
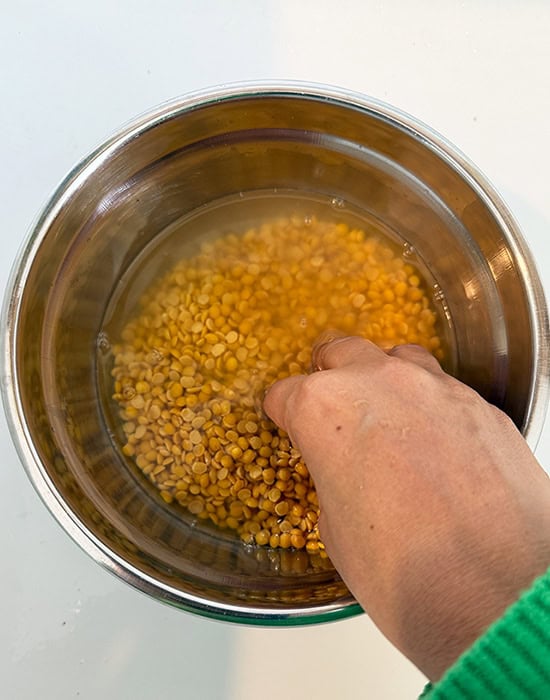
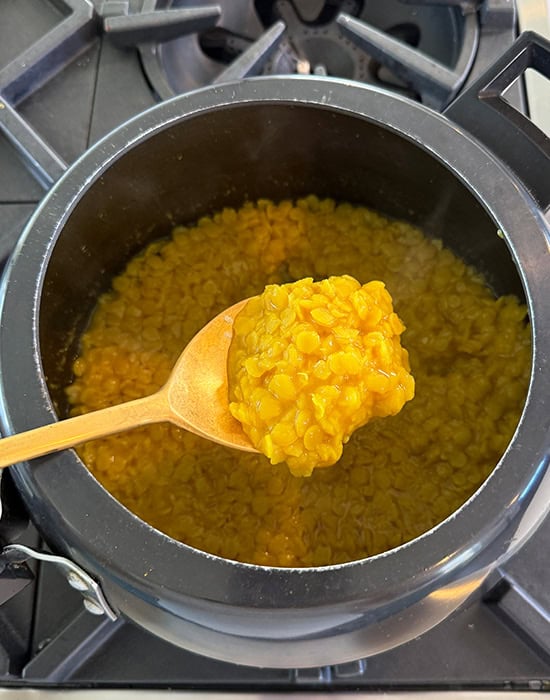
Rinse the dal first, at least twice. Then cook it with salt and turmeric until it’s completely cooked and very tender. A lot of Indians I know like their dal to be very soft/mushy at this stage, whereas some prefer some dal particles to be still visible. It’s a personal choice!
- The masala base is where the magic happens!
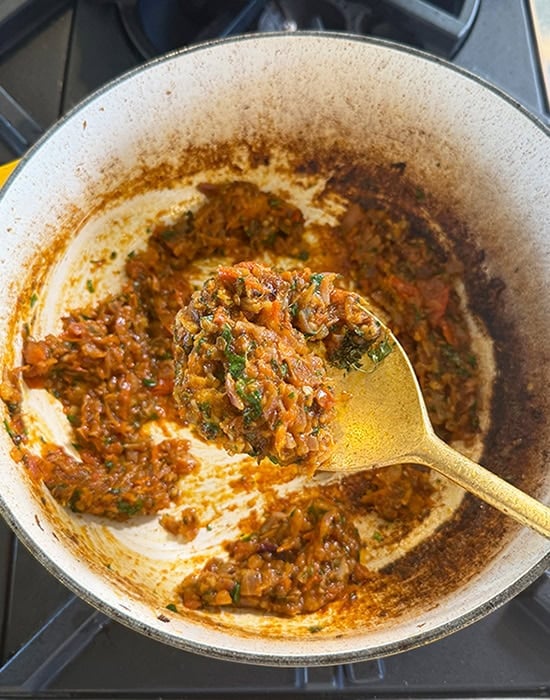
The base of this dal tadka is made with fresh onions, tomatoes, ginger, garlic and chilies. Pound that fresh ginger-garlic with your hands, it’s worth the effort!
- More layers of ingredients create deeper flavors
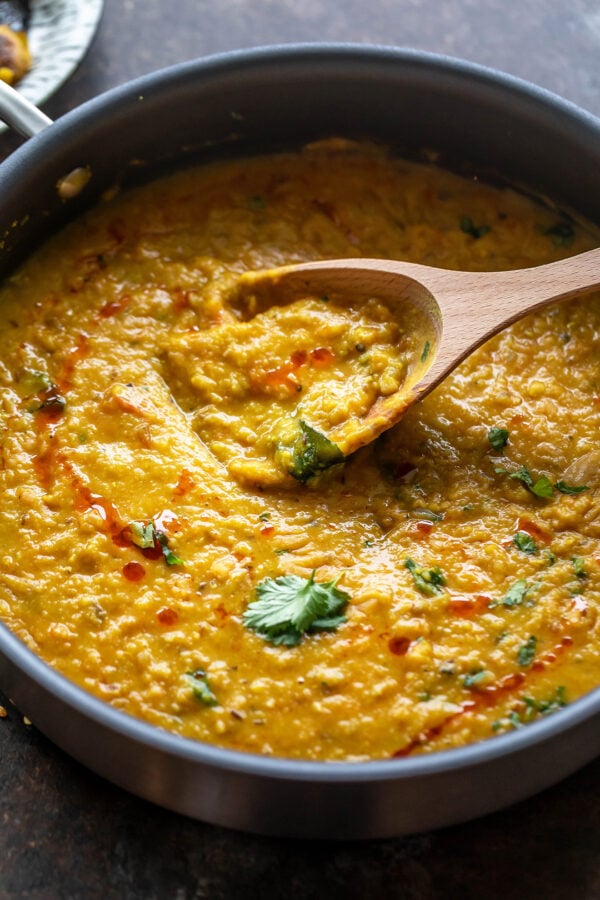
Once the masala base is done, then we add different spices and herbs in layers thus creating bold flavors! It’s important that this masala is cooked well and there’s so raw smell or taste.
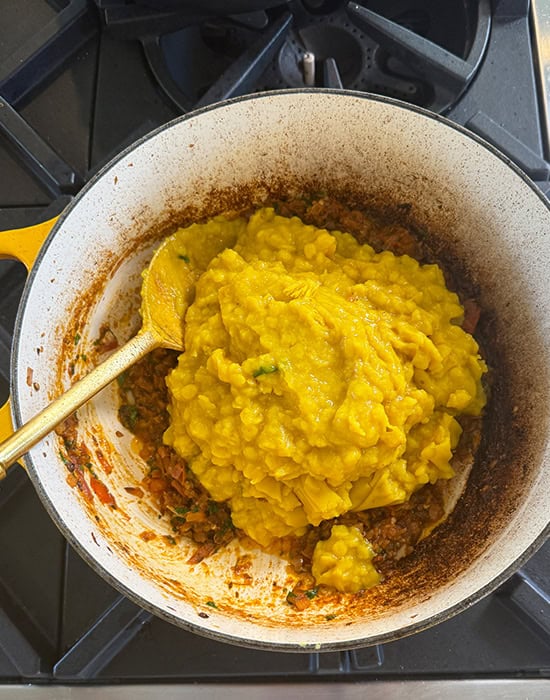
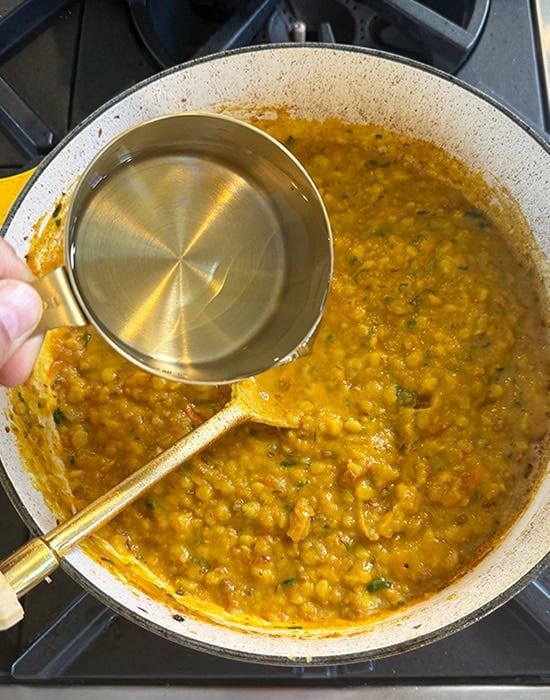
- Simmer the dal with the masala
The cooked dal and the masala must mingle together for a bit for those flavors to deepen. You can also adjust the consistency of dal at this point. Add hot water to make it thinner.
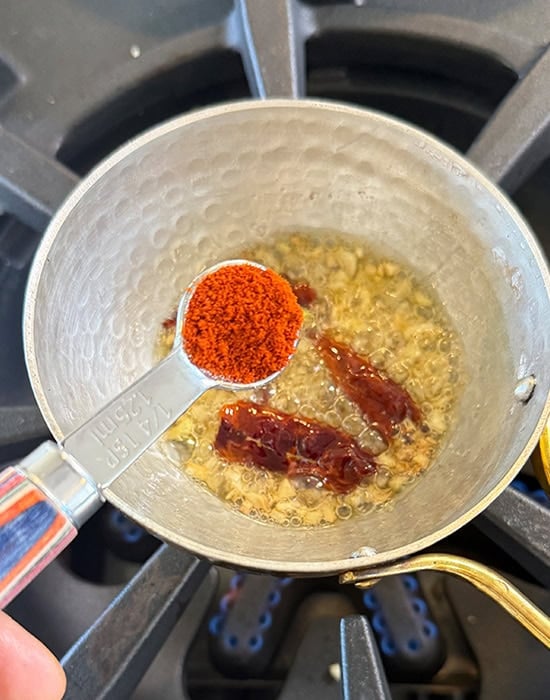
- Final tadka for extra flavor
Bloom the garlic, red chilies and Kashmiri red chili powder for that extra flavor at the end. Kashmiri red chili powder also lends a beautiful color to the dal.
- Dhungar technique takes the dal to the next level!
The dal is great at this point as is but take it a notch up by infusing it with smoky flavor. It will taste just like the one from your favorite dhaba! Enjoy with jeera rice or rotis.
Storage and Re-heating
Store the dal in the refrigerator for up to 3 days in an airtight glass container. The dal thickens considerably in the fridge. To reheat, you can either use the microwave or use a pot on stovetop. I usually reheat on stovetop. You will need to add some hot water while reheating to thin it out a little before serving.

Dal Tadka (Restaurant-Style)
Ingredients
- 1 cup toor dal, 200 grams , also known as arhar dal/split pigeon peas lentil
- ½ teaspoon turmeric powder
- 1 & ½ teaspoon salt, divided, adjust to taste
- 3 & ½ cups water, divided
- 4 large garlic cloves, divided
- 1 inch ginger
- 1 green chili
- 1 & ½ tablespoon ghee, 22 ml , also known as clarified butter or use oil
- 1 teaspoon cumin seeds
- 1 tablespoon coriander seeds, crushed in mortar pestle
- 2 cloves, whole
- 1 medium red onion, 150 grams , chopped
- 2 medium tomatoes, chopped
- ½ teaspoon coriander powder
- ¼ teaspoon garam masala
- ¼ teaspoon kashmiri red chili powder
- ⅛ teaspoon red chili powder, or adjust to taste
- 2 tablespoons chopped cilantro
- 1 teaspoon kasuri methi, crushed, dried fenugreek leaves
Tempering/Tadka
- 1 tablespoon ghee , 15 ml
- 2 large garlic cloves, chopped
- ¼ teaspoon hing, also known as asafoetida
- 2 dried red chilies
- ¼ teaspoon kashmiri red chili powder, optional
piece of charcoal & melted ghee, for dhungar method, optional
Instructions
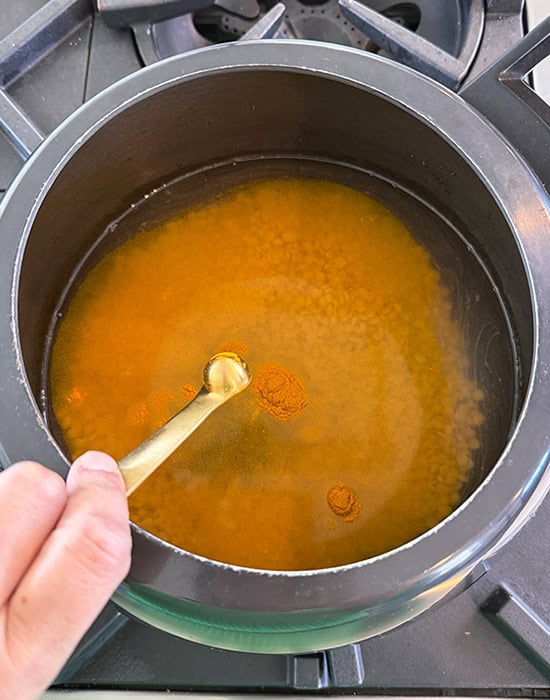
- To a stove-top pressure cooker add 1 cup toor dal along with ½ teaspoon turmeric, 1 teaspoon salt and 3 cups water. Pressure cook for 4 whistles on high heat then lower the heat and let it cook for 3 to 4 minutes. Let the pressure be released naturally. If using an Instant Pot, cook on high pressure for 8 minutes and let the pressure release naturally. If cooking on stove-top, add dal and water to the pot and cook for around 30 minutes uncovered until dal is very tender. Refer to the notes in the blog post. Set the cooked dal aside.
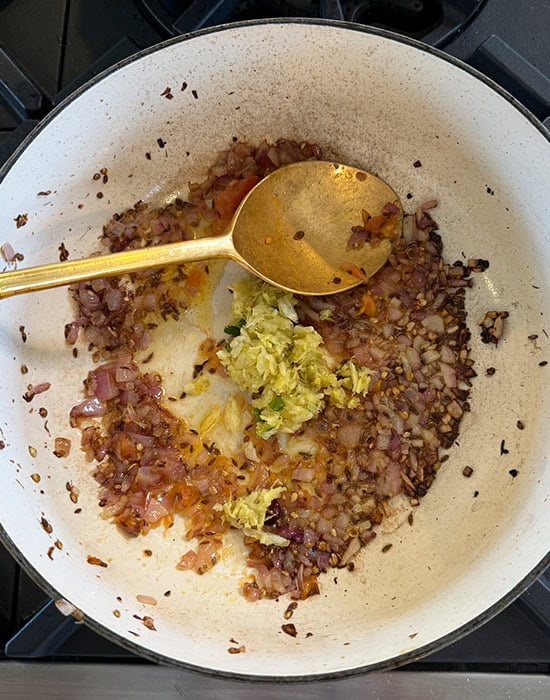
- Meanwhile, crush 4 large garlic cloves, 1-inch ginger and 1 green chili using a mortar pestle and set it aside.
- In a heavy bottom pan, heat 1& ½ tablespoons ghee on medium heat. Once hot, add 1 teaspoon cumin seeds, 1 tablespoon coriander seeds (crushed) and 2 cloves. Sauté for a few seconds until fragrant.
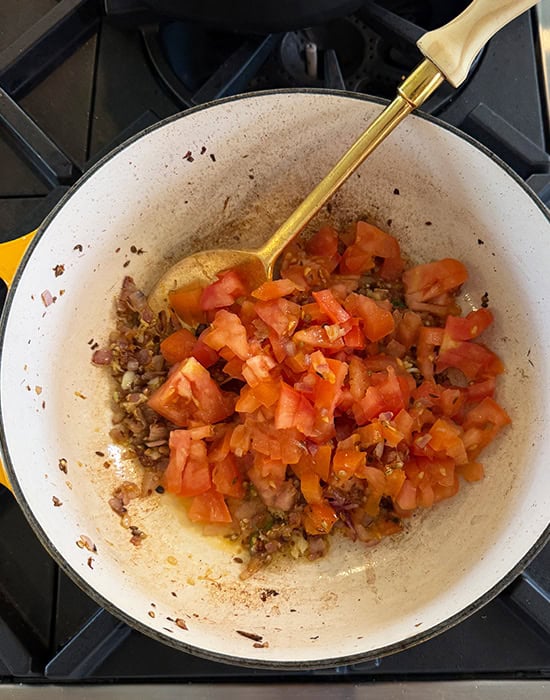
- Then add 1 medium onion (chopped), cook for around 3 to 4 minutes until they are soft and start to change color. Add the crushed garlic-ginger-green chili. Cook for 1 to 2 minutes until raw smell goes away.Add 2 medium tomatoes (chopped) along with remaining ½ teaspoon salt and mix. Cover and cook for 7 to 8 minutes until the tomatoes are very soft and cooked.
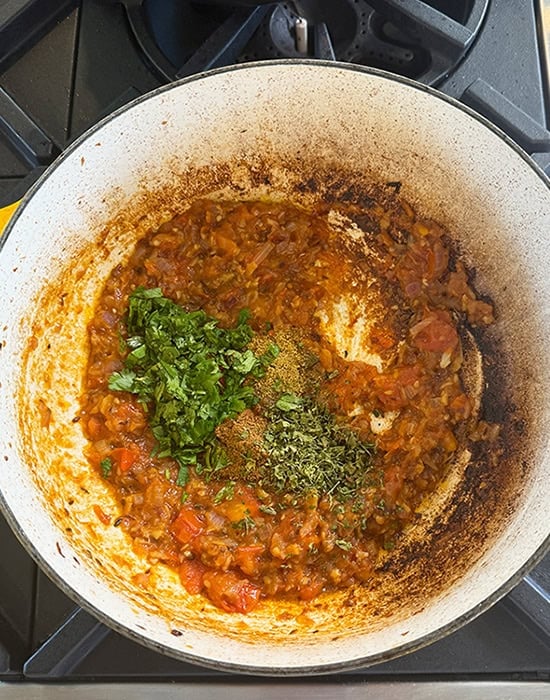
- Then add ½ teaspoon coriander powder, ¼ teaspoon garam masala, ¼ teaspoon Kashmiri red chili powder, ⅛ teaspoon red chili powder (refer note 1), 2 tablespoons cilantro (chopped) and 1 teaspoon kasuri methi. Stir the spices with the masala for 30 seconds.
- Add the boiled dal to the masala now and mix. I also added ½ cup water here as dal looked very thick to me. Let the dal simmer for 3 to 4 minutes.
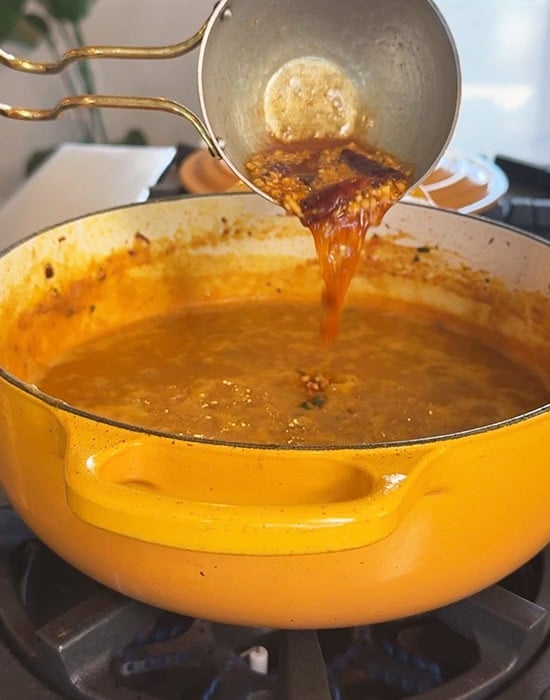
- For the tadka, heat 1 tablespoon ghee in a small pan. Once the ghee is hot, add 2 garlic cloves (chopped), ¼ teaspoon hing (refer note 2) and 2 dried red chilies. Cook for one minute until the garlic starts changing color. Then add ¼ teaspoon Kashmiri red chili powder and remove the pan from heat. Pour the tadka over dal and mix.
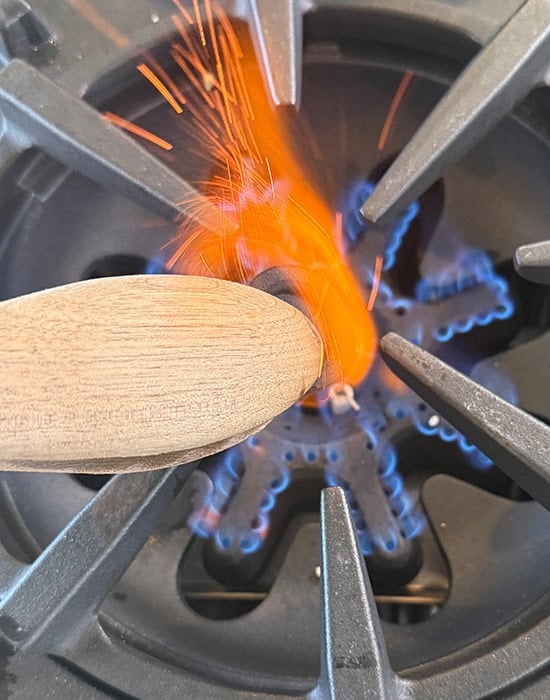
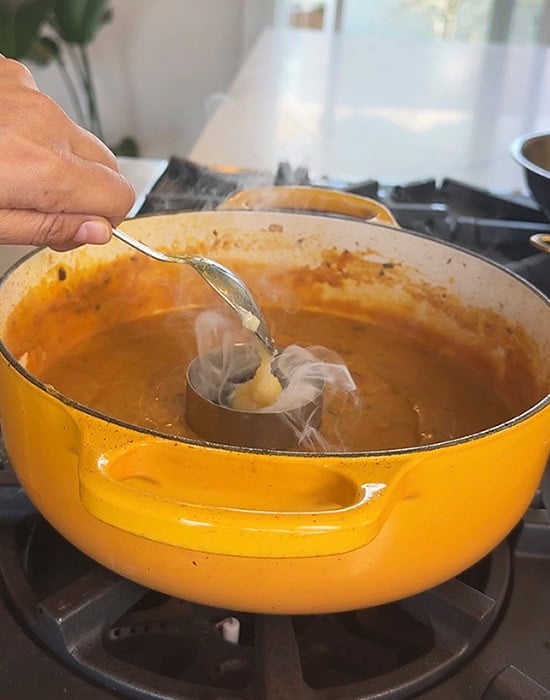
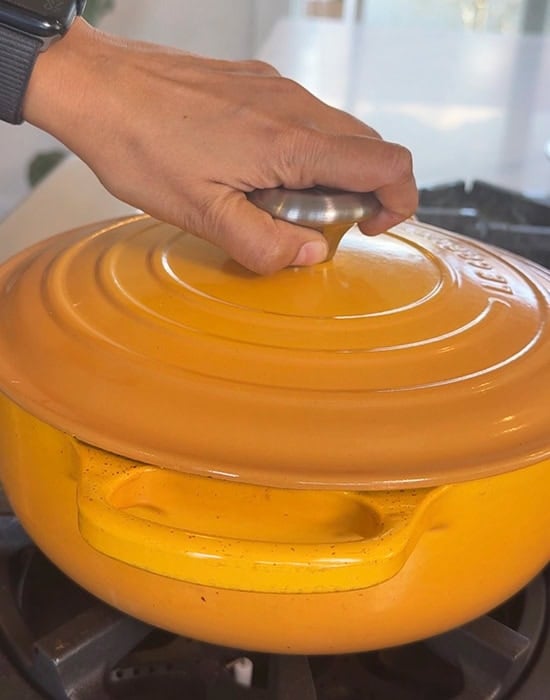
- This last step is optional but recommended.For the dhungar method – place a steel bowl on top of a trivet placed inside the pot of dal (refer to step by step pictures in the post). Then heat a piece of charcoal over direct heat until it’s red hot using a pair of tongs. Using the same pair of tongs, transfer that hot charcoal to the steel bowl on top of the trivet. Pour melted ghee (around 1 tablespoon) on top of charcoal.You will see fumes coming out of charcoal. Immediately close the pan with the lid. Let it remain like this for 5 to 10 minutes. After 5 to 10 minutes, remove lid and remove the bowl from dal. The longer you keep the lid closed, the smokier the dal will be, so don't do it more than 10 minutes.
- Garnish dal with cilantro andserve hot with jeera rice or rotis.
Video
Notes
- To make the dal spicier, use more of the regular chili powder. The Kashmiri red chili powder is very mild and mainly for the color, and I have used only 1/8 teaspoon of regular chili powder. Use 1/2 teaspoon or even more for a spicier dal.
- Use gluten free hing to make this recipe gluten free.
Nutrition
Nutrition information is automatically calculated, so should only be used as an approximation.

Hey! What is the added tempering for at the end? Why not just put all ingredients in the ghee at the start, then add the lentils? Why the xtra tempering what does it add? Thanks!!!
Hi! in Indian cooking we often do tadka at the end, it adds a lot of flavor and is often serve before serving the dish. The garlic, hing , the flavors of these will be more pronounced when you do a tadka of this at the end and add at the top before serving. hope this helps.
I will attempt the recipe this evening, seems delicious.
I was wondering: what do you do with the charcoal afterwards? Can you let it cool and reuse it? It would seem a bit wasteful to throw it away after one use, but not sure if this is possible with the ghee on top. I tried to look on other websites too, but haven’t found any answer.
I throw it, when we use charcoal for grilling, that’s what we do with that too, it’s burnt now. I am not sure what I would do with it afterwards.
Also if you don’t want to do this step, just skip it’s optional anyway. The dal is nice without dhungar too.
Those calories are per serving? It was so good i literally ate 4 serving sizes and now I’m worried ..
Absolutely yummy! Everytime I make it,the bowl is wiped clean!
I made this exactly as directed (except for the charcoal) and it was delicious! I served it with long grain basmati rice, raita, and homemade chapati. It was so authentic tasting that it transported me back to India. Thank you for this recipe!
you are welcome!
This was delicious – thanks for the recipe
welcome! 🙂
Recipe is very yummy. Where did you get that little bowl you used on top of the dahl for smoking? What kind of oil could you try
it’s a regular steel bowl, available easily everywhere- check Indian stores, amazon etc. You can use any oil- avocado, canola etc
Just tried this recipe(I tweaked a few flavours as per our taste) with the dhungar method and I think this is now our favourite dal.
Thanks Manali!
glad to know!
Excellent. I’ve just tried it and very happy with the result. I varied things somewhat, given different conditions – no pressure cooker and no charcoal – but thoroughly good to eat and I must congratulate you on your very detailed and helpful instructions. I shall now, while eating the dal, check out your other recipes. Thanks!
welcome!
Simply the best dall I have ever eaten. I have used the smoking charcoal on tikka before but never dall. A revelation.
Thanks?
so glad to know!
I am going to try this recipe using my table top smoker…I will keep you posted
It was amazing using my table top smoker…just love your recipes!!
Can you link the table top smoker you’re talking about? Is it like a smoking gun just to infuse flavor?
I have so many requests to make this over and over- it’s fool- proof
it’s my fav for sure! 🙂
That little stand you put the steel bowl on during the Dhungar method , does that have a name? I could improvise but I’d like to get one of those eventually too.
this is what I use: https://www.amazon.com/Guestway-Pressure-Vegetable-Stainless-Steaming/dp/B076RPTJQY/ref=sr_1_3?dchild=1&keywords=steel+stand+for+instant+pot&qid=1599060762&sr=8-3
You honestly don’t need it, just keep a bowl on the dal, it will be fine
Dear Manali – We live in USA. In this time of restricted life , I try to make lunch and dinner out of what I have, and avoid frequent grocery shopping. Daal is my favorite dish and I am trying variety for a change of taste! I liked your tarka daal recipe. It came out very well. I used one time ghee during tempering only for health reasons.
I do not have options for charcoal method here. Thank you very much for this recipe. I will look for more in future.
good to know 🙂
Just found this today and made it for lunch. Sooo good! I didn’t have a lot of time so I didn’t follow this method at all and it was STILL delicious! Next time I will follow step by step. I can only imagine how good it will be when I do.
Hello Manali
Today I was hunting for Dal tadka recipe. Found yours. Made it exactly your way.
You have explained it beautifully that it was easy for me to make. Second, smoked it..oh wow! It was superb. Third it was delectable. Not a drop was left. Though I added little more water than half a cup to make it the consistency of what we have. I have been asked to cook it again in the future. Thank you so much.
so glad to know Shivani 🙂
Amazing and easy recipe!! I’m just a teenager and all my family members loved it. Thankyou
Just made this tonight. I didn’t have methi so omitted that. Didn’t have green chilis so added a little extra chili powder and also added in some kale and chard from our garden. This was absolutely fantastic and growing up eating Indian food my whole life I know a good dal when I taste one!
Nice Recipe
hi, can you comment on how to make this if you don’t have a pressure cooker?
soak the dal for 2-3 hours and then cook in a pan until it’s soft and cooked through and then follow rest of the steps as it is.
Can you please share the link to what kind of charcoal to buy for this? Thanks ! Made the dal today and it was very yummy wo the charcoal but I do want to try with it too 🙂 THANKS!
You can find it where they have the summer grilling stuff/BBQ stuff at grocery stores, I use the one from Kingsford.
Going to try this Saturday! Do you end up mixing the ghee you pour over the charcoal into the actual dal? Or does it just smoke the inside and you discard the charcoal and the ghee you poured over the charcoal? I assume the ghee collects in the bottom of the small steel bowl.
No, discard! that hot ghee or oil is just to bring out the smoke from the charcoal, not to be added into the dal.
Question – what is your method for heating up the charcoal?
as shown in the pictures, direct over heat!
I tried this dal recipe….. It was amazing ?… yummy…. actually like dhaba…. my husband really loved it…. Shared the recipe with my sister also.
I tried this dal recipe….. I was amazing ?… yummy…. actually like dhaba…. my husband really loved it…. Shared the recipe with my sister also.
I made this for dinner tonight. It was yummy and liked by all. Though smokey effect will try next time. Thank you for the recipe.
Superb!
Do we need to dry roast the dhaniya before crushing them?
no
It is so nice so now I am forced to make it every week. We eat it with rice and/or paratha
how nice! 🙂
Trying out the recipe today.
Thank you for sharing. Dal was very delicious without the duhar
Love this recipe, and your recipes in general.
I’m in Canada, in my apartment in self-imposed seclusion, so don’t have the ability to use the dhungar method. I’ve tried adding a bit of liquid smoke, as the commenter above asked about, and it really is a pretty good substitute.
Hello, for a full meal, i’d like to know how is the dal tarka served. With vegetables aside? Bread/rice?
Rice, dal and rice is the classic combo 🙂
I made this recipe last week, and my husband, my son, and I really loved it! The flavor was amazing! I’m trying your Dhaba Dal recipe tonight!
hope you enjoy that too 🙂
Tastes so yummy and that smoky flavor, just one word wow
Don’t miss Restaurants of India any more..
yay 🙂
Hi! I tried this recipe for guests who came for dinner and it turned out to be fabulous! Simple and tasty! Restaurant style!
I haven’t bothered making dal in ages because it was always a bit dull when i made it myself. But this is now my favourite dal recipe! Although I cheated by just adding liquid smoke at the end.
absolutely delicious! I will double the recipe next time, it doesn’t make a lot and it’s a bit of work and clean up, but it’s SO worth it! I didn’t try the charcol, I just made the simpler version, but it is better than our local Indian restaurant! Thank you
Thank you for sharing this receipe…it was SO good. I can’t wait to try more of your dishes.
This one is definitely on our heavy rotation list.
The Dal Tadka turned out to be really authentic and yummy in taste
good to know 🙂
What kind of charcoal do you use? Is it the same as for bbq.
not the self-ignited one..that one has chemicals and you don’t want that. the simple charcoal is what I have used here
Hi Manali.Cooking dal’s which are rich and flavourful was never my forte.This Dal Tadka recipe was just awesome.I have followed so many recipes, but this one takes the cake.Thank you.I would love to have the recipe for dal makhani and a ‘whole ‘ moong dal recipe.
So glad you liked this Amrita! I have a super good Dal Makhani on the blog already 🙂 https://www.cookwithmanali.com/dal-makhani/ …will post whole moong dal too!
Hi there, I was wondering, rather than using charcoal, is it possible to just put in some liquid smoke to achieve the same effect? I’ve never used charcoal like this so I’m a little reticent. Thanks a lot.
You can try liquid smoked, I have never tried it
Did you try liquid smoke?
Hey. Your recipes have helped me get much closer to being able to cook like my mum since I moved out! I would be so grateful if you could conjure up a version if this daal without using a pressure cooker
Bhavesh, just soak the dal for 1-2 hours then drain the water. Put it in a pan, add water, turmeric and salt and cook the dal until it’s done. It will take some time on stove-top but will get cooked eventually. Then, just follow the rest of the steps as it is..hope this helps!
It was so good. One of the best dal recipe I tried out. Thanks alot
It was awesome- yummy dal!
Excellent!!
I made this for dinner tonight and it was absolutely brilliant. Lovely flavours and simple to make. I didn’t have the things for the dhungar method so I’ll have to try in the future. Thanks Manali
Welcome! glad you liked it..do try the dhungar method..it makes for an amazing change! 🙂
yammi, look like very testy.
I will definitely try this recipe
This is an interesting take on our traditional Dal Tadka. Loved the addition of Dhungar method!
Thanks! Smokey flavor is awesome!
Thanks for sharing this recipe Manali, it was so good, better than restaurants. Dhungar method really makes all the difference.
Yummy dhal recipe. Let me try dear!, the dhal NI way!
Let me know how it turns out CV!
The result is amazing thank u