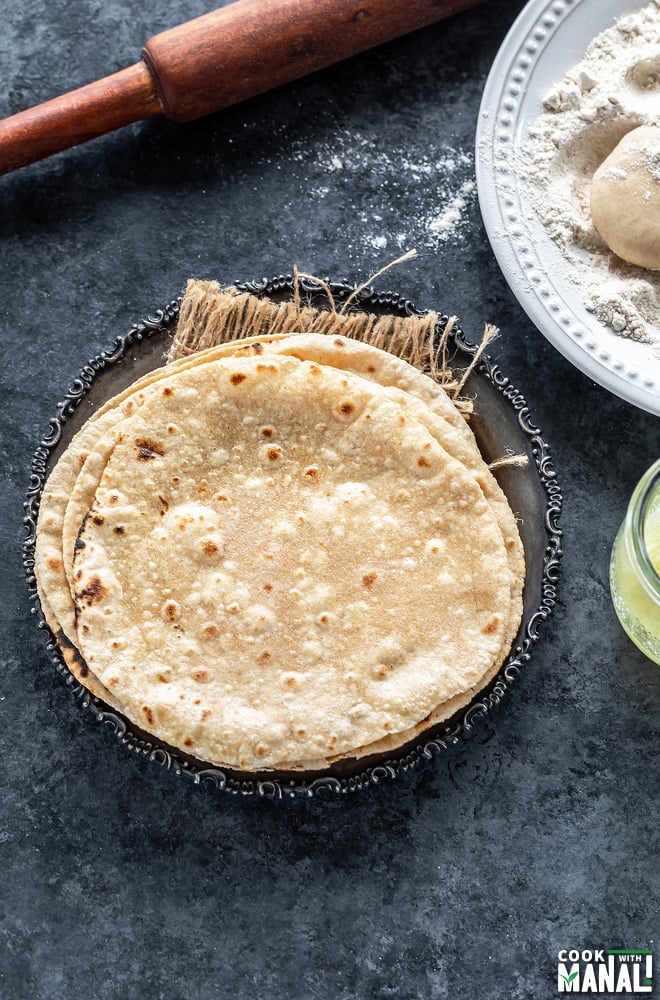
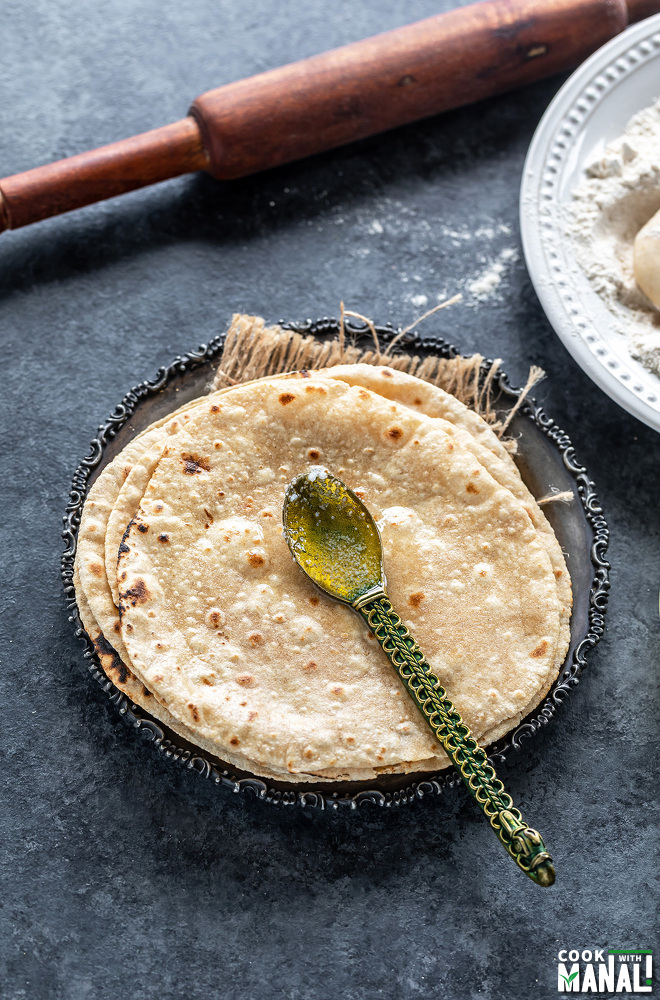
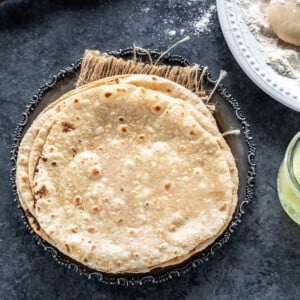
Learn all the tips and tricks to make soft roti at home.
This everyday Indian flatbread was a staple growing up, one that I ate every single day.
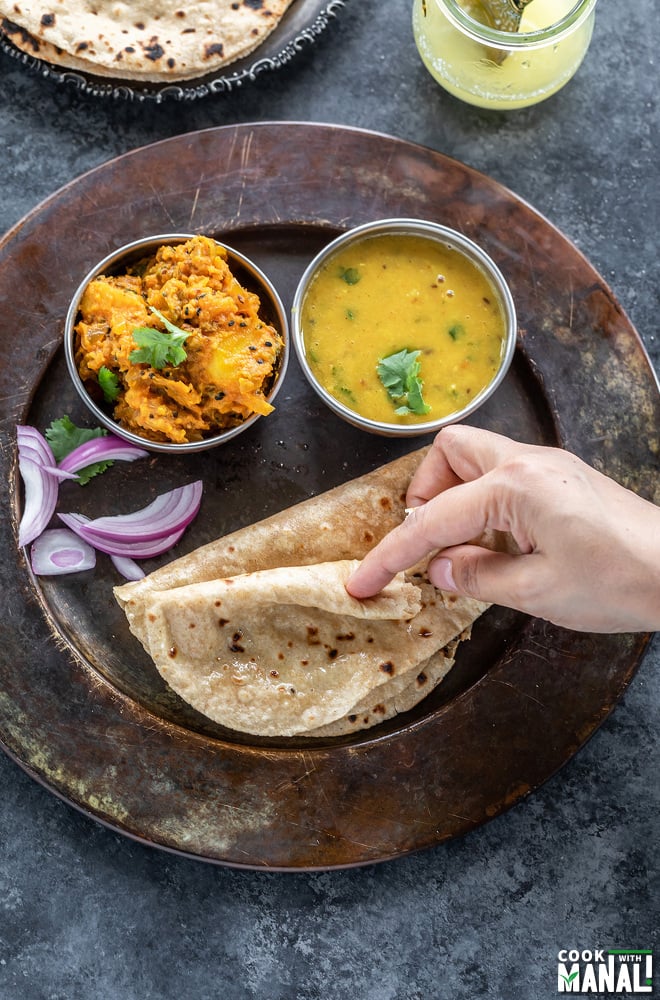
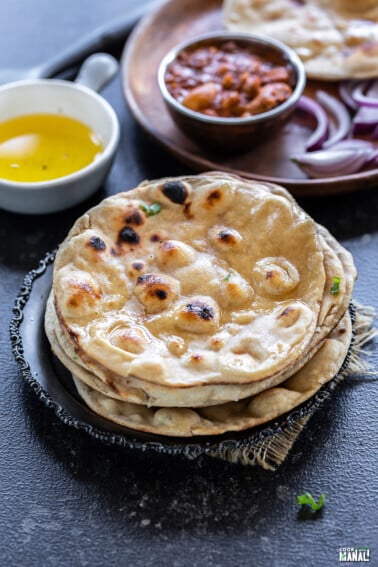
Roti is made of whole wheat flour and nothing else really and is eaten in India with dal and curries.
Roti is an integral part of Indian cuisine, the north Indian cuisine especially.
I was born and raised in north India and grew up eating it everyday of my life.
Roti, dal and rice were always on the table in my house for literally every meal.
It took me several years to learn to how to make a good roti. Trust me, it’s a skill which needs a lot of practice.
I learnt so much cooking but this was something that took time. Now, after making years I am confident enough to make rotis and make them several times every week.
What is Roti?
In simple words, roti is a flatbread made with wholemeal wheat flour. It is known as “atta” in hindi.
Atta is also used to make other breads like paratha and puris in India on a daily basis.
Roti is simplest bread that is made everyday in Indian households. It is made with only 2 ingredients- atta (the wheat flour) and water.
Some people add salt, some add oil but in my house it was always made with these 2 ingredients only.
Like I said, it is the simplest form of bread.
It is known by different names in different parts of the country and sometimes there’s also a difference in the way you cook it.
Roti/Phulka/Chapati/Rotli are more or less the same thing.
They might have some difference in their thickness (like rotli in Gujarat is very thin while my North-Indian version is slightly thicker) and the way they are cooked but more or less they are same.
You need a rolling pin and a rolling board to make this flatbread. We call it chakla (the board) and belan (the rolling pin) in hindi.
Is roti vegan? Yes, if you don’t apply ghee on the roti after it’s cooked, then it is vegan.
My mom never applied any ghee on roti, I guess it’s just not a tradition to have ghee on roti in eastern Uttar Pradesh (where I am from).
On the other hand, Sarvesh never ate roti without ghee! He’s a punjabi and ghee is must on rotis for him.
If you want to keep it vegan, simply skip the ghee or use vegan butter.
Is roti gluten-free? The traditional roti is not gluten-free since it is made of wheat.
How is Roti Cooked
So this will vary in different parts of the country.
At my home, it was first rolled and cooked on tawa until cooked slightly and then put on direct flame until it puffs.
But at a lot of people I know (including my mother-in-law), cook it all on the tawa.
She simply uses a cloth to puff the roti directly on the tawa. Both ways are fine, it’s just what you are used to.
I usually puff it directly on flame since I like the taste better that way or maybe it’s because my tastes buds are just more used to that taste of the bread cooked on direct flame.

Tips to make soft rotis
One of the biggest challenges that I faced when I first started making rotis was that they never turned out soft.
Sometimes, they would be so hard that they could crack like a wafer. Not kidding!
Over the years and hundred of roti later, I can now make good rotis. I tried everything from adding milk to yogurt and what not but eventually realized that you don’t need any of these.
It’s a skill which comes with practice. The more you make it, the better you will get. Each step right from making the dough, kneading it, to rolling the roti is important and has an effect on the final outcome.
I am sharing you some of the things that I have learned in my roti making journey! 🙂
The dough needs to be soft and pliable– now, I know this can get confusing. But you have to knead a soft dough.
If the dough feels too tight- add more water, start by adding 1-2 teaspoons at a time and add more as needed.
If the dough feels too wet/sticky- add more flour.
It should be smooth and when you press the dough with your fingers, it should leave an impression.
Knead with warm water- not a really big deal but it definitely helps if you use warm water to knead the dough.
You can even add some oil to the dough. I don’t do it though but some swear by it.
Knead the dough with the knuckles on your fingers- stretch the dough, knead using the knuckles, then fold and knead again.
Keep doing this until your dough is smooth and pliable.
Let the dough rest for 20 to 30 minutes- now this is really important. After you knead the dough, cover it with a damp cloth or a damp paper towel and let it rest for 20 to 30 minutes.
The makes the rolling easier, the rotis so much better.
Roll each dough ball to a smooth ball, round and no cracks- to roll a good roti, start with making sure that dough that you are going to roll is round and smooth.
If you start with a nice round and smooth dough, your chances of making a good roti will increase. Once the ball is round, then press it lightly between your palms to make it little flat.
Roll evenly using a rolling pin– ah! the toughest thing to do and this definitely comes with practice.
You have to apply equal pressure while rolling the roti and once you master it, the roti will automatically move as you roll.
Move the rolling pin all the way through the rolled roti so that it rolls evenly from all sides. Comes with practice so definitely don’t worry if you can’t do it in the first go.
Tawa should be hot before you add the rolled roti– this is one mistake that I did when I started making rotis and paratha. My tawa wouldn’t be hot enough and I would add the rolled roti to it.
The roti will take more time to cook since the tawa was not hot and that would result in a hard over-cooked roti.
So, make sure sure the tawa is heated well on medium-high heat before you put the roti on it.
Dust the dry flour (atta) from the rolled roti before putting it on the hot tawa– it makes your roti less dry and more soft.
Apply ghee once done- to add to the flavor and also to keep them soft, brush them with ghee once cooked.
Why my roti didn’t puff?
The most frustrating part of this entire roti making process happens when it doesn’t puff.
Even after making it for many years, I still have rotis which won’t puff.
The biggest reason is that it wasn’t rolled evenly. If it’s rolled too thin, to the point where edges are almost tearing apart (and the center of the roti is thick), then the roti won’t puff.
Make sure that its thickness is same throughout, that’s a good roti which will puff.
It also won’t puff if the dough was too tight/hard.
Frequently Asked Questions
How to store roti? If I am sending them with my husband to work, I always put an aluminium foil first, then a paper towel and then place the roti on top.
If you just roll them in an aluminium foil or paper towel, they will become soggy.
I store them the same way in the refrigerator with two layers.
How to re-heat roti? You can microwave them, just cover them with a damp cloth and microwave for 30 seconds.
You can sprinkle some water on the roti before heating them up.
Can you freeze these? Yes, you can freeze them. Just let it come down to room temperature.
Then place a parchment paper between each roti and make a stack. Then transfer the entire stack into a freezer bag and freeze.
Which brand of atta is the best? I use Sujata Gold atta and find it the best for rotis. You can use the brand that you like.
Method
1- Take 2 cups (270 grams) atta in a large bowl. Usually a round flat plate with shallow edges called paraat is used but I just had a round mixing bowl so that’s what I used.
You can add little oil if you like here, I did not add any.
2- Start adding water, little by little.
3- As you add water, mix with your hands and bring the dough together. I needed around 3/4 cup (180 ml) +1 tablespoon (15 ml) water here. You may need more or less water depending on the kind of flour.
4- Once the dough comes together, start kneading the dough. Knead with the knuckles of your finger, applying pressure.
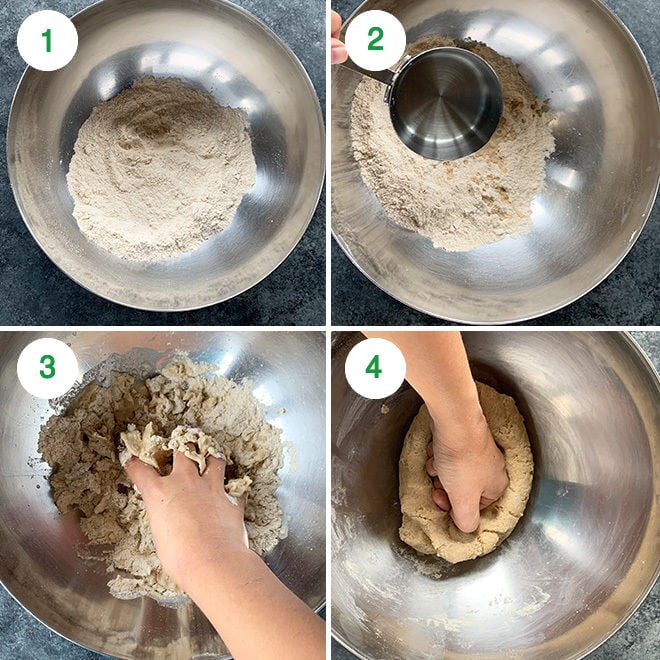
5- Fold the dough using your palms and knead again applying pressure with your knuckles.
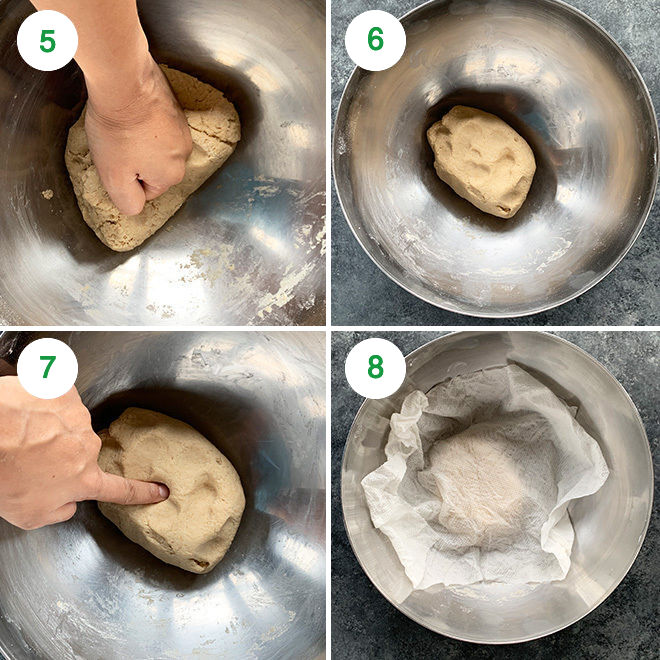
6- Keep kneading until the dough feels soft and pliable. If it feels hard/tight, add little water and knead again. If it feels too sticky/soft, add some dry flour and mix.
7- Once done, the dough should be smooth. Press the dough with your fingers, it should leave an impression.
8- Cover the dough with a damp cloth or paper towel for 20 to 30 minutes.
I placed my paper towel under tap water and then squeezed all the water from it and used that damp paper towel to cover the cloth.
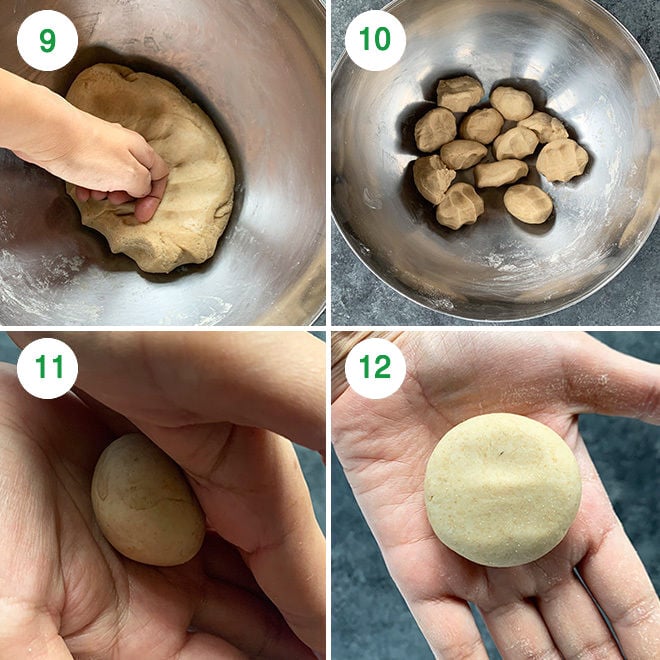
9- After the dough has rested, give it a quick knead again.
10- Divide the dough into 12 equal parts, each weighing around 35 to 37 grams.
11- Start working with one ball, while keep the remaining dough balls covered with a damp cloth so that they don’t dry out. Take one of the balls and press it between your fingers to make it smooth.
Then roll it between your palms to make it round and smooth. There should be no cracks.
12- Press the round dough ball and flatten it slightly.
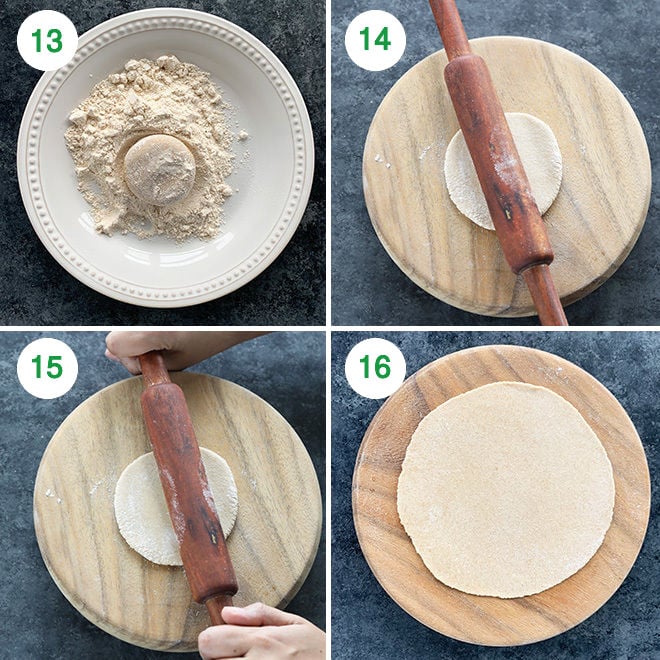
13- Now take around 1/4 cup atta in a plate for dusting the roti while rolling it. Dip the prepared dough ball into the dry flour and dust it from all sides.
14- Then start rolling the roti, using a rolling board and rolling pin.
15- Move the rolling pin lengthwise across the dough applying gentle pressure as you roll. If you are rolling it correctly, the dough will move in circular motion on its own and the roti will roll evenly. This comes with practice.
You can also roll and then take the dough and move it a little with your hands and roll again.
You will have to dip the roti in dry flour several time while rolling the roti. Anytime the dough starts sticking to the rolling pin, dip the roti into the atta from both sides and then continue rolling.
16- Roll it thin until you have a 5 to 6 inch diameter circular roti.
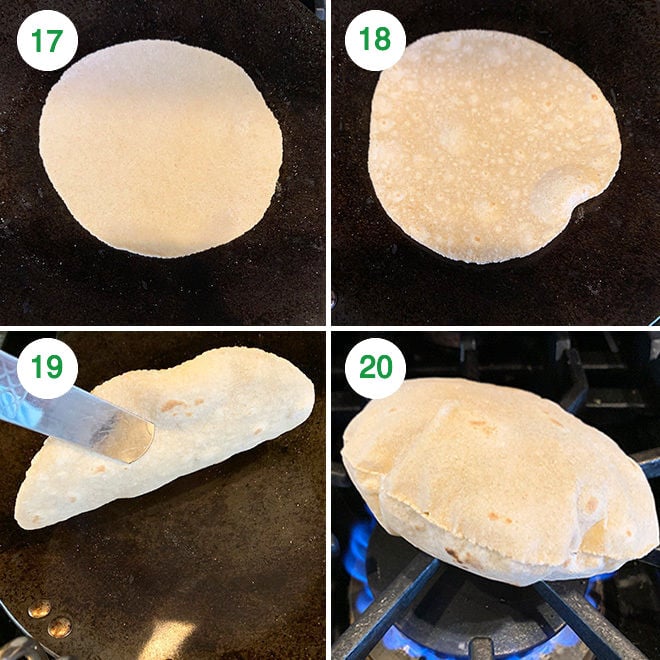
17- Heat the tawa (skillet) on medium-high heat. Make sure the tawa is hot enough before you place the roti on the tawa.
Dust excess flour off the rolled roti and place it on the hot tawa.
18- Let it cook for 15-30 seconds until you see some bubbles on top side. At this point flip the roti, you don’t want the first side to cook too much.
19- Now, let the other side cook more than the first side around 30 seconds more. Use a tong to see how much it has cooked from the second side now. If you see brown spots all over, means it has cooked enough.
20- Now, remove the roti from the tawa using a tong and place it directly on flame with the first side (which was little less cooked) directly on the flame.
The roti if rolled evenly will puff up, flip with a tong to cook the other side as well. The roti is done when it has brown spots, don’t burn it.
Apply ghee on the rotis immediately. Make all the roti/phulka similarly.
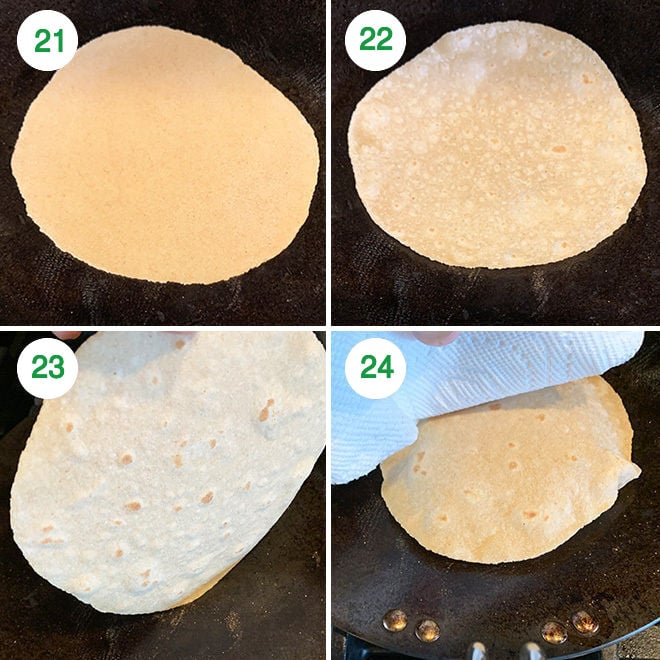
What if you have an induction top and can’t puff the roti on flame.
No worries, here’s how you can make chapati (or roti whatever you call it) on tawa without putting it directly on flame to puff.
21- Roll the roti as usual and place it on the hot tawa.
22- Let it cook for 30 seconds until you see some bubbles on top. At this point flip the roti. You don’t want the first side to cook a lot.
23- Now, let the other cook side until it has nice brown spots (so it should cook more than the first side).
24- Now flip again (with the first side now at the bottom), press the roti with a paper cloth, any cotton cloth or spatula. It will puff up.
Flip again to cook the other side some more. Remove from tawa and brush with ghee.
The rotis are best enjoyed warm! Serve then with dal like dal tadka and simple Indian stir-fry like bhindi masala or aloo palak.
If you’ve tried this Roti Recipe then don’t forget to rate the recipe! You can also follow me on Facebook and Instagram to see what’s latest in my kitchen!
Roti Recipe - How to Make Roti/Chapati
Ingredients
- 2 cups atta, whole wheat flour, 270 grams + 1/4 cup for rolling the roti
- 1-2 teaspoons oil, optional, 5-10 ml
- water, as needed to knead a soft dough, I used around 3/4 cup (180 ml) + 1 tablespoon (15 ml)
- ghee, to brush the rotis
Instructions
Knead the dough
- Take 2 cups (270 grams) atta in a large bowl. Usually a round flat plate with shallow edges called paraat is used but I just had a round mixing bowl so that's what I used.You can add little oil if you like here, I did not add any.
- Start adding water, little by little. As you add water, mix with your hands and bring the dough together. I needed around 3/4 cup (180 ml) +1 tablespoon (15 ml) water here. You may need more or less water depending on the kind of flour.
- Once the dough comes together, start kneading the dough. Knead with the knuckles of your finger, applying pressure.
- Fold the dough using your palms and knead again applying pressure with your knuckles.Keep kneading until the dough feels soft and pliable. If it feels hard/tight, add little water and knead again. If it feels too sticky/soft, add some dry flour and mix.
- Once done, the dough should be smooth. Press the dough with your fingers, it should leave an impression.
- Cover the dough with a damp cloth or paper towel for 20 to 30 minutes.I placed my paper towel under tap water and then squeezed all the water from it and used that damp paper towel to cover the cloth.
Roll the roti
- After the dough has rested, give it a quick knead again.Divide the dough into 12 equal parts, each weighing around 35 to 37 grams.
- Start working with one ball, while keep the remaining dough balls covered with a damp cloth so that they don't dry out.
- Take one of the balls and press it between your fingers to make it smooth. Then roll it between your palms to make it round and smooth. There should be no cracks. Press the round dough ball and flatten it slightly.
- Now take around 1/4 cup atta in a plate for dusting the roti while rolling it. Dip the prepared dough ball into the dry flour and dust it from all sides.
- Then start rolling the roti, using a rolling board and rolling pin.Move the rolling pin lengthwise across the dough applying gentle pressure as you roll. If you are rolling it correctly, the dough will move in circular motion on its own and the roti will roll evenly. This comes with practice.
- You can also roll a little and then take the roti and move it a little with your hands and roll again. Roll it thin until you have a 5 to 6 inch diameter circular roti.You will have to dip the roti in dry flour several time while rolling the roti. Anytime the dough starts sticking to the rolling pin, dip the roti into the atta from both sides and then continue rolling.
Cook the roti
- Heat the tawa (skillet) on medium-high heat. Make sure the tawa is hot enough before you place the roti on the tawa.Dust excess flour off the rolled roti and place it on the hot tawa.
- Let it cook for 15-30 seconds until you see some bubbles on top side. At this point flip the roti, you don't want the first side to cook too much.Now, let the other side cook more than the first side, around 30 seconds more. Use a tong to see how much it has cooked from the second side now. If you see brown spots all over, means it has cooked enough.
- Now, remove the roti from the tawa using a tong and place it directly on flame with the first side (which was little less cooked) directly on the flame.The roti if rolled evenly will puff up, flip with a tong to cook the other side as well. The roti is done when it has brown spots, don't burn it.
- Apply ghee on the rotis immediately. Make all the roti/phulka similarly. Serve warm.
Making Roti/Chapati on Induction top (without puffing on flame)
- here's how you can make chapati (or roti whatever you call it) on tawa without putting it directly on flame to puff.Roll the roti as usual and place it on the hot tawa. Let it cook for 30 seconds until you see some bubbles on top. At this point flip the roti. You don't want the first side to cook a lot.
- Now, let the other side cook until it has nice brown spots (so it should cook more than the first side). Now flip again (with the first side now at the bottom), press the roti with a paper cloth, any cotton cloth or spatula. It will puff up.
Flip again to cook the other side some more. Remove from tawa and brush with ghee.
Notes
Nutrition
Nutrition information is automatically calculated, so should only be used as an approximation.


Loved this simple healthy recipe! Was delicious with a vegetable biryani and dal. So quick and easy to make.
I thought I would fail to do it nicely, this was very helpful. Thank you
Hello Manali, after preparing some dough, I made some rotis it turned out kind of hard. Any tips please to improve my roti making skills. In additon, after cooking the rotis on the stove, I didnt use up all of the dough. So I placed it in the fridge so it doesnt go bad. So the problem is, it was very cold and it took forever to make it get back to room temperature, which fyi, it didnt get to room temperature unfortunately. Anyway, what is the method or way to get the dough to room temperature? Thanks much appreciated for your response in advance. 🙂
Hi Ally, cover your rotis when you make them and apply little ghee. Overall making good rotis take time, so please keep practicing. As far as brining atta to room temperature is concerned, I am afraid I don’t know an easy way out :/ I usually keep it out for 1-2 hours before making rotis and that works well for me.
Thanks for a simple recipe with just flour, water and salt. I made it last night and it was very good. To puff it up I put it directly on the ceramic cooktop! But in saying that it puffed up nicely on the skillet too. I couldn’t get atta flour, so I used stoneground whole wheat.
glad it worked Grace!
Great recipe, the roti were delicious and perfect for scooping up the dal and rice we had for dinner. Too bad I can’t post a video, fun watching them puff up on the flame. This recipe is a keeper
Glad to hear that Wendy, you can always tag me on social!
thanks for making this recipe Manali
Hi im Karim. Just a quick one does it matter what side of the roti is placed on the tawa first after rolling? The top or bottom side after rolling?
it doesn’t matter
Well explained
Thanks a lot
My husband is from India. He told our 5 year old he wish I knew how to make roti. So I tried your Recipe he told me it looks right but it is raw on the inside and no salt. He refused to eat it. So I am guessing lower the temperature But how much salt. Since my husband grow up making it he doesn’t need measurements however I do. Thanks for your help
Hi Lean, roti doesn’t have salt. At least not the one I grew up eating. I am from north India and nobody I know adds salt to their roti. But of course every house can have their own way of making it. If you want to, I would add 1/4 teaspoon and no more. As far as being raw is concerned, a good roti takes time and practice. Make sure you roll it evenly and thin and your tawa is really hot before you put the roti on it.
Will it dried the dough if I add salt to the flour?
you can add salt, it was never added in my house
I can only use Almond flour.. will it work ?
no it won’t. That will be a different recipe since almond flour isn’t a 1:1 replacement for whole wheat flour. Thanks!
Thank goodness this site has copy-paste, it’s a lifesaver!
I think making Roti is an art. Thank you for this detailed instructions/tips on how to make good and soft roti with no-oil. I just have to keep practicing to finally get the hang of it. Thanks again Manali!
it sure is! it takes a lot of practice to get it right even though it appears so simple on paper! 🙂 keep practicing!
Hi, Manali!Thanks for the recipes, i really love all of them.
I am having some issue with my roti. After cooking, some small dark stains comes up. In the beginning I thought it could be raw, but i cooked a lot, so impossible to be raw. They puff nicely, they are soft, only these dark stains that disturbs me. I even thought it could be the atta, but the maid used the same one here and her rotis are perfect 🙁
Hope you can help me.
Hi Rebecca, if they are well cooked and don’t feel raw to eat then I wouldn’t worry about it a all! or do you mean they are dark stains/brown spots from cooking??
My rotis are coming out hard, never like my mum’s. She made it so thin and soft. I am not sure what I am doing or not doing. Maybe you can help and give me some tips.
Well there are lots of tips in this article, please go through it. and it takes practice to make good rotis, keep at it. You will become better. It all starts from getting the dough right, to rolling n cooking it right.
Can I use any whole wheat flour? Thank you 😊
use atta for best results!
What is the difference between Atta and regular whole wheat flour? An Amazon the ingredients for Sujata Chakki Atta is just “Whole Wheat Flour”
I think the difference is in texture and fiber content.
Lots of great tips @Manali. Thank you. They didn’t turn out perfectly for me, but I used a cast iron skillet and I assume the temperature was a bit ‘off’. Some ‘puffed’ very nicely, others only a little. The dough felt “right” – my Atta is not as white as yours and I used more water to get the desired feel. Great exercise. I’ll make them again!
I like too bake chapati but I don’t no how too bake.
we don’t bake rotis, we cook them on griddle. 🙂 You can follow the recipe here!
No matter what I do, my chapati is hard, only soft a short time and hardens before I can eat a half of it. What’s the solution?
over-cooking the chapati, tawa not being hot enough and most importantly you are not kneading a soft dough. Every small step makes a difference, making a soft roti is a skill which takes some practice to get it right. Please make more 🙂
I spent years trying to make good roti that is actually soft. This was what helped me finally get it tonight: “It should be smooth and when you press the dough with your fingers, it should leave an impression.” Thanks for that advice! The Punjabi is impressed. 😉
glad it helped!
Hi is it cold or hot water please?
Thank you for easy recipe that works well.
room temperature works just fine.
Thank you for this easy to follow instructions Roti is a favourite and this is my first attempt to make my own.
Just made my first chapatis and they turned out surprisingly well!
Thank you so much for the detailed recipe!
I finished them on the flame of the gas stove and it was fun watching them puff up. I think it gave them more flavor too. My husband said they need salt so I may try salt in the dough next time. We shared one with ghee (yum) and one with paneer. They really complimented the paneer nicely!
glad to hear Michelle! Traditionally, we never added salt to rotis but of course you can if that’s what you like 🙂
I have been making these for a while now. I like to put my oven to about 400 degrees. When they come out of the fry pan I throw them in the oven for ten or fifteen seconds, where they usually blow up like a balloon. I’ve followed a few different recipes. This one seems to work best.
glad to know it works! We never put rotis in oven since we never had ovens back in India 🙂
I make two roti every morning and eat with cheese and hot drink. Atta I get from Amazon I am not happy with my “tawa” I will try Amazon again.
Thank you for the instructions.
Maung
Hi Manali have just made these Rotis and they turned great and fluffy,thank you.
awesome!
If you can’t find atta it works quite well with half extra strong white bread flour and half wholemeal flour -I use the direct flame if I find the pan wasn’t quite hot enough when I started and one side is raw
Hi Manali,
Thanks for the recipe and instructions. French Canadian here with a Punjabi husband. Roti is one thing I have not attempted yet but definitely will with your recipe. Can the dough be made in advance and cooked the following day?
Hi Manali, Thank you for providing this recipe and also your recipes for Pav and Pav Bhaji. My Indian husband is delighted his western wife is learning a few recipes after 20 years of marriage; all the recipes I’ve tried have hit the mark!
I thought I’d let you know one little glitch. If you adjust the number of rotis in the print view, the water volume doesn’t automatically adjust (likely due to the placement in the ingredient list.) Problem solved for me at this point, but it might throw someone else off.
hey, we actually disabled that feature sometime back because of the confusion it was causing. Not sure how you were still able to use it, I will look. Thanks for letting me know.
Could I make the dough a few hours ahead of time and let it rest til dinner? If so, should I leave it on the counter or in the fridge?
definitely, cover with a damp paper towel or cloth and let it rest. Counter is fine, if it’s very hot where you live when I would say use the fridge
Hi Manali! Thank you for the detailed steps to ensure a perfect finish! Question: what is an ideal temperature for the water to be added? Should it be warm, hot, or cool? Thank you!
warm is fine, doesn’t need to be hot
Can I use all purpose flour if I don’t have whole wheat flour?
sorry rotis are not made with all purpose flour. You can use all purpose flour but it won’t be roti then.
Easy quick ! This is the first time I made it right. I added a bit salt and 1 tsp oil. even though I’m in indian I never got chapathi right. I used atta from Indian store. I have new task to browse your other recipes. Thank you Manali
welcome!
Thankyou so much … Manali tha way you teach us it’s really easy I will try now 😊
Thank you Manali, that was amazing detail and wonderfully explained.
Can this batch be made to freeze?
You mean freeze the dough? I don’t do it. You can try freezing chapatis dough, roll and freeze without cooking. Place parchment paper between each rolled roti.
Thank you sooo much! Tried it and my chapstis came out fabulous. Fantastic recipe and directions.
Awesome!
How beautifully you explained it for us that was fantastic lovely. my parents are from pakistan but i visited their country home five or six times. they have cute storied about chapati but i was never successful to make perfect one for them to cheer them up. May this recipe helps me
Had great fun making these to go along with 2nd time Chicken Korma. Just new at cooking Indian. Tried an open flame to finish off with gas and with the pan. I was a little less intimidated with the pan. Will try with Ghee next time.
My husband and I just prepared our batch of roti. We had them for breakfast. I spread some garlic on my mine with butter and curry chicken. Thanks again. We will make them once a month.
So, I tried this in an Indian Restaurant. Well, I was curious to ask them about the recipe.
But don’t get the right time to do that.
I guess now I Know their Secret 🙂
Absolutely loved this recipe, and the result was amazing! This is the first time making chapati and it was soft and puffed up as well.
So glad to know that Nirusha, thanks for taking out time to leave a review! 🙂
Thank you for the instructions. First time made roti and all of them are soft and puffed!!
glad to know 🙂
I was so scared for one of the 17 ways this would go wrong but they turned out perfect. Just saved us $20 worth of roti alone every time we want a yummy dinner!
How can i store the roti for couple of hours before we eat, without them getting moist. I store them in a casserole but the rotis at the bottom get really mushy.
layer of aluminum foil, then a layer of paper towel and then roti on top. it will not get soggy
Could I make the dough, store it in the fridge or at room temp, and then roll and cook the balls when I want to eat them fresh? Or do I have to make them all immediately?
dough stays fine for 2 days in the fridge
Thank you so much. I was pleased with the outcome. They even puffed up ! I still can’t roll them out round. When I was in Uni, I had Gujarati, Punjabi and Bengali friends. I could never roll them out correctly and my friend would reject them! I’ve only ever made chappati once since but they were not soft and I was disheartened. Your recipe and guidance has given me the confidence. I will definitely make it again. Be interesting to see how long before I can get the shape right.
I loved my friend’s aloo paratha. I would love to try and recreate it now that I have found your website.
Hi, do you know how it’ll turn out if I use a tortilla press to form the roti instead of rolling it out?
Thanks!
the tortilla press doesn’t make it thin enough but you can try
Just want to say thank you for this detailed recipe. I’m Polish but I absolutely love Indian food!
glad to hear!
Wonderful instructions!! First time and all puffed, all were soft, and no crackers. My pan got too hot halfway through because I was so slow rolling with my glass (rolling pin in storage, so I rolled the dough the way grandmother would have). The first one puffed so much it startled me 😃. I took a picture but don’t know how to attach it. I’m feeling so proud & successful!!
I made fluffy and soft chapatis using Aashirvaad Whole Wheat Atta and got amazing results. Thank you.
I mixed some chick pea flour as well.