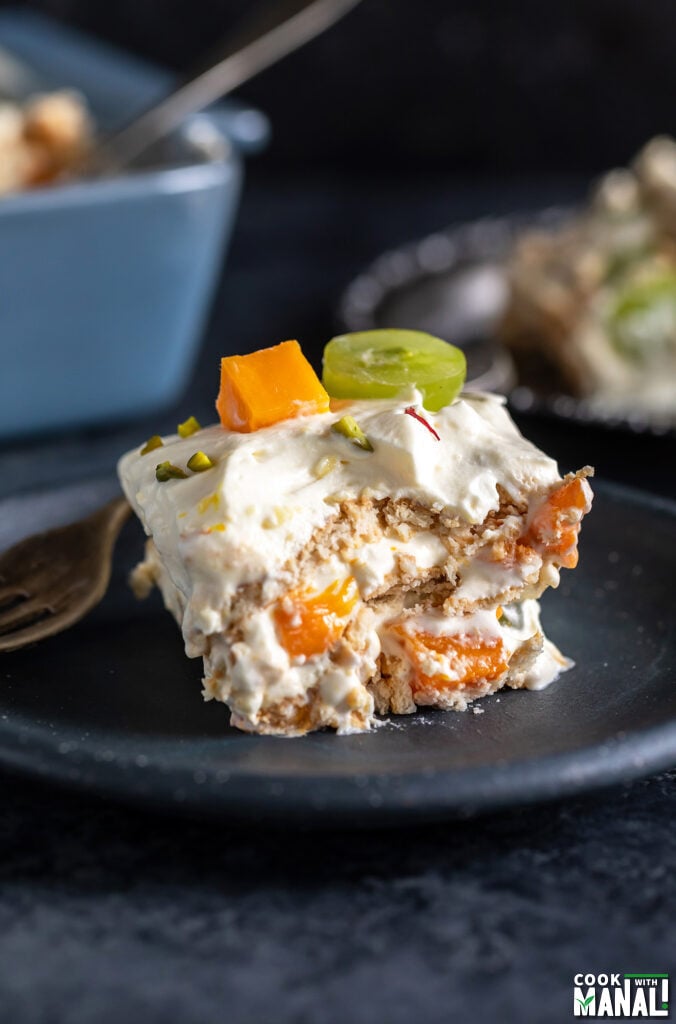
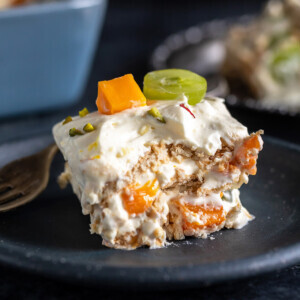
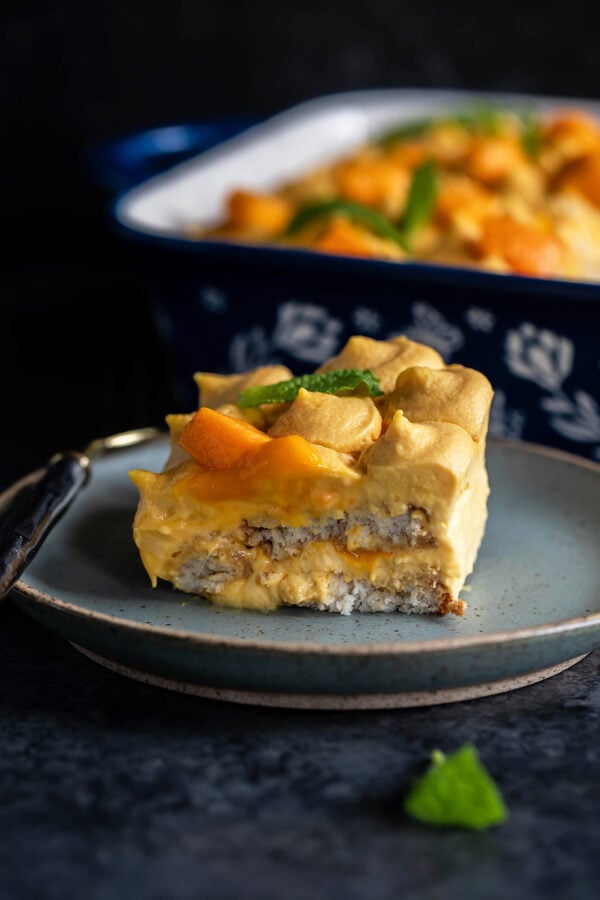
Inspired by the Indian fruit custard that I grew up eating, this Fruit Custard Icebox Cake has layers of whipped cream-custard mix, fresh fruits and parle-g biscuits. This no-bake cake is seriously refreshing, easy to put together and makes the perfect summer dessert.
My mom made fruit custard so often during summers in India. There were so many fruits in the market during that time of the year and it was possibly the easiest and quickest dessert she could make. A bowl of chilled fruit custard during those hot days definitely made for a special treat.
I still make it once in a while just to relive those days and for the nostalgia factor. This time around I thought of making it again but in a different way and share with you guys a different way to enjoy this childhood dessert. I am sure if you grew up in India in the 90s, you have fond memories of eating fruit custard and this fruit custard icebox cake takes that dessert to the next level.
For those who don’t know, icebox cakes are a form of no-bake cake which are perfect for summers. Well, they are not cake in the traditional sense but they use cookies/biscuits to create those cake layers. They are often made with whipped cream, nuts, wafers and fruits. It’s very simple to put together and makes a great summer dessert which you can make without turning on the oven.
This fruit custard icebox cake takes inspiration from the classic fruit custard and converts it into a cake with parle-g biscuits, a custard and cream filling and fresh fruits. One bite into it and it will take you back to those childhood days. At least it happened to me!
This Fruit Custard Icebox Cake
- is easy to make with few ingredients.
- is a no-bake cake which you can make without even turning on the oven.
- makes the perfect summer dessert.
- is refreshing and lightly sweetened.
- great for summer potlucks and parties.
- makes a great make ahead dessert.
This cake is very lightly sweetened and that’s the reason I think it’s so perfect for summers. That light cream with those fresh fruits, is exactly what I want in a summer dessert and this ticks all those boxes.
Ingredients
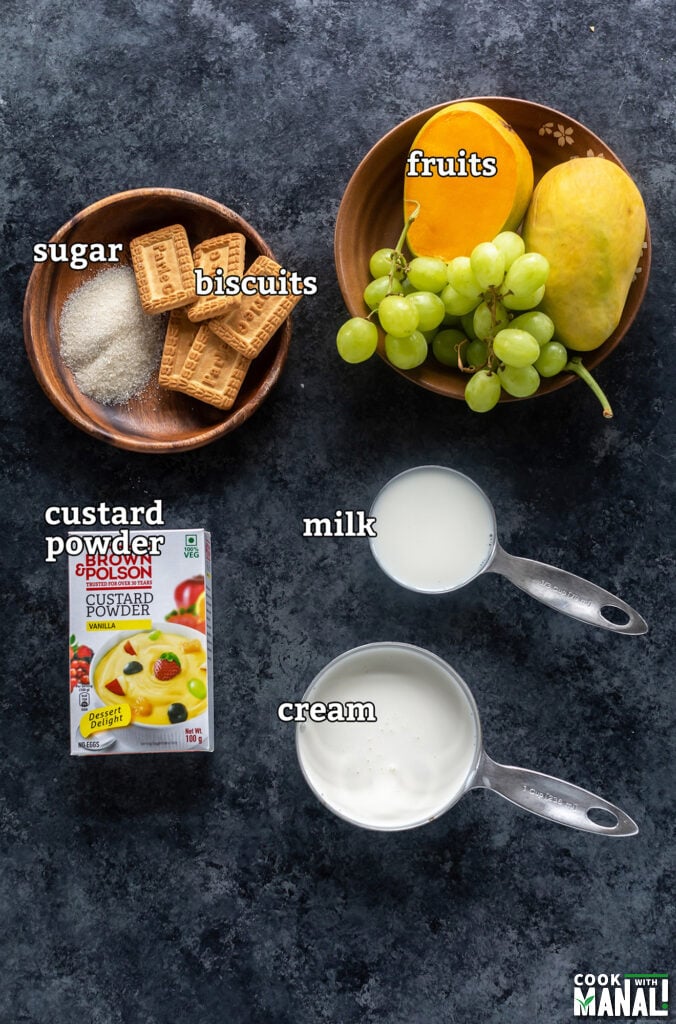
Custard powder: I grew up eating vanilla custard made from Brown Polson custard powder. And I am still very partial to that brand when making fruit custard. But of course, you can use any custard powder brand, Indian stores have tons of options.
Parle-g biscuits: for layering the cake, I used parle-g biscuits. Again a classic biscuit which I grew up eating, but you can use any cookie of choice. Other good options will be biscoff cookies, digestive biscuits.
Heavy cream: make sure that you use heavy cream which has a fat percentage of at least 35%. You will need it whip and then set well. I use a brand with 40% fat.
Fruits: you can use any fruits of choice. I used the one that I love most in my fruit custard- mango, banana and grapes. I would not recommend using apples, they will get brown quickly. Pomegranate will be nice too or strawberries.
Step by Step Instructions
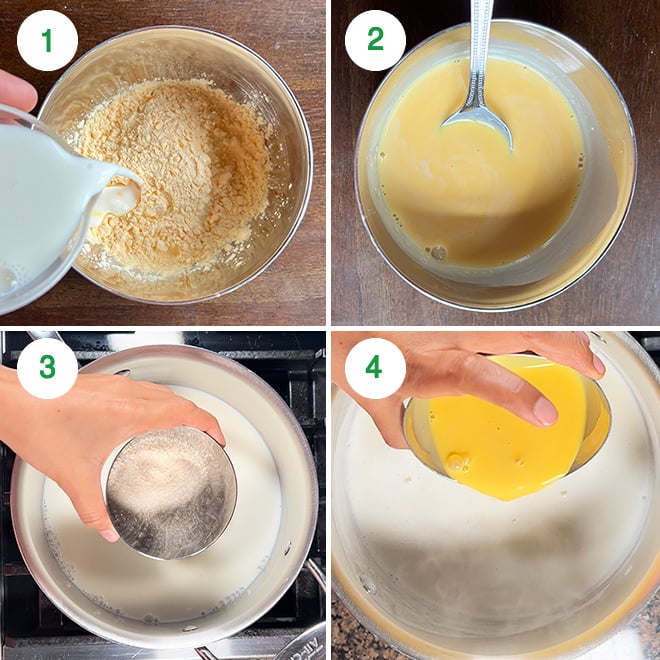
1- Make custard by following the instructions on the package. Add 2 & 1/2 tablespoons (25 grams) of custard powder to a bowl. Add 125 ml of milk (from 500 ml) to the bowl.
2- Stir and make a smooth paste. Set this aside.
3- Now, add the remaining 375 ml milk to a pan on medium high-heat and add 4 tablespoons sugar (50 grams) to it. Stir and bring it to a boil. Stir often so that milk doesn’t stick to the bottom of the pan. You can add an additional 1 tablespoon sugar here for sweeter custard.
4- Once milk comes to a boil, add the prepared paste to it and remove the pan from heat. Remember to whisk it before adding as the powder settles down at the bottom.
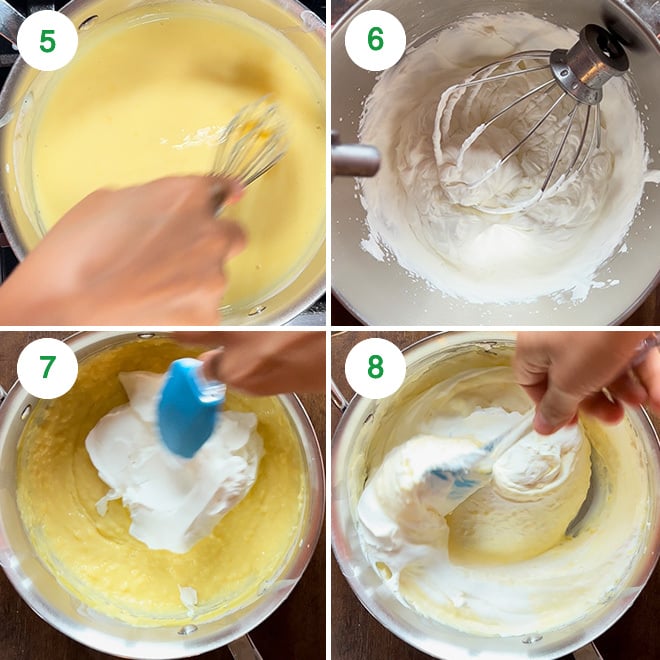
5- Whisk well using a wire whisk (so that there are no lumps) and then put the pan back on medium heat. Cook for 2 more minutes, stirring continuously until the custard thickens. Do not over-cook at this point else it will become too thick and custard will burn. Remove pan from heat. Let it cool down a little, then cover with a cling sheet and let it cool down in the refrigerator for 30 minutes.
6- Meanwhile, add 2 cups heavy cream to the steel bowl of your stand mixer (or use your hand mixer). Using the wire whisk attachment, beat the cream until it forms stiff peaks.
7- Take the custard out of the refrigerator. If it has thickened too much, you can always add a tablespoon or two of milk and stir it. Fold the whipped cream into the custard.
8- Add in 3 parts and fold well after each addition using a spatula until all of it is fully incorporated.
9- Now, we will start layering the cake. Take a 8×8 inch square pan (or any pan you have), and spread a thin layer of the custard-cream mixture at the bottom.
10- Arrange 15 parle-g biscuits over the top (1st layer of biscuits).
11- Followed by a thick layer of cream-custard mixture (1st layer of custard cream). In total we will have 3 thick layers of the cream custard mixture so divide it accordingly.
12- Then top with fruits, I used cut grapes, sliced bananas and chopped mangoes (1st layer of fruits). There will be 2 layer of fruits and final layer of fruits for top garnish, so divide accordingly
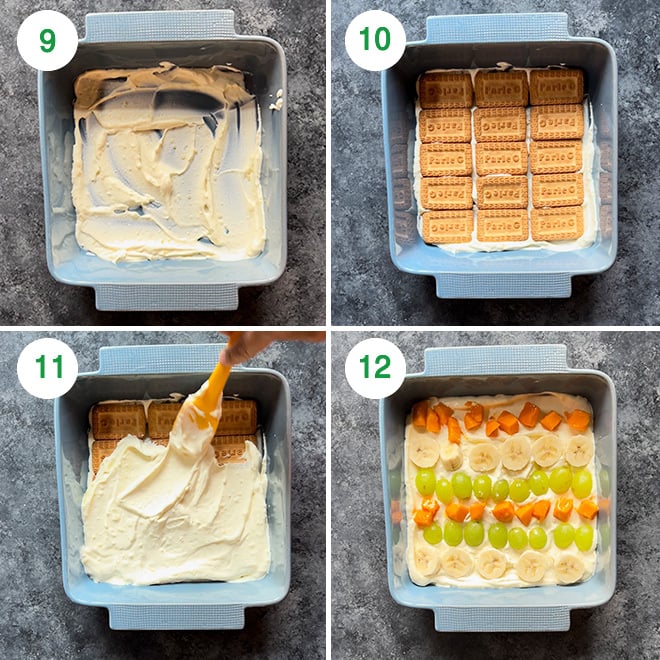
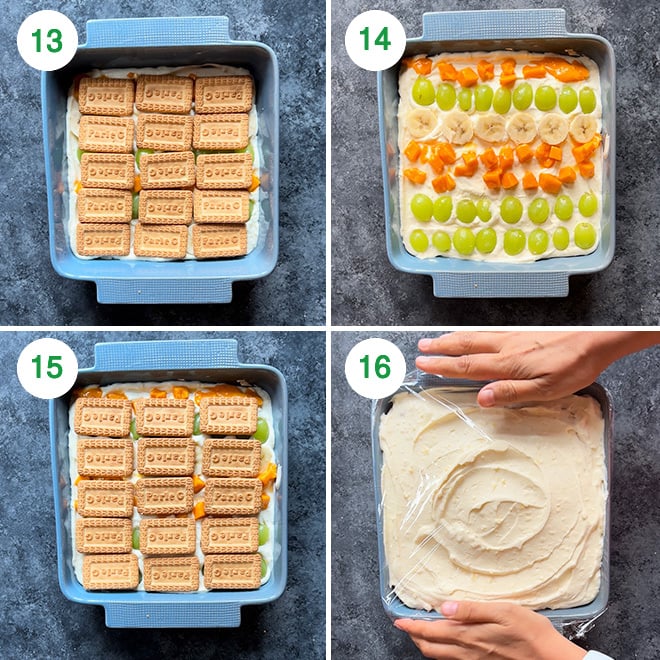
13- Followed by 15 more parle-g biscuits (2nd layer of biscuits).
14- Then layer of custard-cream (2nd layer of custard) and fruits (2nd layer of fruits).
15- Followed by the remaining 15 parle-g biscuits (3rd and final layer of biscuits).
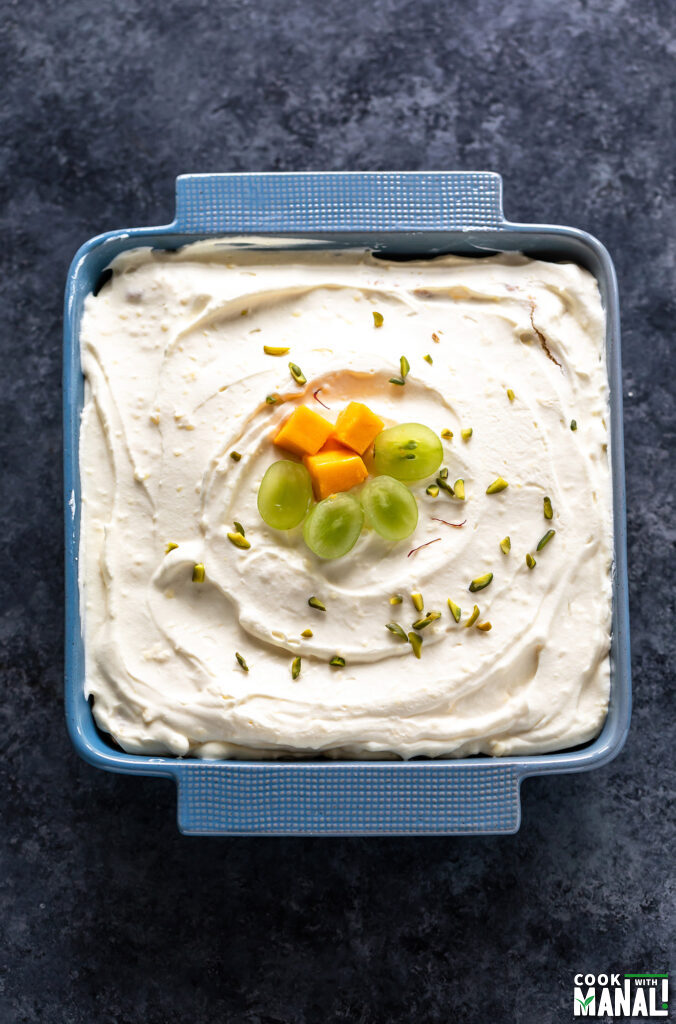
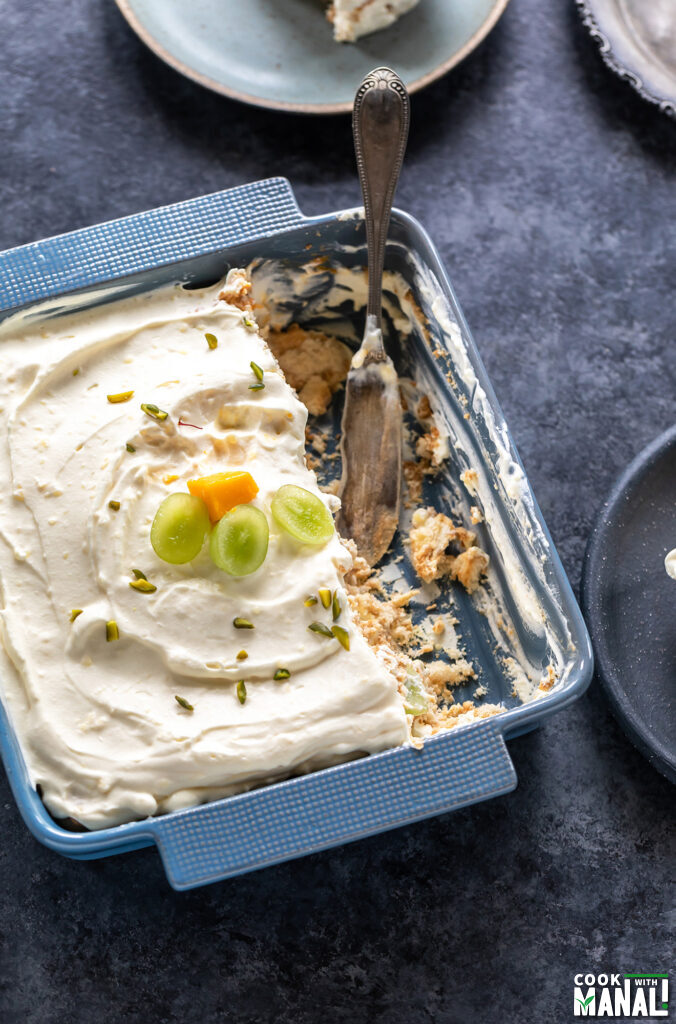
16- And finally layer of cream-custard (3rd and final layer of custard). Wrap the cake and put it in the refrigerator for 8 hours or overnight. Top with more fruits on top once it’s set. Slice when it’s cold and set and enjoy! You can garnish with chopped pistachios before serving.
Make Ahead
This is a great make ahead dessert. It needs at least 8 hours in the refrigerator so this is perfect for your party the next day. I would suggest keeping it refrigerated until it’s time to serve. Since this dessert is so heavy on whipped cream, it won’t hold well if you keep it outside in hot weather for too long.
Flavor It Up
I made this fruit custard icebox cake using vanilla custard powder. At Indian stores, you can find custard in various flavors like banana, strawberry etc. so you can use those flavors to change the flavor of the dessert.
Another great way to flavor it would be to add saffron to your custard or even thandai powder. You can also add different essence to your custard.
Using Other Cookies/Biscuits
I used parle-g, because one I love parle-g and it’s always in my pantry and two it just goes so well with that nostalgia factor. After all, it was one biscuit which I grew up eating.
But you can use any cookies you want, graham crackers work great. Digestives will also work well.
Tips & Notes
- This is a lightly sweetened dessert. Since we fold so much cream into the prepared custard, the sweetness really goes down. It was perfect for me but if you wish to make it sweeter, add more sugar while making the custard. Or you can also add some powdered sugar (icing sugar/confectioners sugar) while whipping the cream.
- Cookies/biscuits should cover the entire pan. Only then you will have layers. Fill any empty spaces while layering by breaking the biscuits into small pieces and then adding those pieces to those empty spaces.
- If you prefer cleaner slices, you can layer the pan with parchment paper first (with overhanging edges) and then layer the cake. When it’s time to serve, you can pull the entire cake out of the pan using the hanging parchment paper. That way you will get cleaner layers.
- You can top the cake with chopped nuts, saffron strands. You can even add chopped nuts in between the layers, it will give a nice crunch to the cake.
If you’ve tried this Recipe then don’t forget to rate the recipe! You can also follow me on Facebook, Instagram to see what’s latest in my kitchen and on YouTube to watch my latest videos.
Fruit Custard Icebox Cake
Ingredients
- 2 & 1/2 tablespoons custard powder, 25 grams, I use and recommend Brown Polson Vanilla Custard Powder
- 500 ml whole milk, divided
- 4 tablespoons sugar, 50 grams
- 2 cups heavy cream, 16 oz
- 45 parle-g bicsuits
- 2 medium bananas, sliced
- 2 mangoes, cut into cubes
- 20 grapes, cut in half
- chopped pistachios, saffron strands, to garnish
Instructions
- Make custard by following the instructions on the package. Add 2 & 1/2 tablespoons (25 grams) of custard powder to a bowl. Add 125 ml of milk (from 500 ml) to the bowl. Stir and make a smooth paste. Set this aside.
- Now, add the remaining 375 ml milk to a pan on medium high-heat and add 4 tablespoons sugar (50 grams) to it. Stir and bring it to a boil. Stir often so that milk doesn't stick to the bottom of the pan. You can add an additional 1 tablespoon sugar here for sweeter custard.
- Once milk comes to a boil, add the prepared paste to it and remove the pan from heat. Remember to whisk it before adding as the powder settles down at the bottom.
- Whisk well using a wire whisk (so that there are no lumps) and then put the pan back on medium heat. Cook for 2 more minutes, stirring continuously until the custard thickens. Do not over-cook at this point else it will become too thick and custard will burn. Remove pan from heat. Let it cool down a little, then cover with a cling sheet and let it cool down in the refrigerator for 30 minutes.
- Meanwhile, add 2 cups heavy cream to the steel bowl of your stand mixer (or use your hand mixer). Using the wire whisk attachment, beat the cream until it forms stiff peaks.
- Take the custard out of the refrigerator. If it has thickened too much, you can always add a tablespoon or two of milk and stir it. Fold the whipped cream into the custard.Add in 3 parts and fold well after each addition using a spatula until all of it is fully incorporated.
- Now, we will start layering the cake. Take a 8×8 inch square pan (or any pan you have), and spread a thin layer of the custard-cream mixture at the bottom.
- Arrange 15 parle-g biscuits over the top (1st layer of biscuits). Followed by a thick layer of cream-custard mixture (1st layer of custard cream). In total we will have 3 thick layers of the cream custard mixture so divide it accordingly.
- Then top with fruits, I used cut grapes, sliced bananas and chopped mangoes (1st layer of fruits). There will be 2 layer of fruits and final layer of fruits for top garnish, so divide accordingly
- Followed by 15 more parle-g biscuits (2nd layer of biscuits). Then layer of custard-cream (2nd layer of custard) and fruits (2nd layer of fruits).
- Followed by the remaining 15 parle-g biscuits (3rd and final layer of biscuits). And finally layer of cream-custard (3rd and final layer of custard). Wrap the cake and put it in the refrigerator for 8 hours or overnight.
- Top with more fruits on top once it's set. Slice when it's cold and set and enjoy! You can garnish with chopped pistachios and saffron strands before serving.
Notes
- This is a lightly sweetened dessert. Since we fold so much cream into the prepared custard, the sweetness really goes down. It was perfect for me but if you wish to make it sweeter, add more sugar while making the custard. Or you can also add some powdered sugar (icing sugar/confectioners sugar) while whipping the cream.
- Cookies/biscuits should cover the entire pan. Only then you will have layers. Fill any empty spaces while layering by breaking the biscuits into small pieces and then adding those pieces to those empty spaces.
- If you prefer cleaner slices, you can layer the pan with parchment paper first (with overhanging edges) and then layer the cake. When it’s time to serve, you can pull the entire cake out of the pan using the hanging parchment paper. That way you will get cleaner layers.
- You can top the cake with chopped nuts, saffron strands. You can even add chopped nuts in between the layers, it will give a nice crunch to the cake.
Nutrition
Nutrition information is automatically calculated, so should only be used as an approximation.
 Your feedback is valuable!Please share your comments, ratings, and any suggestions or adaptations below to help us improve and make our recipes more successful.
It’s lovely recipe,tempt to make it
Which measure cup have u used,200 ml or 250 ml?
Will do if v add little more or less cream to custard?
I used US standard cup where 1 cup is 8 oz (240 ml). I have mentioned all ingredients in grams/oz as well.