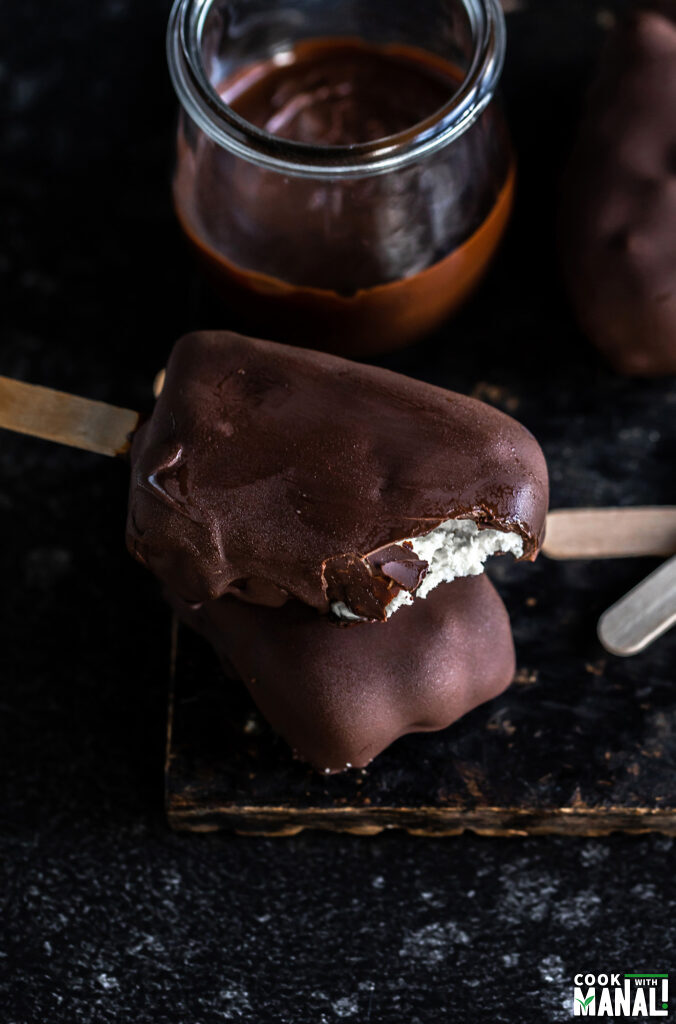
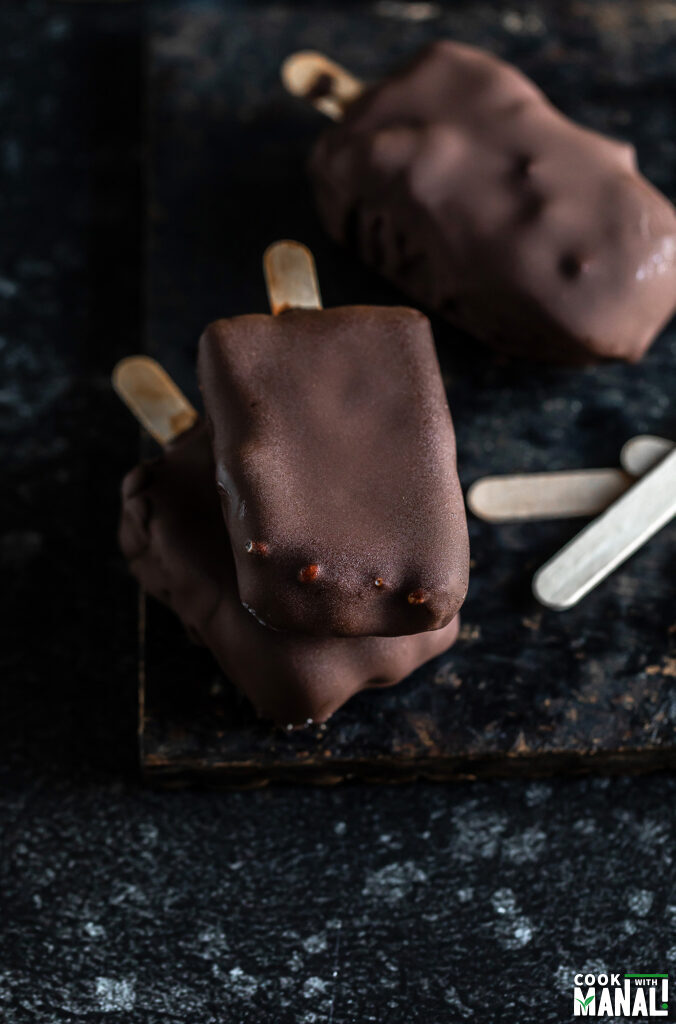
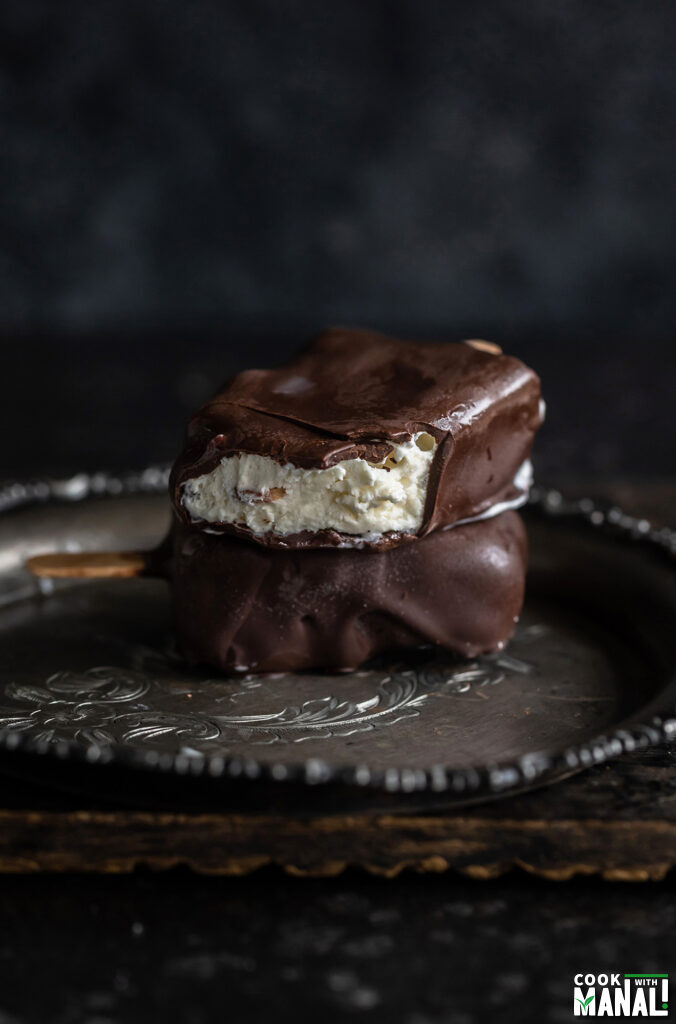
Beat the heat with this homemade Choco Bar Ice Cream. Soft vanilla ice cream bars dipped in chocolate makes the ultimate summer treat. Keep them plain or roll in nuts for added texture!
Which ice cream immediately takes you to your childhood days? For me it is Choco bar and Feast! For those who grew up in India during the 90s would totally get what I am talking about. That ice cream cart vendor selling choco bar, mango twist, cornetto and feast would be my favorite person during summers.
We would get money from mom once in a while to enjoy those summer treats and he would relish them so much. Oh, the simple joys of life back then! I feel like we miss out on so many simpler things now. I have always loved chocolate and needless to say I always picked choco bars and feast over other ice cream like butterscotch, mango etc.
For the nostalgia factor and also because I love choco bars, I decided to make these at home and let me tell you, these turned out everything I expected and more!
There’s this creamy soft serve like vanilla ice cream dipped in some delicious real chocolate. It really can’t be better than this for a summer treat!
What is Choco Bar?
These are vanilla ice cream on a stick and dipped in chocolate. They can also be dipped in chocolate and then coated with nuts. In the US, they are very similar to the Magnum ice cream bars that you find at grocery stores.
I would usually get the one with nuts whereas my brother would always choose the plain ones. Either way, they were all delicious. Now, I see plenty of flavors even in choco bar like caramel etc. but back then we only had the plain ones, the vanilla dipped in chocolate.
This Homemade Choco Bar Ice Cream
- tastes exactly your favorite choco bar ice cream!
- made without any preservatives.
- easy to make at home with few ingredients.
- makes the best summer treat.
Ingredients
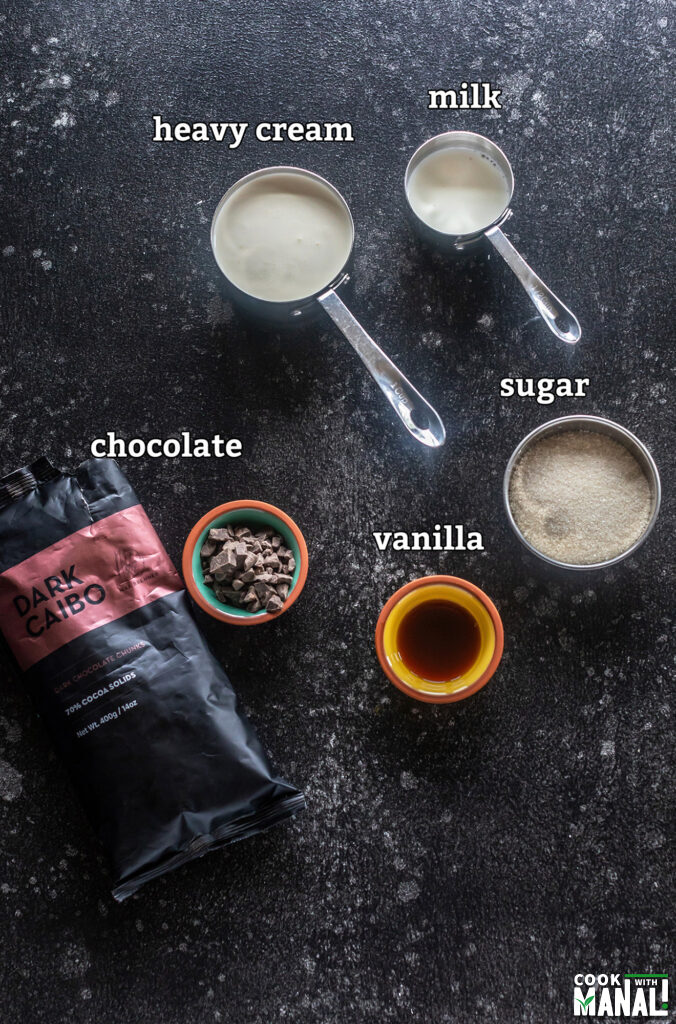
Whole milk: we basically use milk in this recipe to make evaporated milk and for that whole milk works best. You should not use fat-free milk as that will decrease the fat percentage in the ice cream and affect the texture. So, use full-fat whole milk here.
Heavy cream: again, use real heavy cream with a fat percentage of at least 35%. Do not use Amul cream which we get in India, it’s a low fat cream and will not give the best results.
Vanilla: choco bars are flavored with a simple vanilla flavor and so I have used pure vanilla extract. If you want to make it more fun, you can definitely use other flavors like butterscotch, almond etc.
Sugar: to sweeten the ice cream base, I have used sugar. You can adjust the amount of sugar to taste. You can also use condensed milk if you have that on hand.
Chocolate: for dipping the ice cream bars, I have used real dark chocolate with 70% real cocoa. Definitely use good quality real chocolate here. If you are using a sweet chocolate like milk chocolate, I would reduce the amount of sugar in the ice cream base and use 67 grams (1/3 cup) only.
Fat Content in This Recipe
When testing this recipe, I wanted a creamy almost soft serve like ice cream inside. I could have very well made the classic no churn vanilla ice cream with heavy cream and condensed milk and that would have worked too. But that wouldn’t have the sweet milky flavor that this choco bar does because of reducing the milk and then using that in addition to the ice cream.
Addition of evaporated milk (thickened milk) lowers the fat percentage of this ice cream a little than the 100% heavy cream based ice creams. It also gives it a milky texture and flavor. If you don’t want to reduce the milk (which I strongly suggest you do), you can straight away add around 250 ml of evaporated milk. In that case I would use condensed milk in place of sugar in the recipe.
Dipping Chocolate
It’s important to use the right chocolate for dipping these choco bar. You have two options here:
- Use real chocolate and mix it with oil: this makes the magic shell which hardens immediately and works perfectly well here. Use real good chocolate for the best flavor. I used Max Brenner Dark Caibo (dark chocolate chunks) which works like a charm for this recipe. Most people make the magic shell with coconut oil but I used avocado oil which is odorless and neutral in taste because I didn’t want my choco bar to have any extra flavor.
If you don’t want to use oil at all, that will work too. But you will need to first temper the chocolate. Search articles on “how to temper chocolate” and then use that tempered chocolate for dipping the bars.
- Use melting wafers/candiquik: this is another option which works for dipping. These are not real chocolate and need to be tempered. Just melt them and use in the recipe. My favorite are the melting wafers from Ghirardelli. You can use these but I would recommend going with the chocolate first. That true chocolate flavor is important for the choco bar.
Freeze It Little Longer
The ice cream base for this ice cream takes a little longer to freeze than the usual no-churn ice creams. So, I would say give this 24 hours. It also begins to melt quickly so once you have it out of the refrigerator, you have to dip in the chocolate quickly. I usually do 1 choco bar at a time and keep the remaining the freezer while I do so.
Step by Step Instructions
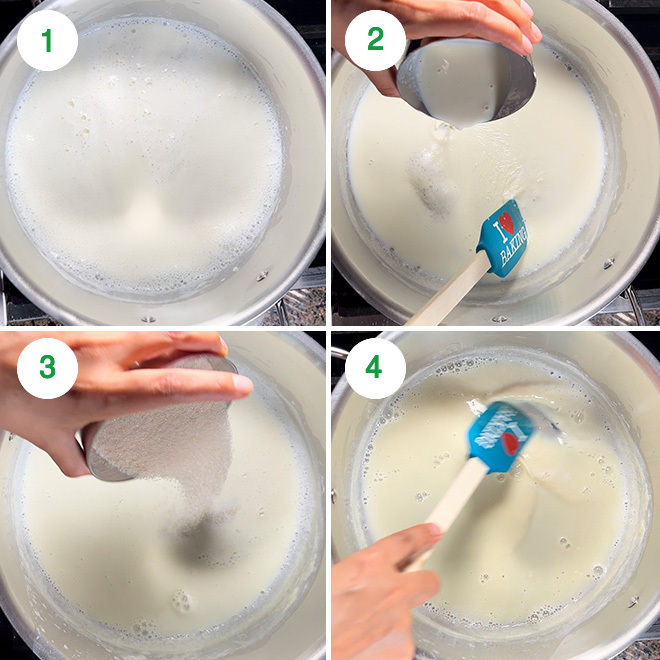
1- Add 500 ml whole milk to a pan on medium-high heat. Stir often and let it come to a boil which will take around 4 to 5 minutes. When it comes to a boil, lower the heat to low-medium.
2- Let it simmer on low for 10 minutes, then add 1 tablespoon of milk powder to it. I mixed the powder with a little bit of milk (hot milk from the pan) in a small bowl before adding it so that it dissolves easily. Stir and let simmer 5 more minutes,
3- Then, add the sugar. You can add anywhere between 1/3 cup (67 grams) to 1/2 cup (100 grams) sugar. If you are using milk chocolate for dipping the bars, I would suggest using 1/3 cup. If using dark chocolate use 1/2 cup. Stir and let the sugar dissolve.
4- Cook 3-5 more minutes. In the end, we want milk to be reduced to half which is 250 ml. This took around 15 to 20 minutes. Remove the pan from heat. Your thickened/evaporated milk is now ready. Let it cool down to room temperature.
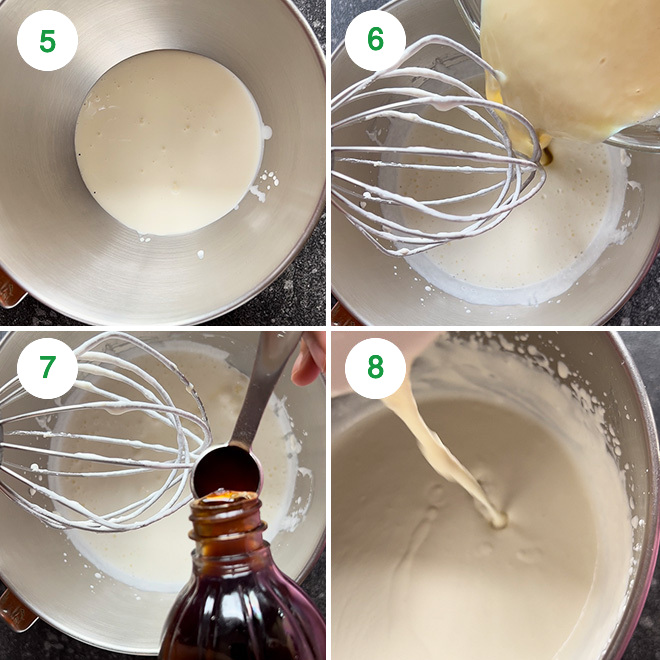
5- Add 1 & 1/2 cups heavy cream to the steel bowl of your stand mixer (or use your stand mixer). Beat the cream using the wire whisk attachment on medium speed for 1 minute. We don’t want any peaks here, just beating it a little.
6- Then add the prepared evaporated milk to the cream.
7- Also, add 1 teaspoon of vanilla.
8- Now, again beat the mixture on medium speed for around 2 minutes. We are not looking for any peaks here, just the mixture should become thick and creamy. You can see the consistency of the mixture in the photo below. This consistency gives that creamy texture to the ice cream bar.
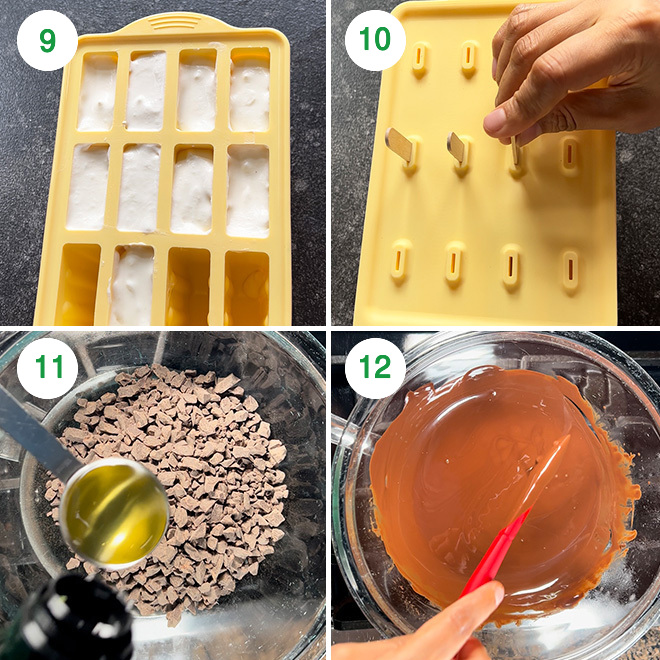
9- Pour the prepared mixture into the ice cream mold.
10- Cover and then insert wooden ice cream sticks in each compartment. If your mold doesn’t have space for inserting ice cream molds, cover with an aluminum foil and then make small slits with a knife and then insert the sticks through that space. Freeze 24 hours.
11- Once ice cream bars are frozen, prepare the dipping chocolate before taking it out of the freezer. I have used dark chocolate here with 70% cocoa solids. Place chocolate into a bowl and place it over a pot of simmering water. The bottom of the bowl (with chocolate) should not touch the surface of water. This is called the double boiler method for boiling the chocolate.
Add around 5 tablespoons of oil, I added avocado oil. You can use coconut oil as well.
12- Stir and let the chocolate melt completely. Remove bowl from heat and let it cool down a little to room temperature. Then transfer it to a tall glass so that you can easily dip the entire bar into the chocolate.
13- Take the mold out of the freezer. This ice cream melts quickly so there’s no need to run it under warm water. I usually just run a knife around and then pull gently. It should come out. If not, then you can place the mold under running warm water for a few seconds and then try again. Meanwhile, place a sheet of parchment paper over a baking tray and keep it ready.
14- Dip the frozen bar into the melted chocolate. Dip it completely so that it gets coated from all sides. Make sure chocolate isn’t hot when you dip the bar into it.
15- Remove the bar from the glass and hold it over that sheet of parchment paper so that all the excess chocolate drips there. Hold it for a minute or two until the chocolate dries off and sets. Since, we have added oil and created a magic shell, this will solidify pretty quickly. Do not place the choco bar on that parchment paper before the chocolate has set else it won’t get a smooth finish. Once set, place it on parchment paper and proceed with dipping more bars.
This is the plain choco bar.
16- If you want to make it with nuts, first dip the ice cream bar into the chocolate. Then take it out, sprinkle it with nuts (chopped almonds) immediately. Let the chocolate set and then dip it in chocolate again. This way you will have a nutty choco bar. If you want, you can even skip the second dipping in chocolate and just let it be garnished with nuts. Make all choco bars similarly.

Important Tips
- Use good quality chocolate: using good quality chocolate is crucial to how your final choco bar will taste. So use a very good tasting chocolate. I used dark chocolate from Max Brenner which was really good. You can use either dark or milk chocolate.
- If you don’t want to use oil while melting the chocolate, you can simply use plain chocolate. But remember to temper the chocolate in that case. Without tempering, the chocolate would melt and not set completely and you will have a problem dipping your choco bar.
- Another easy way to dip a choco bar is using melting wafers or candyquik. But again, use a good quality one, my recommendation is to use Ghiradelli melting wafers.
- If you don’t want to thicken the milk, you can straight away use around 250 ml of evaporated milk. l definitely recommend to cook and thicken the milk though, that makes the ice cream really delicious.
If you’ve tried this Recipe then don’t forget to rate the recipe! You can also follow me on Facebook, Instagram to see what’s latest in my kitchen and on YouTube to watch my latest videos.

Choco Bar Ice Cream
Ingredients
- 500 ml whole milk
- tablespoon milk powder, 10 grams
- 1/3-1/2 cup sugar, to 67-100 grams, to taste. For sweeter chocobar use 100 grams
- 1 & 1/2 cups heavy cream
- 1 teaspoon vanilla
For Dipping The Ice Cream
- 400 grams chocolate, I use 70% cocoa, you can use sweeter chocolate
- 5 tablespoons oil, I used avocado oil, can use coconut oil or vegetable oil
Instructions
- Add 500 ml whole milk to a pan on medium-high heat. Stir often and let it come to a boil which will take around 4 to 5 minutes. When it comes to a boil, lower the heat to low-medium.
- Let it simmer on low for 10 minutes, then add 1 tablespoon of milk powder to it. I mixed the powder with a little bit of milk (hot milk from the pan) in a small bowl before adding it so that it dissolves easily. Stir and let simmer 5 more minutes,
- Then, add the sugar. You can add anywhere between 1/3 cup (67 grams) to 1/2 cup (100 grams) sugar. If you are using milk chocolate for dipping the bars, I would suggest using 1/3 cup. If using dark chocolate use 1/2 cup. Stir and let the sugar dissolve.Cook 3-5 more minutes. In the end, we want milk to be reduced to half which is 250 ml. This took around 15 to 20 minutes. Remove the pan from heat. Your thickened/evaporated milk is now ready. Let it cool down to room temperature.
- Add 1 & 1/2 cups heavy cream to the steel bowl of your stand mixer (or use your stand mixer). Beat the cream using the wire whisk attachment on medium speed for 1 minute. We don't want any peaks here, just beating it a little.
- Then add the prepared evaporated milk to the cream. Also, add 1 teaspoon of vanilla. Now, again beat the mixture on medium speed for around 2 minutes. We are not looking for any peaks here, just the mixture should become thick and creamy. You can see the consistency of the mixture in the photo below. This consistency gives that creamy texture to the ice cream bar.
- Pour the prepared mixture into the ice cream mold. Cover and then insert wooden ice cream sticks in each compartment. If your mold doesn't have space for inserting ice cream molds, cover with an aluminum foil and then make small slits with a knife and then insert the sticks through that space. Freeze 24 hours.
- Once ice cream bars are frozen, prepare the dipping chocolate before taking it out of the freezer. I have used dark chocolate here with 70% cocoa solids. Place chocolate into a bowl and place it over a pot of simmering water. The bottom of the bowl (with chocolate) should not touch the surface of water. This is called the double boiler method for boiling the chocolate.
- Add around 5 tablespoons of oil, I added avocado oil. You can use coconut oil as well. Stir and let the chocolate melt completely. Remove bowl from heat and let it cool down a little to room temperature. Then transfer it to a tall glass so that you can easily dip the entire bar into the chocolate.
- Take the mold out of the freezer. This ice cream melts quickly so there's no need to run it under warm water. I usually just run a knife around and then pull gently. It should come out. If not, then you can place the mold under running warm water for a few seconds and then try again. Meanwhile, place a sheet of parchment paper over a baking tray and keep it ready.
- Dip the frozen bar into the melted chocolate. Dip it completely so that it gets coated from all sides. Make sure chocolate isn't hot when you dip the bar into it.
- Remove the bar from the glass and hold it over that sheet of parchment paper so that all the excess chocolate drips there. Hold it for a minute or two until the chocolate dries off and sets. Since, we have added oil and created a magic shell, this will solidify pretty quickly. Do not place the choco bar on that parchment paper before the chocolate has set else it won't get a smooth finish. Once set, place it on parchment paper and proceed with dipping more bars.This is the plain choco bar.
- If you want to make it with nuts, first dip the ice cream bar into the chocolate. Then take it out, sprinkle it with nuts (chopped almonds) immediately. Let the chocolate set and then dip it in chocolate again. This way you will have a nutty choco bar. If you want, you can even skip the second dipping in chocolate and just let it be garnished with nuts. Make all choco bars similarly.
Notes
- Use good quality chocolate: using good quality chocolate is crucial to how your final choco bar will taste. So use a very good tasting chocolate. I used dark chocolate from Max Brenner which was really good. You can use either dark or milk chocolate.
- If you don’t want to use oil while melting the chocolate, you can simply use plain chocolate. But remember to temper the chocolate in that case. Without tempering, the chocolate would melt and not set completely and you will have a problem dipping your choco bar.
- Another easy way to dip a choco bar is using melting wafers or candyquik. But again, use a good quality one, my recommendation is to use Ghiradelli melting wafers.
- If you don’t want to thicken the milk, you can straight away use around 250 ml of evaporated milk. l definitely recommend to cook and thicken the milk though, that makes the ice cream really delicious.
Nutrition
Nutrition information is automatically calculated, so should only be used as an approximation.
 Your feedback is valuable!Please share your comments, ratings, and any suggestions or adaptations below to help us improve and make our recipes more successful.