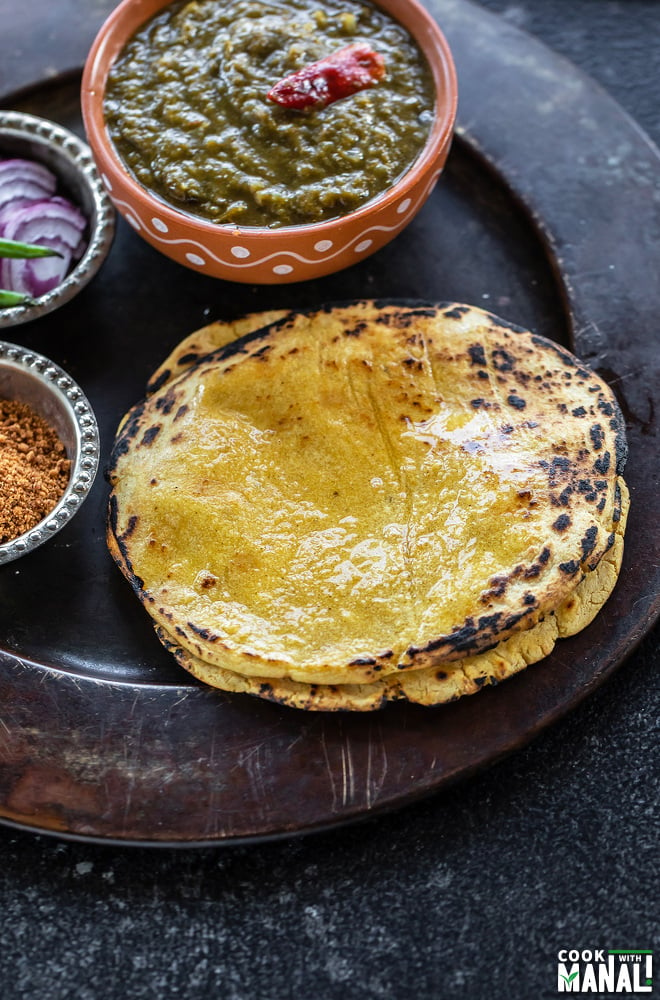
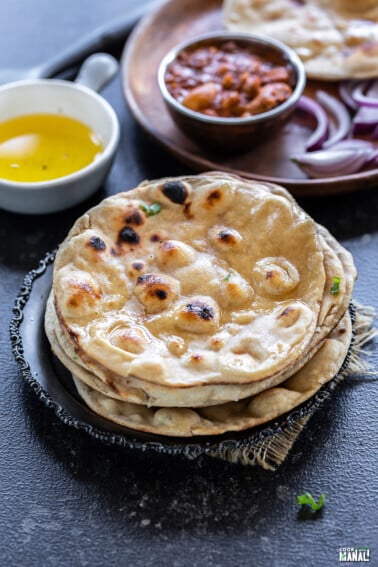
Makki Ki Roti – a winter staple in North India. This flatbread is gluten-free and is made with corn flour.
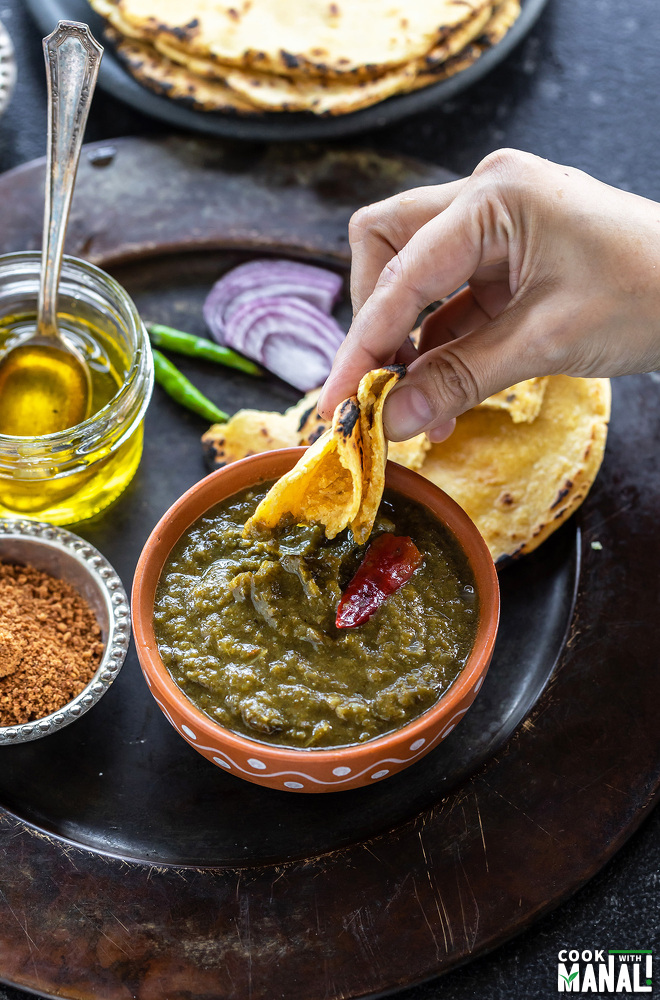
The roti is traditionally served with Sarson ka saag! It’s one of my favorite things to enjoy in winters.
Disclosure: This post contains affiliate links. For more information on my Affiliate and Advertising Policy, please click here.
Few things are so traditionally associated with winters in Delhi.
Like aloo methi, methi paratha, gajar halwa or makki ki roti and saag!
Whenever I make sarson ka saag, I always make makki ki roti along with.
It’s like I can’t have the saag with my normal roti or rice. I need the makki roti.
However in spite of me making the roti several times, I didn’t want to share the recipe until I perfected it.
What is Makki ki Roti
It’s a flatbread made with makki atta (maize flour).
It is gluten-free and served with saag.
The basic recipe only involves kneading the dough and making rotis from it.
As a variation, greens like methi (fenugreek), spinach are often added to it. Such rotis with added greens are also served as such for breakfast.
I love them with a dollop of butter and cup of masala chai.
Makki ki roti can be little tricky to make. It uses makki ka atta (maize flour/corn flour) which is a gluten-free flour and as with any gluten-free flour, the trick lies in rolling and cooking it properly.
On paper, the recipe looks simple. But you need some practice in order to roll these rotis without breaking them.
I have learned several tips along with way and I am happy to share them with you today.
Tips to Make Perfect Makki ki Roti
Use the right flour: don’t confuse! in India you would often find corn flour which is not maize flour. It’s white in color and is actually cornstarch. You don’t use that for makki ki roti.
Here in the US, you do get yellow corn flour which is in fact maize flour. And you can very well use it for making makki roti.
Knead with hot water: for me hot water works best to knead the dough. It makes the rotis pliable and easy to roll.
Some people like using lukewarm water, I think it would depend on the type of flour. Here in the US with the flour that I get, hot water (though not boiling) works best.
Add water little by little in the beginning and then let the flour sit for 5 minutes before kneading.
This way flour absorbs water and rotis are softer.
Knead the dough balls again before rolling them: once you have kneaded the dough, you make dough balls from it.
Before you start rolling the dough balls, knead them again using the heel of your palm.
This again makes the dough pliable and easy to roll.
Grease your hands with water while rolling them: this helps in the rotis not stick to your hands as you press/flatten them.
Shape into a roti using a parchment paper: so what I do is that I first flatten the dough ball a bit using my palms.
And then I transfer it to a parchment paper and then press more until it becomes a round of 7 to 8 inches diameter.
Parchment paper makes the whole process super easy, there’s no sticking!
Keep heat of the tawa on medium: these rotis are little thick and hence need to be cooked well on medium heat.
Add atta (whole wheat flour) to make the rolling easier: if you want to simplify the rolling process, you can add some wheat flour to the dough.
The rotis won’t be gluten-free then, so keep that in mind. But the rolling becomes so much easier!
Method
1- In a bowl mix together makki ka atta, salt and ajwain.
2- Start adding water, little by little. Mix to incorporate the hot water into the flour.
3- Add around 1 1/4 (10 oz) cups at this point, you may do this with a spoon and leave it for 5 minutes.
Don’t knead the dough at this point. Leave it for 5 minutes.
4- After 5 minutes, add more hot water (remaining 1/4 to 1/2 cup) little by little and start kneading.
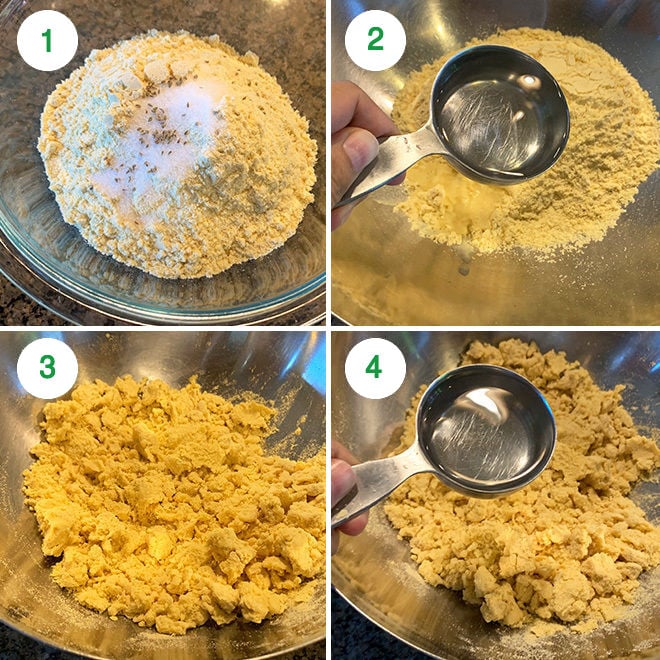
5- Knead to form a soft dough. You may need more or less water depending on the type of flour you have.
Let the dough rest for 10 mins then divide dough into 6 equal parts (around 90-95 grams each).
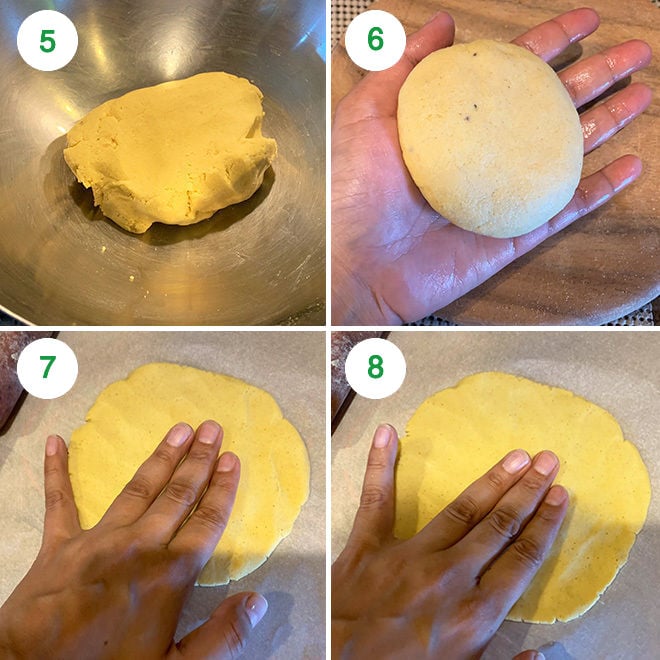
6- Take one dough ball and wet you hands with hot water. Using the heel of your hand knead the dough ball again. This will make the dough pliable.
Now roll the dough between you hands by moving the top hand in circular motion (remember to grease your hands with water).
I roll like this until I have a circle of around 2.5 inches diameter.
7- At this point, I transfer the dough to a sheet of parchment paper. Remember to have some anti-slip sheet beneath the parchment so that it doesn’t slip as you roll the roti.
Using wet hands again start rolling the roti on the parchment paper. Keep pressing and patting the dough and move the parchment paper around to roll it from all sides.
You don’t have to roll it thin, it should be little thick.
8- You may use a rolling pin too here, whatever you prefer. I just do with my hands since I like the look of the rotis better when I pat and roll with hands. Roll until it reaches a diameter of 7-8 inches.
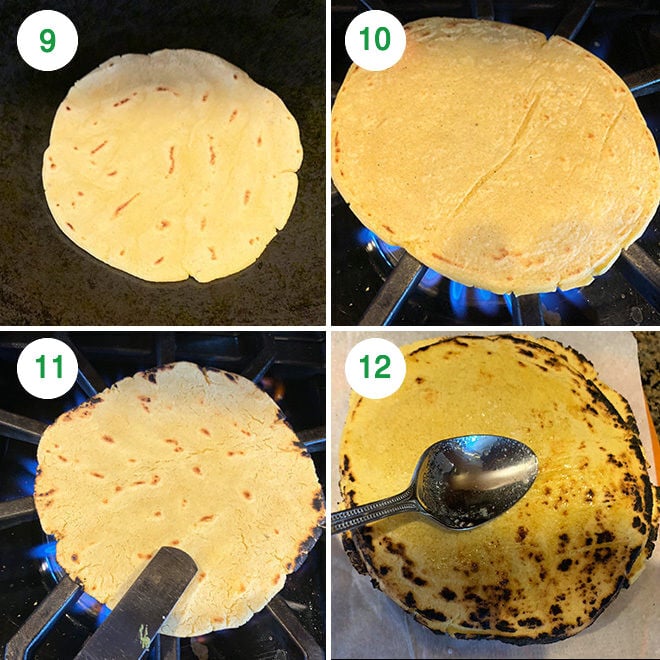
9- Heat a tawa on medium heat and place the rolled roti on it. You may add little oil or ghee to the tawa before you place the roti on it.
If you are afraid that it will break while you lift it from the parchment paper, simply put the roti with the paper directly on the tawa (with the paper side up) and then carefully peel the parchment paper from the top.
Cook until one side has brown spots on it and then flip and cook the other side as well.
10 & 11- Once my roti is cooked, I like to transfer it directly on heat to give it that charred look. I roast from both side until it gets little charred.
This step is optional and you may skip it.
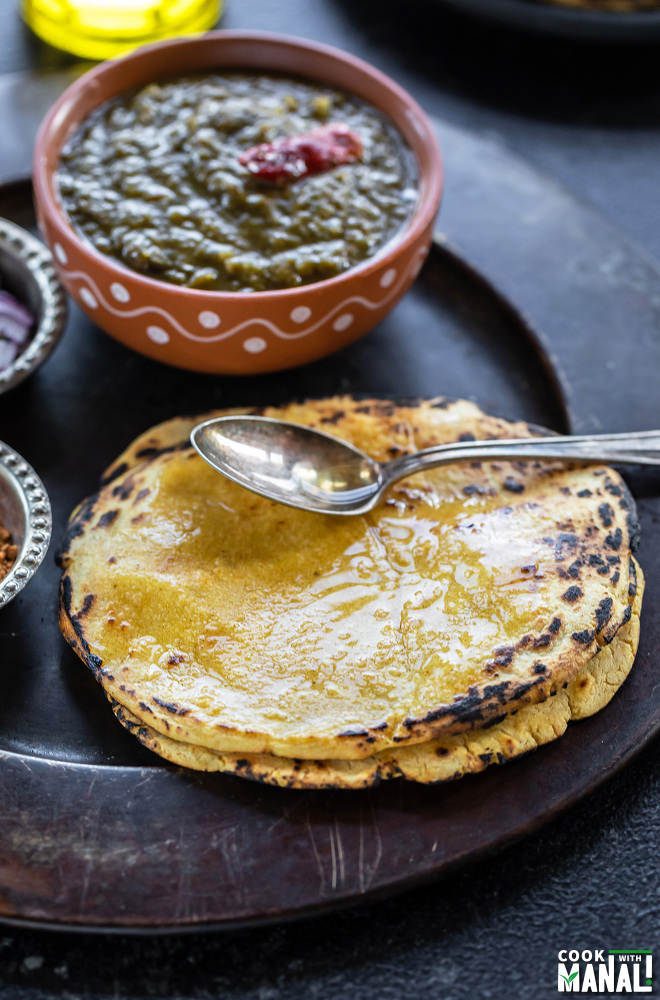
12- Cook all the rotis similarly. Apply ghee on rotis before serving.
Serve Makki ki Roti with sarson ka saag, butter and jaggery. Yum!
If you’ve tried this Makki Ki Roti Recipe then don’t forget to rate the recipe! You can also follow me on Facebook and Instagram to see what’s latest in my kitchen!

Makki ki Roti
Ingredients
- 2 cups makki atta, maize flour/corn flour, 250 grams
- 1/2 teaspoon salt
- pinch ajwain, carom seeds
- hot water, as needed to knead the dough and roll the roti, around 1.5-1.75 cups
Instructions
- In a bowl mix together makki ka atta, salt and ajwain.
- Start adding water, little by little. Mix to incorporate the hot water into the flour. Add around 1 1/4 (10 oz) cups at this point, you may do this with a spoon and leave it for 5 minutes.Don't knead the dough at this point. Leave it for 5 minutes.
- After 5 minutes, add more hot water (remaining 1/4 to 1/2 cup) little by little and start kneading.
- Knead to form a soft dough. You may need more or less water depending on the type of flour you have.Let the dough rest for 10 mins then divide dough into 6 equal parts (around 90-95 grams each).
- Take one dough ball and wet you hands with hot water. Using the heel of your hand knead the dough ball again. This will make the dough pliable.Now roll the dough between you hands by moving the top hand in circular motion (remember to grease your hands with water).I roll like this until I have a circle of around 2.5 inches diameter.
- At this point, I transfer the dough to a sheet of parchment paper. Remember to have some anti-slip sheet beneath the parchment so that it doesn't slip as you roll the roti.
- Using wet hands again start rolling the roti on the parchment paper. Keep pressing and patting the dough and move the parchment paper around to roll it from all sides.You don't have to roll it thin, it should be little thick.You may use a rolling pin too here, whatever you prefer. I just do with my hands since I like the look of the rotis better when I pat and roll with hands. Roll until it reaches a diameter of 7-8 inches.
- Heat a tawa on medium heat and place the rolled roti on it. You may add little oil or ghee to the tawa before you place the roti on it.If you are afraid that it will break while you lift it from the parchment paper, simply put the roti with the paper directly on the tawa (with the paper side up) and then carefully peel the parchment paper from the top.
- Cook the roti until one side has brown spots on it and then flip and cook the other side as well.
- Once my roti is cooked, I like to transfer it directly on heat to give it that charred look. I roast from both side until it gets little charred.This step is optional and you may skip it.
- Cook all the rotis similarly. Apply ghee on rotis before serving.
- Serve Makki ki Roti with sarson ka saag, butter and jaggery. Yum!
Notes
- If you want it to be little easier to roll these makki roti, you can replace 1/2 cup of the makki atta with regular whole wheat atta.
- To make these rotis vegan, skip applying the ghee on the rotis at the end or you can apply oil. They are naturally gluten-free.
Nutrition
Nutrition information is automatically calculated, so should only be used as an approximation.
 Your feedback is valuable!Please share your comments, ratings, and any suggestions or adaptations below to help us improve and make our recipes more successful.

Thank you for this recipe – very clearly written and easy to follow, turned out very nice!
Thanks for trying Jalpa!
Can you tell me the American brand of maize flour I don’t have Indian store near my place in US
sorry I have never bought makki ka atta from American grocery store, so I can’t say.
You mentioned maize , I have maize , is maize good or corn meal .many yrs back when I was in New Jersey I bought , a brand I think sher with lion picture on it but that makki atta I think was not good maybe I was new to cooking dint make properly, I am not Punjabi
the one with lion picture is actually good, I think it’s the BRAR brand and commonly available in the US. You need yellow corn flour or maize flour for this recipe. Look for maize flour, you can also use masa harina (mexican/spanish flour which you will find at American grocery stores) but the taste and texture will be a little different.
Was missing my Mum’s Makki di roti. Suprisingly have never made it myself as Mum used to make them whenever we visited my Nani and it was her favourite food. I thought of them this morning and decided I need to try it this Diwali and I am so happy. It came out delicious with butter, mint chutney and a home made ginger, lime and green chilli pickle. Thanks for sharing this recipe brought back beautiful memories💖
thanks for trying Sangeeta, Happy Diwali!
How long do you knead for? I know I did something wrong and want to try again sometime.
just until it comes together, try to knead using the heel of your palm
Thanks a ton for a much needed recipe
Amazing!! Sooo delicious.. however I hd a little prob with the technic.. wil get beta with practice I guess💖 Thank u doll for the lovely recipe🤗
I use a tortilla press make dough ball place it in press cling film top and bottom n its much easier then by hand and way faster to
This is a fantastic recipie and your tips were invaluable as this is only the second time I’ve tried to make this and the rotis were a real success. Tried a different recipe a few years back and it was so disastrous that I gave up after attempting the 2nd or 3rd roti and it taken me a few years to even consider making this dish again. So thank you for your version which really does work!!
glad to know!
hi Manali
when I’m trying its turning white from one side , I see the same in your pictures , do you know what can be done to fix it ?
Hi Aman what do you mean by it’s turning white? might just be the flour you are using.
This was spot on perfect.i was scared to try it but turned on so well along with sarson Ka saag
glad to know 🙂
Hi! Manali what brand of corn flour did you use ? I live in Chciacgo so probably I can find something similar to what you used . Thanks in advance .
hmm now I can’t remember 🙂 maybe it was 24 mantra
Hi Manali! I would like to try to make this, but I am a bit lost concerning which flour I should use. I live in Europe and I have two things in hand. The first one is cornstarch: also called maizena, it’s a very thin white powder which is used as a thickener. The second one is corn flour: also thin but less thin that the previous, yellow. Polenta is usually a bit more coarse, but I don’t have it. Could you please advise on which one I should use among my two options? Thank you!
use the corn flour, yellow color one.
I am of Indian descent (from the Caribbean), so I have made paratha roti and dosti roti, but never these. They are DELICIOUS! Thank you for your detailed recipe.
welcome!