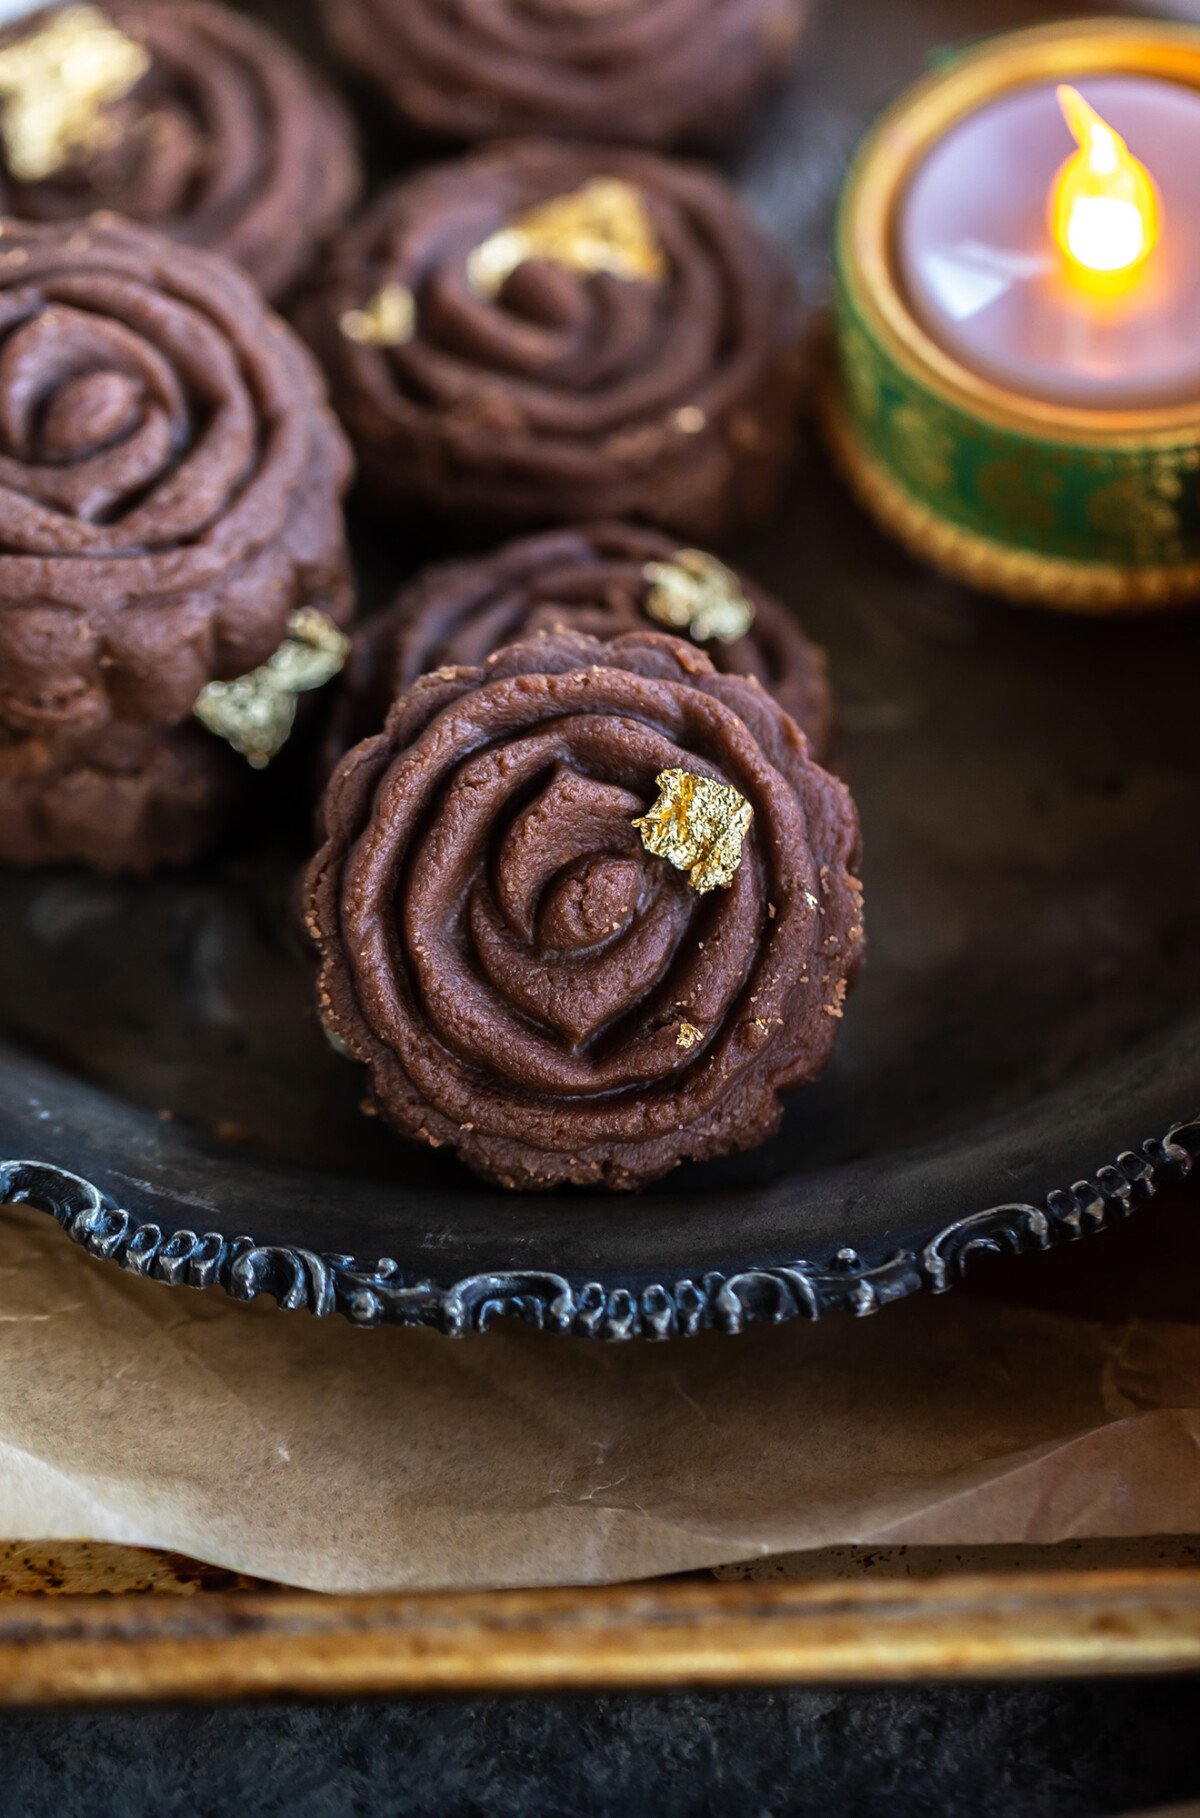
This Nutella Peda is a sweet fudge made with mawa (dried milk solids) and nutella. This mithai is easy to make requiring only around 15 minutes of cooking time. Perfect to make for the festive season and also for gifting your friends and family.
Hazelnut and chocolate is a match made in heaven and I am a big fan of this combination. I even made Sarvesh’s birthday cake last year with the same flavors. If you are a fan of this combination like me then you are going to love making this Nutella Peda for the festivities. This recipe is easy to make and needs only 15 minutes of cooking time. Pedas are generally made with mawa/khoya (dried milk solids) or milk powder.
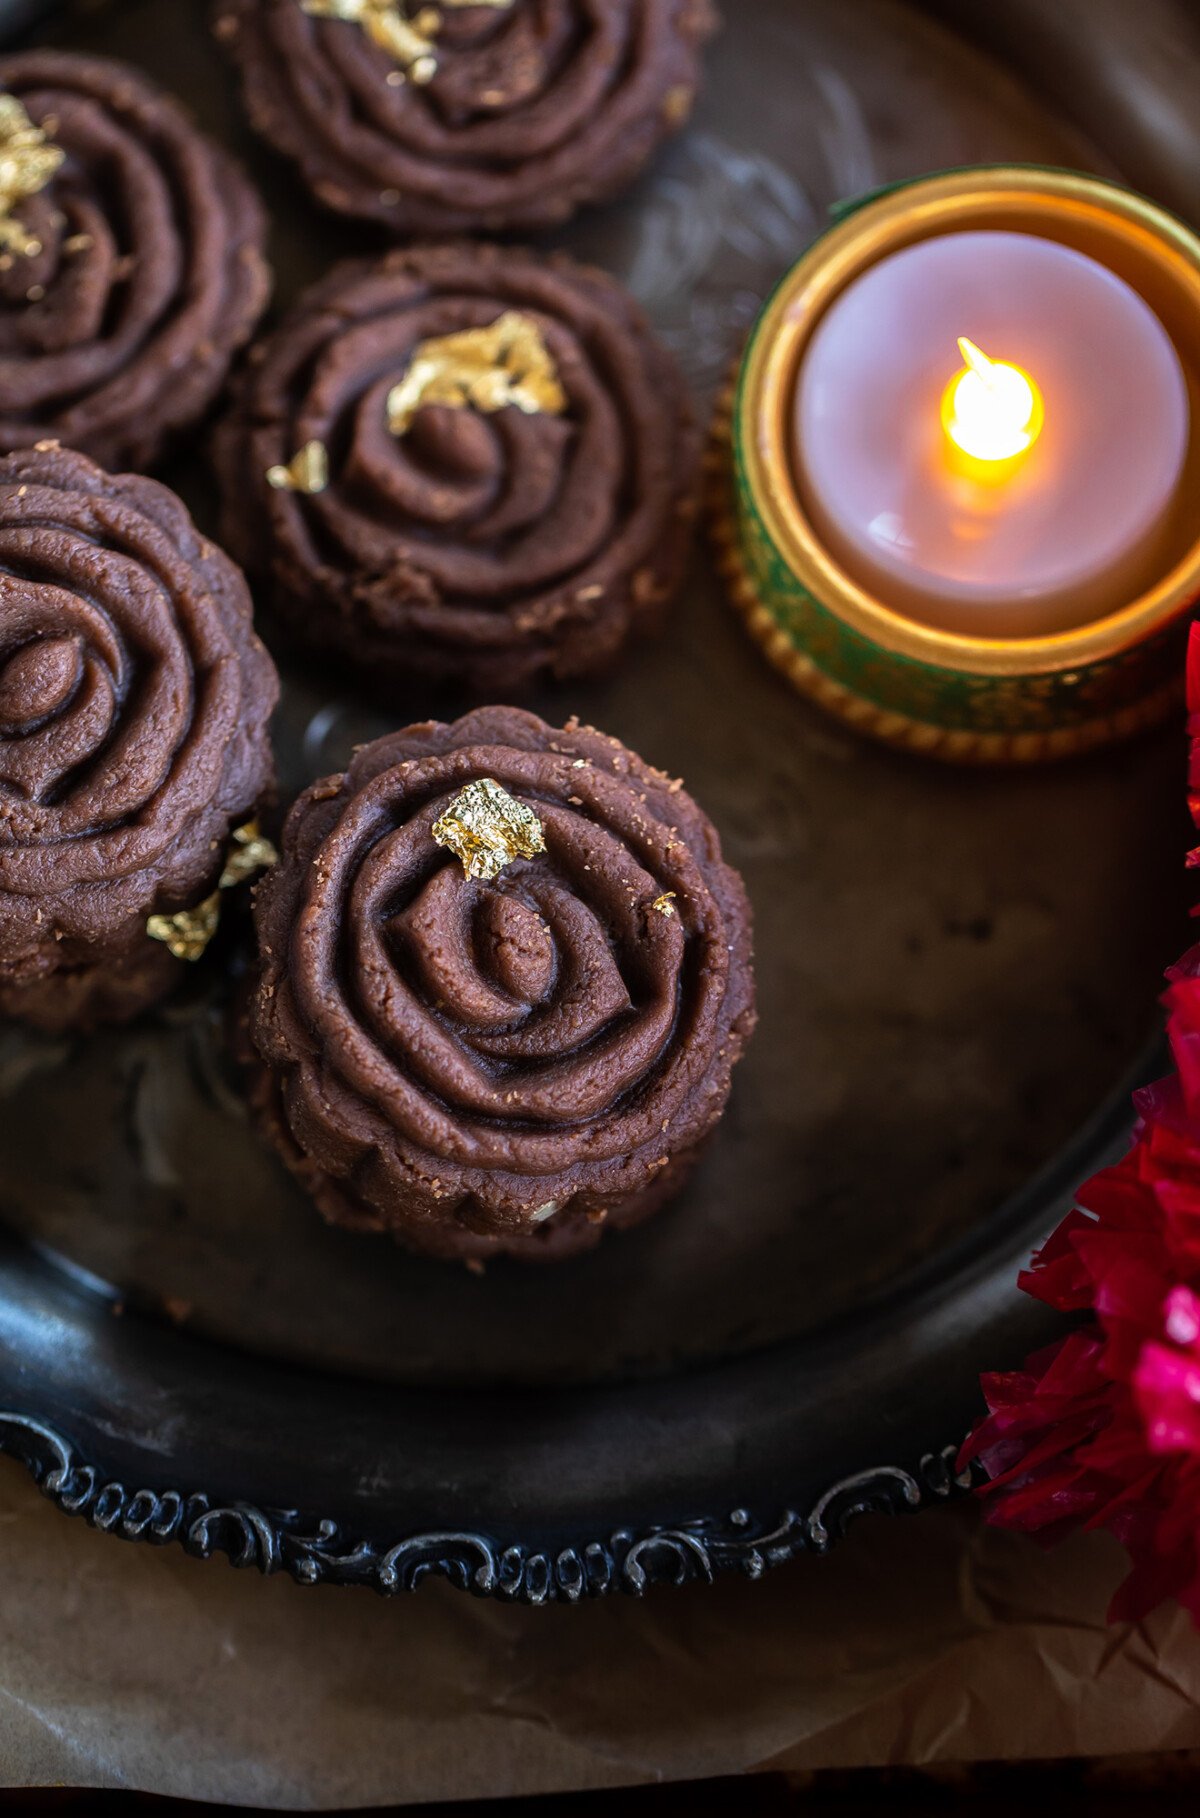
Made with mawa, and nutella, these pedas are perfect for Diwali or to make for your potlucks and get-togethers. I like using a mold to shape the pedas since it makes the pedas look extra pretty. But if you don’t have a mold you can simply shape them using your hands. I have always been a huge peda fan, my nani (maternal grandmother) used to make the best pedas at home with just milk and sugar. I need to share that version soon on the blog but I have over the years shared other versions like paan peda and mathura peda (another favorite)!
Ingredients
These Nutella Peda require very few ingredients!
Mawa/Khoya: I like using Vadilal brand mawa for this recipe. You can find it in the freezer section at Indian grocery stores. In my experience, this is the best store-bought mawa that’s available in the US.
Nutella: if you are not a fan of store-bought nutella, you can use any hazelnut spread that you like. If the hazelnut spread you are using is unsweetened, then you might have to add sugar to the mixture.
Flavors: I like using salt in my sweets to balance out the flavors and in this peda recipe I also added some vanilla which is optional.
How to Make Nutella Peda
- Add 1 cup mawa (210 grams) to a pan on medium heat. Roast the mawa for 1 to 2 minutes.
- Then add 1/4 cup + 2 tablespoons nutella (or any hazelnut spread you like).
- Stir until combined and turn the heat to low.
- Add 1 tablespoon milk, splash of vanilla and pinch of salt and continue to stir on low heat.
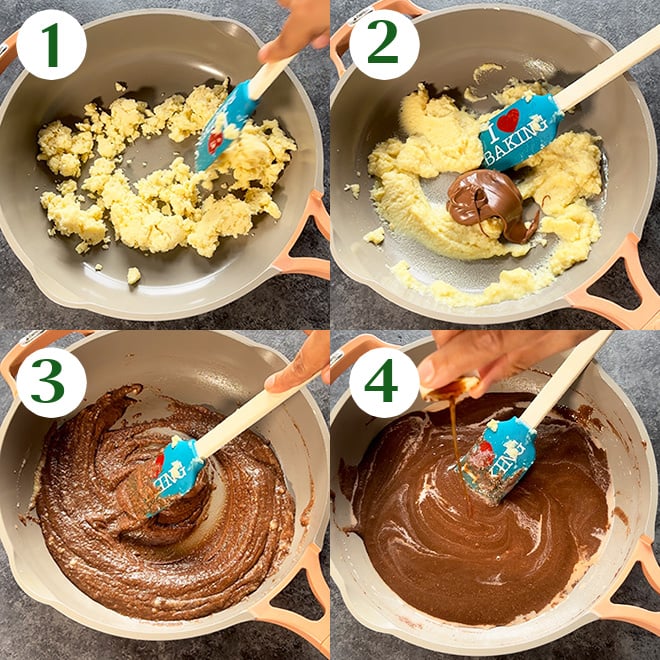
- The mixture will bubble and start to thicken around the 5 minutes mark. Keep cooking on low heat.
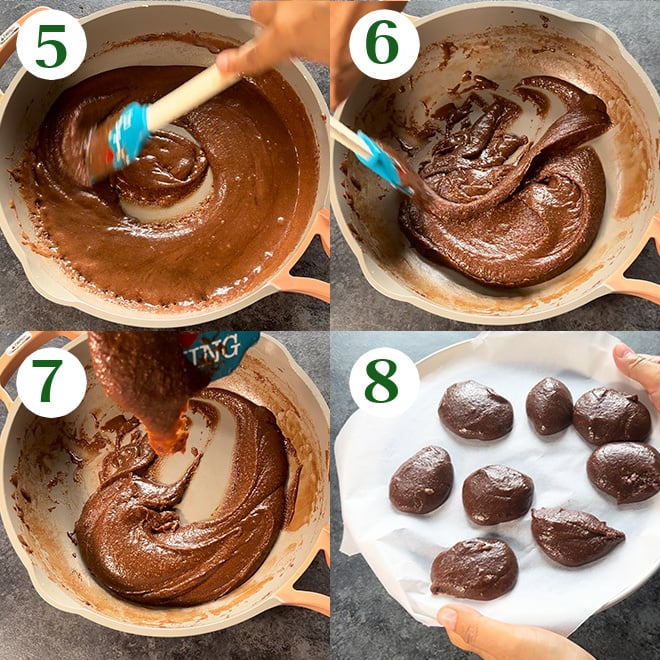
- After cooking on low heat for around 13 to 14 minutes, the mixture leaves the sides of the pan.
- It will have a molten lava-like consistency at this stage (see picture). Do not cook further at this stage as the pedas will turn chewy.
- At this stage turn off heat and transfer the mixture to a greased bowl or parchment paper. Let the mixture cool down a little then roughly divide the mixture into small portions (10-12) and then place this in the fridge for 30 minutes. You will not be able to shape these into pedas at this time.
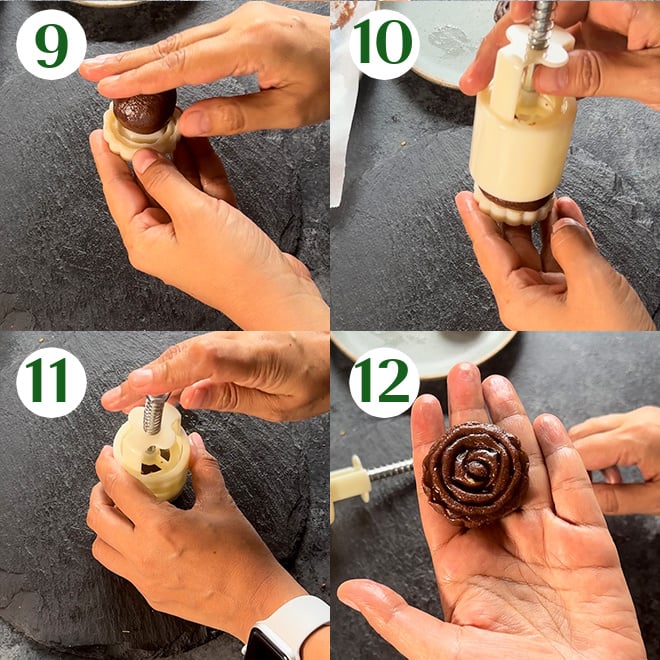
- After 30 minutes are up, take the mixture out of the fridge. At this point you can just shape the pedas by hand into round or oval shape or use a mold to shape them.
- Take a small ball from the mixture and place it in the mold.
- Press the mold to give the peda its shape.
- Remove gently and you have the peda shaped into the preferred design. Make all pedas similarly. I was able to get 12 pedas out of this mixture. Keep the pedas refrigerated and they are best consumed within 3 days.
Variations You Can Try
To give the peda some crunch, you can also stuff them with roasted hazelnuts. Just place one in the center, roll the dough ball and then shape into pedas using the mold. It will give a nice bite when you bite into the pedas.
You can also dip the pedas into some dark chocolate for that extra chocolate flavor.
Manali’s Expert Tips
- Do not overcook the peda mixture. This is the most important step of this recipe. Overcooking the mixture will lead to chewy pedas. It might look like the mixture needs to thicken more but stop cooking at around the 13 to 14 minutes mark when it has a molten lava-like consistency. The peda will set later.
- If you are not a Nutella fan, you can use any hazelnut spread of choice. If you are using a homemade/unsweetened hazelnut spread then you will need to add granulated sugar to the peda mixture. Add it along with the hazelnut spread.
- If you are unable to shape the pedas, it means the mixture wasn’t cooked enough. In that case you would need to put the mixture back on the stove and cook it for a few more minutes and try shaping them again.
- Since this is a milk based dessert, it is best consumed within 3 days.

Nutella Peda
Ingredients
- 1 cup mawa, 210 grams, also know as khoya (dried milk solids)
- 1/4 cup + 2 tablespoons nutella, or any hazelnut spread of choice
- 1 tablespoon milk, I used whole milk
- splash vanilla extract
- pinch salt
Instructions
- To a pan on medium heat, add mawa and roast for 1 to 2 minutes on medium heat. Then add the nutella along with milk, splash of vanilla and salt and mix. Lower the heat to low.
- Keep stirring on low heat and the mixture will begin to bubble and start to thicken around the 5 minute mark.
- After cooking on low heat for around 13 to 14 minutes, the mixture will leave the sides of the pan. It will have a molten lava like consistency at this stage (see picture above). This is the right stage to stop cooking. If you cook further, the pedas might turn out chewy.
- Remove pan from heat and transfer the mixture to a greased bowl or parchment paper. Let the mixture cool down a little then roughly divide the mixture into small portions (10-12) and then place this in the fridge for 30 minutes. You will not be able to shape these into pedas at this time so chilling them for 30 minutes makes it easier to shape them.
- After 30 minutes are up, take the mixture out of the fridge and shape the pedas. You can either shape them into round shapes using your hands or use a mold to give them beautiful shapes. I was able to get 12 pedas out of this mixture. Keep them refrigerated and consume within 3 days for best results.
Notes
- If you are not able to shape the mixture into pedas, put the mixture back in a pan and cook on low heat for 2 to 3 minute more. Then chill the mixture for 30 minutes and shape into pedas.
- If you don’t want to use nutella, you can use any hazelnut spread of choice.
- Avoid overcooking the mixture as this can lead to chewy pedas. The mentioned time can vary depending on the intensity of heat and thickness of the pan so look for molten lava like consistency. You should be able to reach this stage at 13 to 14 minutes mark on low heat.
Nutrition
Nutrition information is automatically calculated, so should only be used as an approximation.
 Your feedback is valuable!Please share your comments, ratings, and any suggestions or adaptations below to help us improve and make our recipes more successful.