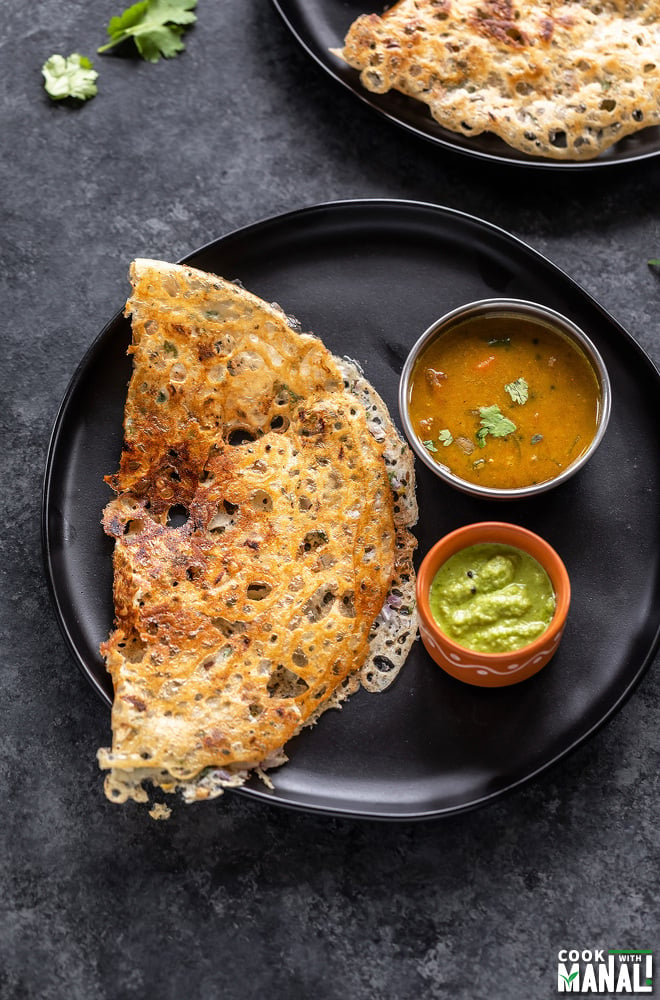
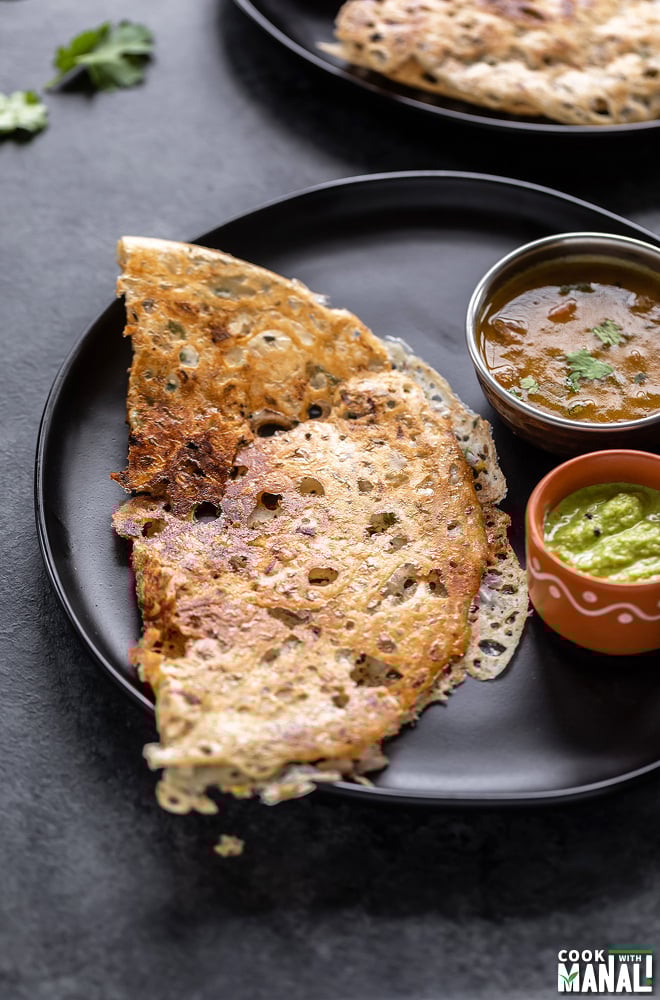
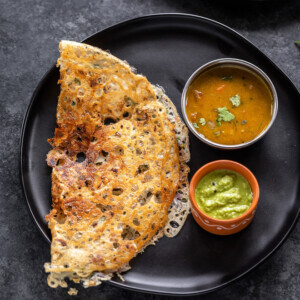
Make restaurant style crispy Rava Dosa at home with this step by step recipe.
Serve with sambar and chutney for a delicious meal!
I like eating all sorts of dosa, whether it’s plain dosa or masala dosa or pesarattu or adai.
Rava dosa is another favorite which I absolutely love.
It’s crispy, crunchy and easy to make too, what’s not to love?
My mother-in-law is a huge rava dosa fan. She only orders that when we go out to eat at any south Indian restaurant.
In fact before I was married, I did not care much for rava dosa. I always just ordered plain or masala dosa.
However, seeing her love for this dosa made me try it and over the years I have really come to love it.
What is Rava Dosa?
So, rava dosa is a savory crepe made with rava (sooji) aka semolina.
This instant version is different than traditional dosa in the sense that it does not need fermentation.
You can make it instantly with only a handful of ingredients.
This instant rava dosa is made with rava (of course), rice flour and some seasonings like curry leaves, ginger, cumin seeds etc.
Making the batter for this dosa is super easy, you only have to mix everything together and then let it rest for 20 minutes and then make the dosa.
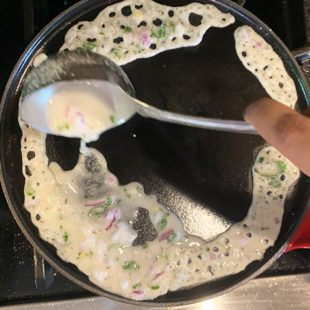
The batter is really thin and has to be poured on the hot tawa with a ladle all around. That’s what gives the dosa it’s characteristic “net like pattern”.
While the dosa itself it easy to make, making it crispy does need some tips.
Tips to Make Crispy Rava Dosa
If you are looking to make restaurant style crisp rava dosa then here are the things that you need to follow!
Use a Iron Tawa/Pan to make the dosa: I cannot stress enough how important this is!
Here’s a dosa made exactly with the same batter, using exactly the same technique on a non-stick pan. I am not saying this dosa was bad, in fact it tastes great. However, as you can see it wasn’t remotely as crisp as the ones that I made on an iron tawa.
So, if you don’t care about the crispiness, by all means use your non-stick pan. But if you really want that super crispy rava dosa, you have to use an iron tawa, there’s no two ways there.
Cook on low heat: the rava dosa needs to be cooked on low heat for it to turn out crisp and nice. It will take time, so please have patience.
First, heat the pan on medium heat. Once it’s nicely heated, lower the heat to low, pour the batter and let the dosa cook until you see it turning golden brown.
This takes anywhere between 10 to 15 minutes on low heat, be patient. Do not try to flip or remove the dosa from the pan until you see it’s nicely browned from the sides and also the center.
Whenever you order rava dosa at a restaurant, they always tell you that it will take more time than the regular dosa, isn’t it? This is the reason, to make a crispy rava dosa takes time.
And in restaurants the dosa is much bigger in size, so obviously it takes even more time to cook well.
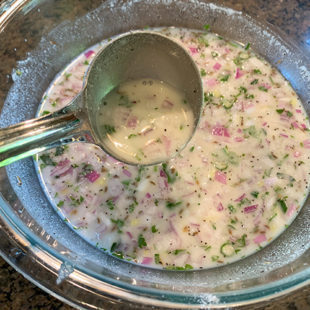
Batter should be very thin: the batter for rava dosa is super thin and watery. It’s like buttermilk consistency. You have to pour the thin batter all around the tawa, starting from the edges and then moving towards the center.
Stir the batter every time you make the dosa since rava settles down at the bottom.
Also the batter may becomes thick as you continue to make dosa and you might need to add more water as needed.
Pour the batter in thin layer all around the tawa: the batter should be poured in a thin layer. Use a ladle or a round bowl and pour the batter onto the tawa from a height. This give the dosa that “net/lace like pattern”.
Pour on the edges first and then towards the center. Remember to not pour too much batter on one place, also do not keep pouring the batter at one spot over and over again.
Don’t try to fill all the gaps as you pour the batter, you want it to be thin.
Pour and move and later you can fill the gaps that are left on the tawa by dropping some batter there.
I hope these tips help you make the perfect dosa at home.
Method
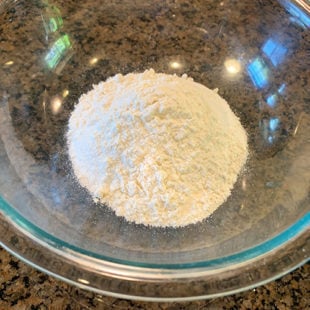
1- To a large bowl add rava (sooji/semolina), rice flour and all purpose flour (maida).
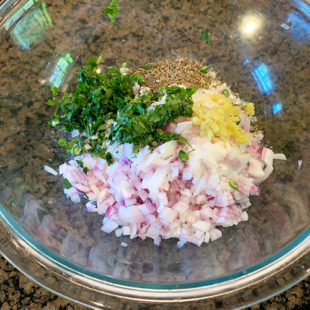
2- To that then add chopped onion, green chili, ginger, curry leaves, cilantro. Also add cumin seeds, black pepper and salt. Stir to combine.
3- Start adding water, little by little, mixing after each addition.
4- I added around 2.5 cups (20 oz) water at this point. Mix until you have a very thin batter and there are no lumps. The consistency of the batter should be very thin like buttermilk. Cover and let the batter sit for 20 minutes.

5- After 20 minutes, stir the batter (as the rava settles down at the bottom). I added another 1/4 cup water (2 oz) at this point to thin out the batter even more. So I added a total of 2 & 3/4 cups water (22 oz). You may need more or less depending on the quality of rava that you use.
To start making the dosa, heat an iron tawa on medium heat. Let it heat up nicely and then wipe it with some oil.
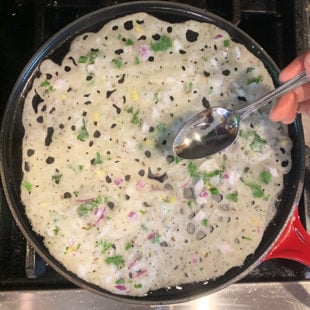
Take a ladle full of batter and start pouring it over the tawa, starting from the edges. Do not pour at one spot multiple times, pour a little of the batter and move the ladle and pour again. You want it to be a thin layer.
6- Go pouring the batter around the edges and then move to the center. Do not try to make a completely round shape here and don’t try to fill the holes. This will give the dosa it’s characteristic pattern.
7 &8- Keep pouring the batter and moving towards the center of the tawa as you pour.
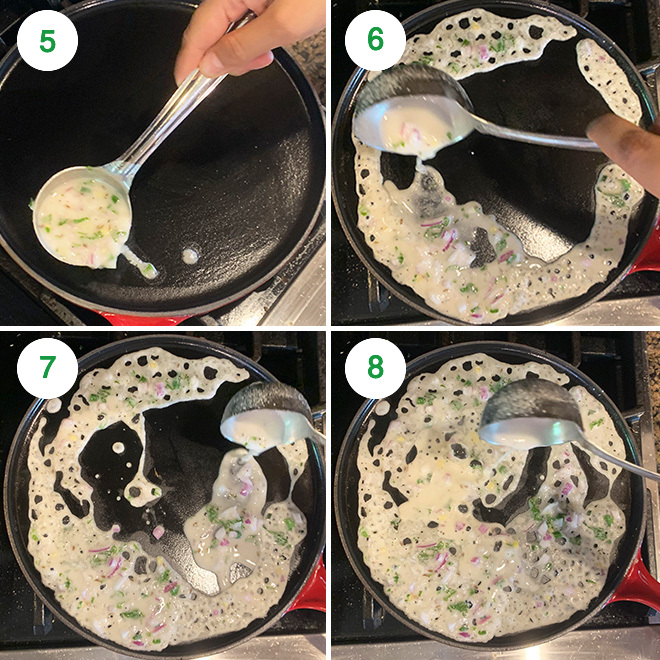
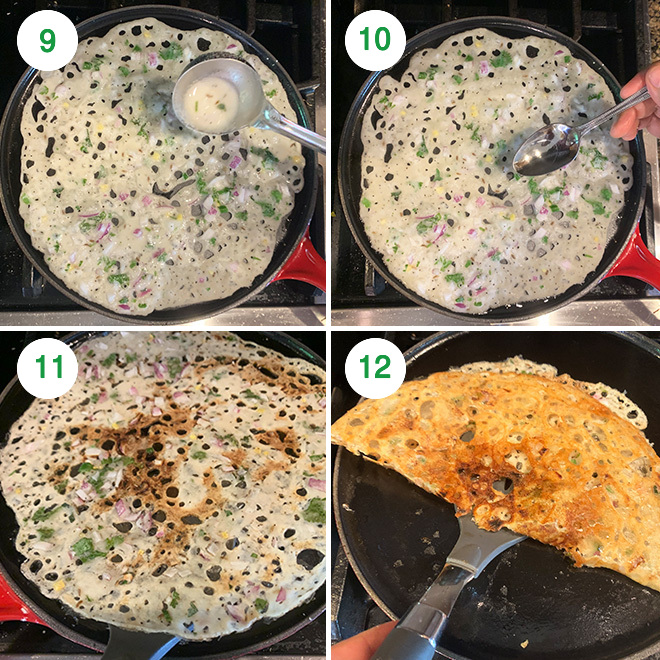
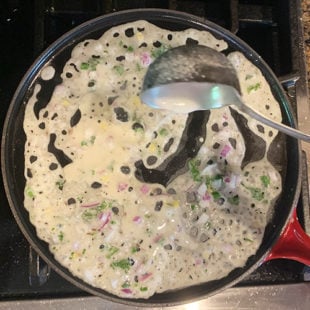
9- Once you have poured the batter all around, fill any of the large holes by dropping the batter into those holes. Leave the smaller holes as such. Now reduce the heat to low-medium.
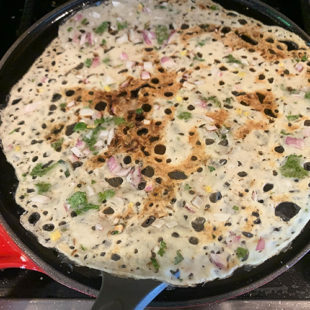
10- Drizzle oil (around 1 teaspoon) around the edges of the dosa and also on top of the dosa.
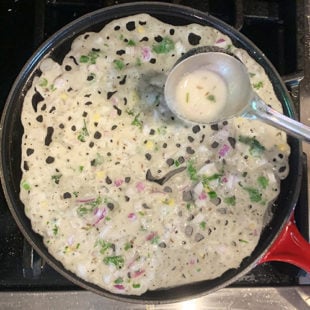
11- Let the dosa cook on low-medium heat until it turns golden brown and crisp. Do not try to remove the dosa or try to flip it in between.
Cooking rava dosa on low heat takes time, it will take anywhere between 12 to 14 minutes for the dosa to cook (this is for a 10-inch pan). If your pan is bigger and dosa is bigger in size, it will take even more time. So, have patience!
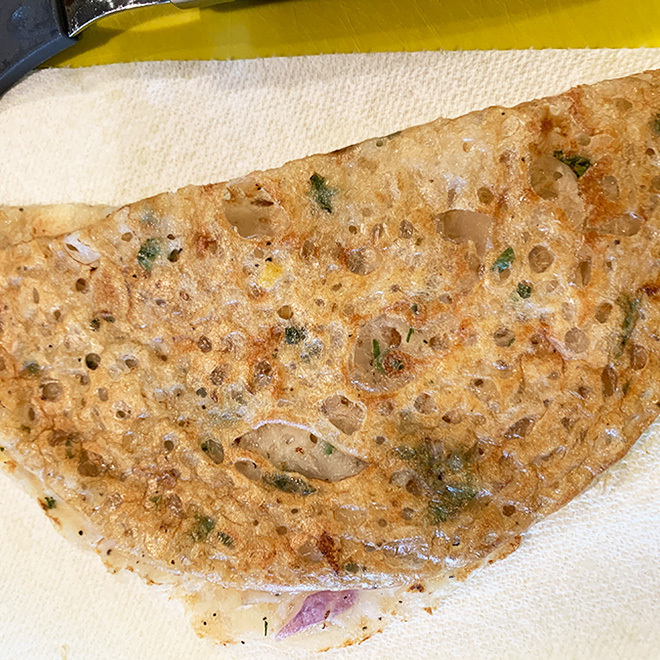
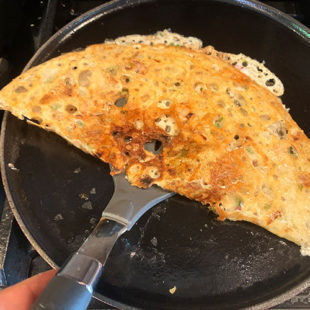
12- Once it’s golden brown, gently remove it from the tawa and fold. Since we pour the batter super thin, it doesn’t need to be cooked on the other side.
Make all dosa same way. Remember to stir the batter every time you make dosa since rava settles at the bottom. You might need to add additional water as you make the dosa if the batter starts getting thick.
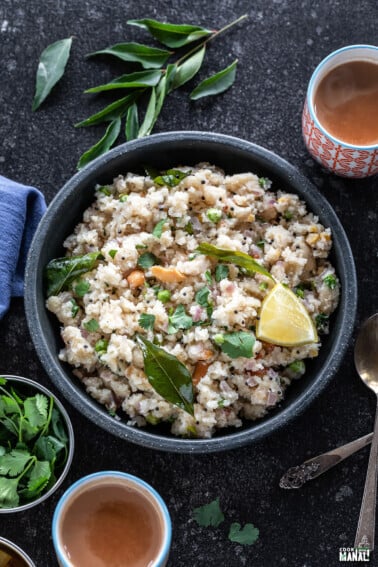
Serve crispy rava dosa with sambar and cilantro coconut chutney!
If you’ve tried this Rava Dosa Recipe then don’t forget to rate the recipe! You can also follow me on Facebook, Instagram to see what’s latest in my kitchen!
Rava Dosa
Ingredients
- 1/2 cup rava/sooji, semolina, 84 grams
- 1/2 cup rice flour, 82 grams
- 1/4 cup all purpose flour, 32 grams
- 1 medium onion, finely chopped
- 1 green chili, chopped
- 1 teaspoon chopped ginger
- 6-7 curry leaves, finely chopped
- 1 tablespoon chopped cilantro
- 1/2 teaspoon cumin seeds
- 1/4 teaspoon black pepper
- 3/4 teaspoon salt, or to taste
- 2.5 - 3 cups water, as needed
- oil, to cook the dosa
Instructions
- To a large bowl add rava (sooji/semolina), rice flour and all purpose flour (maida).

- To that then add chopped onion, green chili, ginger, curry leaves, cilantro. Also add cumin seeds, black pepper and salt. Stir to combine.
- Start adding water, little by little, mixing after each addition.I added around 2.5 cups (20 oz) water at this point. Mix until you have a very thin batter and there are no lumps. The consistency of the batter should be very thin like buttermilk. Cover and let the batter sit for 20 minutes.
- After 20 minutes, stir the batter (as the rava settles down at the bottom). I added another 1/4 cup water (2 oz) at this point to thin out the batter even more. So I added a total of 2 & 3/4 cups water (22 oz). You may need more or less depending on the quality of rava that you use.To start making the dosa, heat an iron tawa on medium heat. Let it heat up nicely and then wipe it with some oil.Take a ladle full of batter and start pouring it over the tawa, starting from the edges. Do not pour at one spot multiple times, pour a little of the batter and move the ladle and pour again. You want it to be a thin layer.
- Go pouring the batter around the edges and then move to the center. Do not try to make a completely round shape here and don't even try to fill the holes. This will give the dosa it's characteristic pattern.Keep pouring the batter and moving towards the center of the tawa as you pour.
- Once you have poured the batter all around, fill any of the large holes by dropping the batter into those holes. Leave the smaller holes as such. Now reduce the heat to low-medium.
- Drizzle oil, around 1 teaspoon around the edges of the dosa and also on top of the dosa.
- Let the dosa cook on low-medium heat until it turns golden brown and crisp. Do not try to remove the dosa or try to flip it in between.Cooking rava dosa on low heat takes time, it will take anywhere between 12 to 14 minutes for the dosa to cook (this is for 10-inch pan & dosa). If your pan is bigger and dosa is bigger in size, it will take even more time. So, have patience!
- Once it's golden brown, gently remove it from the tawa and fold. Since we pour the batter super thin, it doesn't need to be cooked on the other side.Make all dosa same way. Remember to stir the batter every time you make dosa since rava settles at the bottom. You might need to add additional water as you make the dosa if the batter starts getting thick.Serve crispy rava dosa with sambar and cilantro coconut chutney!
Notes
- Remember to stir the batter each time you make a new dosa. The rava (sooji) settled down at the bottom, so you need to stir every time.
- If you want, you can also fill this dosa with spicy dosa aloo. That will make it more filling.
Nutrition
Nutrition information is automatically calculated, so should only be used as an approximation.
 Your feedback is valuable!Please share your comments, ratings, and any suggestions or adaptations below to help us improve and make our recipes more successful.

Q: Can I make the batter in the night and make Dosa in the morning?
yes!
Thanks a lot for your recipes mam because I am a bachelor student and far from home , with your recipes I tried maximum of your recipes and every item is almost success just because of your clear steps( it took 2 years 🙂 )
finally Thanks mam have a great steps ahead
Glad to know Dharan! 🙂
Is the Rava used fine or coarse?
coarse, the one we use for upma
Dosas came out beautifully and they were delicious. My husband loved it. Thanks for sharing
glad to know!
What happen if I don’t add rice folur
it will be less crispy
Hi do I use plain or roasted rice flour?
plain
Your step by step instructions are so good!I have made rava dose before but your recipe and directions turned out best! Thank you!
so glad!
Does it have to be an iron tava? Also, can the batter be made in the morning and dosas prepared in evening?
Like I mentioned, iron tava gives the best results but you can use regular tawa, it just won’t be as crispy. Yes batter can be made in advance, sooji will settle down so whisk and add more water to thin it out later.
Best ever rava Dosa recipe
yay! 🙂
Where do you get an iron teva? Th
amazon! check lodge, this one is from Le creuset.
Is that the Le Crueset Pancake/Crepe pan?
yes!
loved how crispy they turned out