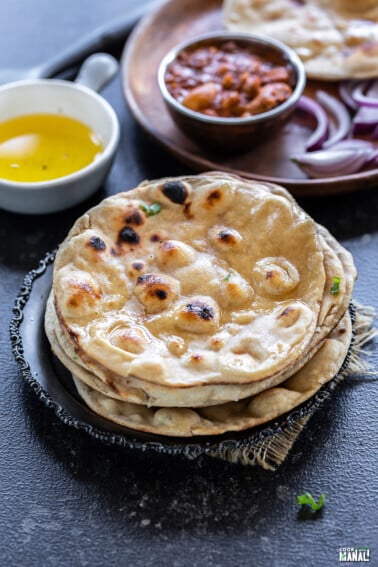
Making garlic naan at home, from scratch is easier than you think and I am going to show you exactly how with my easy, foolproof, step-by-step recipe. These garlic naans are soft, pillowy and perfect for dunking into my creamy dal makhani or restaurant style butter paneer. They also freeze well, so that you can enjoy one whenever you crave it!
You only need a few basic ingredients to make these naans at home, and I am pretty sure you have them already in your pantry. Once you make these, you would never want to buy frozen ones again.
We grew up eating warm homemade roti at home on a regular basis, and naan was something we enjoyed at restaurants and parties too. I know, a lot of folks in the US think that Indians eat naan everyday but that’s simply not the case. In India, it was easier to get good naan from outside but once I moved to the US, I quickly realized that I need to make naans at home. The frozen, rubbery naans were just not making the cut.
After making these naans multiple times over the years, and multiple rounds of recipe testing, it’s safe to say these are my favorite homemade garlic naans. They are not chewy, or stretchy or rubbery. They are just perfectly soft to enjoy with your favorite curries.
My Garlic Naan Secret Ingrdient: Yogurt~
Like most breads, naan is made with basic ingredients like flour, yeast, water/milk, sugar. I like adding some yogurt to keep them soft (I make my butter naan the same way too!). I have tested this recipe with and without yogurt and the one with yogurt always yields softer naans.
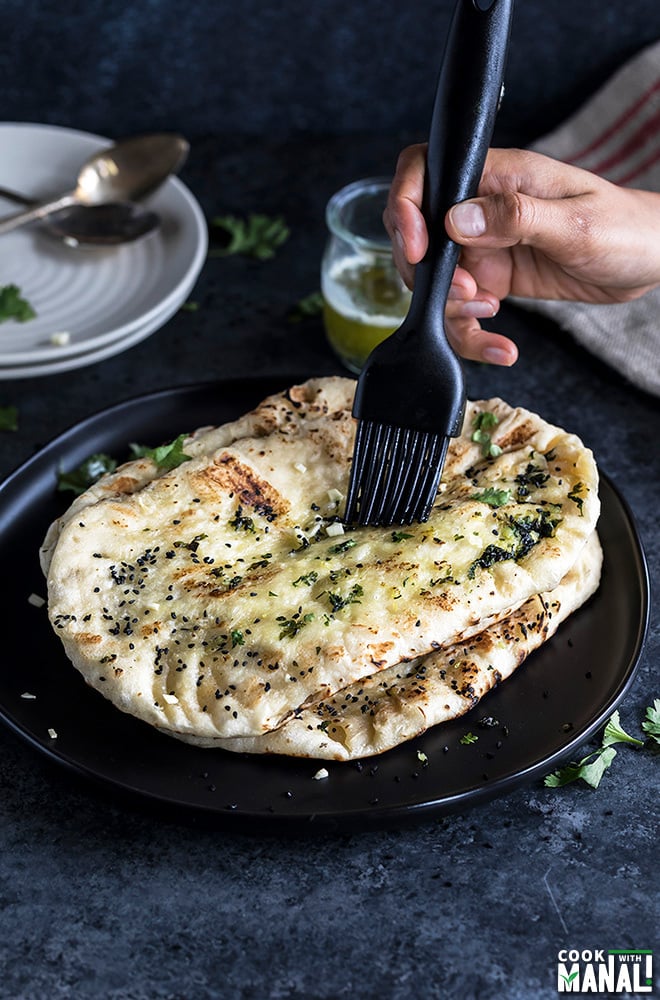
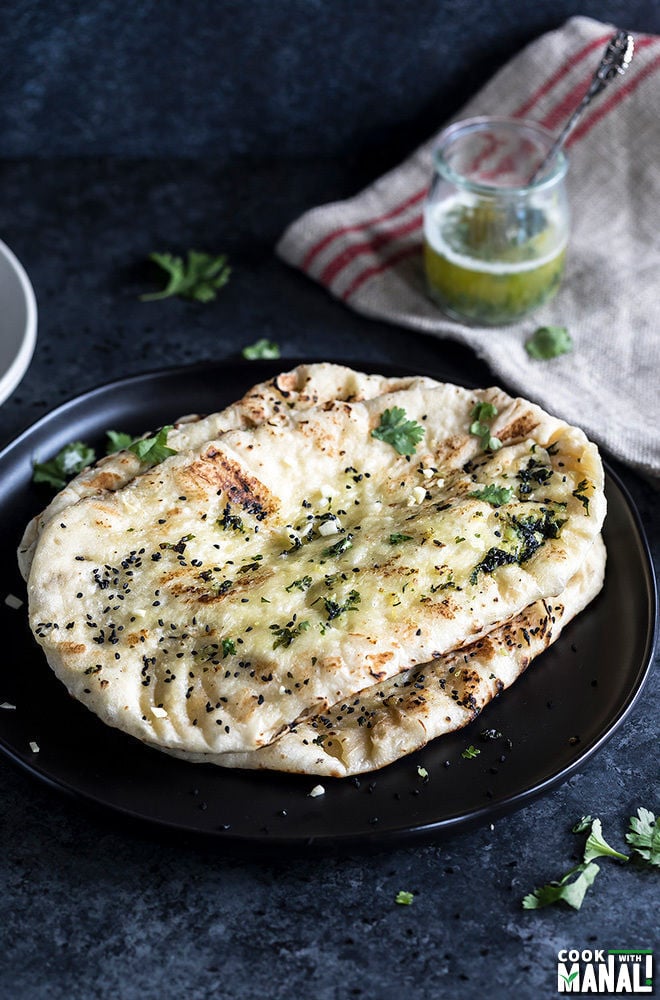
Since this recipe is for garlic naan, I also add some grated garlic to the dough and then brush the naan with lots of garlic butter. The additional garlic butter on top takes them to the next level.
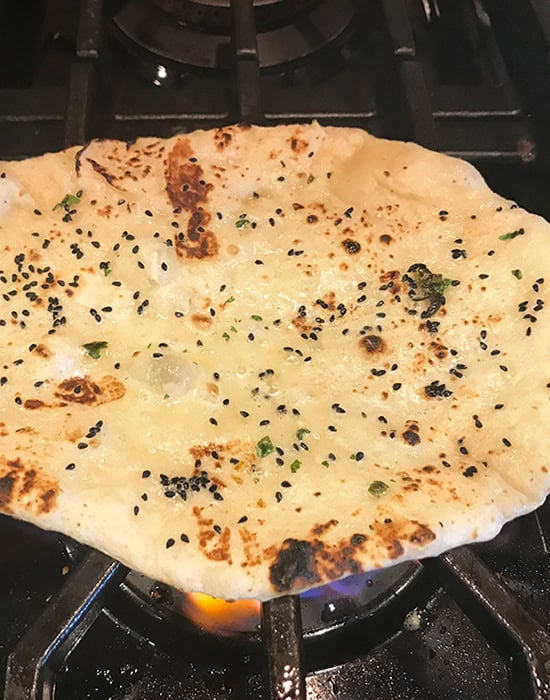
I made this garlic naan on the stove top. Traditionally naan is made in a tandoor (clay oven) but at home, I prefer the stove-top method because they are much softer and better when cooked on a stove-top compared to when cooked in an oven.
I highly recommend cooking these on a cast iron skillet. I have made these on non-stick and other pans; they taste so much better when made on a cast iron because the cast iron gets really hot (like tandoor) and retains heat (and distributes heat evenly), making the naan chewy. It also gives the naan a smoky flavor which you don’t get with non-stick pans.
Troubleshooting My Garlic Naan Recipe
- Dough too sticky: my recipe results in a sticky dough, but resist the temptation to add more flour as this will make then naans dough-y. Let the dough rest if it’s becoming difficult to roll and then roll gently. Apply some oil on your hands while handing the dough- it helps.
- Yeast not rising: If there’s no froth after 5 to 10 minutes of adding active dry yeast to warm water, discard the mixture and start over again. It most probably means either your yeast is old or the water you added was too hot (hence killed the yeast) or too cold (yeast couldn’t activate). Optimal range for active dry yeast to activate is between 105-115 F degrees.
- Unable to roll the naan: the dough is sticky so rolling the naan can feel tricky. Let the dough rest and then roll gently. Apply some oil on your rolling pin also while rolling these naans. Roll lengthwise first and then roll sidewise.
Let’s See How I Make Garlic Naan At Home!
- Let’s activate the yeast first
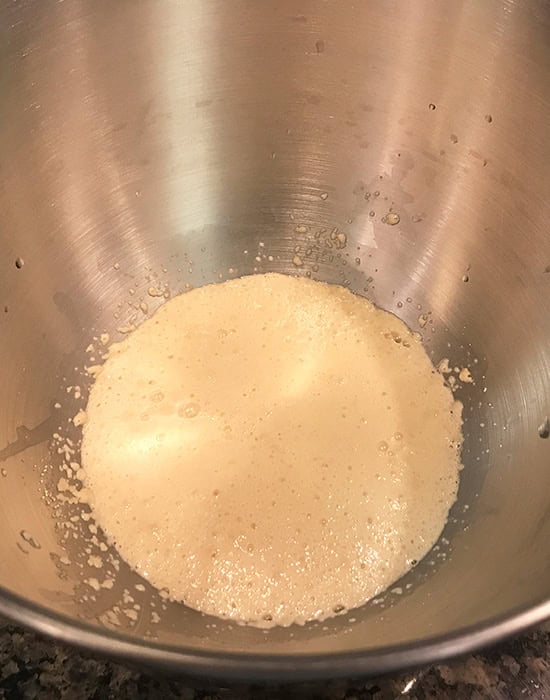
Since I use active dry yeast for the recipe, it needs to be activated first. Mix the yeast with warm water and some sugar and let it bloom. It should be nicely frothy within 5 to 10 minutes. Only then add milk, yogurt and oil.

- Mix in the dry ingrdients
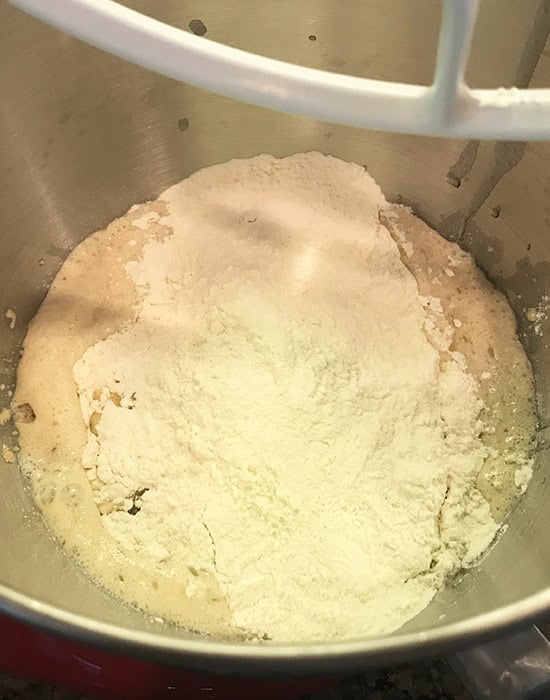
Once the yeast is activated, add the flour and salt and make a sticky dough. This is a sticky dough, so do not try to add more flour at this point. I also add some grated garlic to the dough.

- Wait for the dough to rise
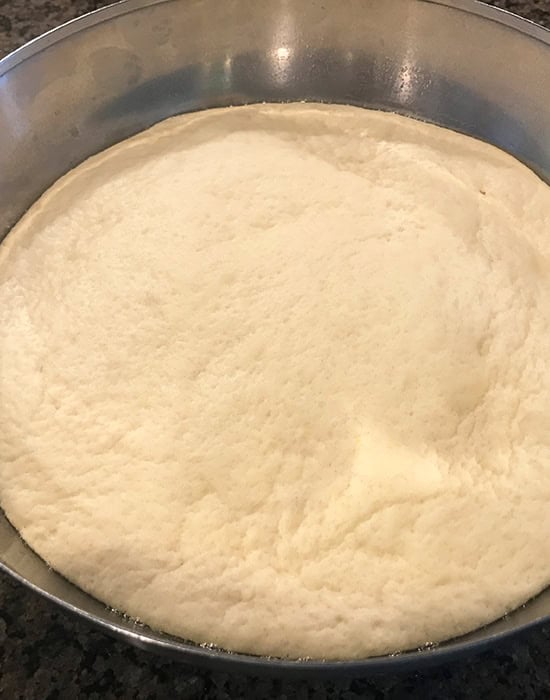
It will take around 60 to 90 minutes for the dough to double in size. If you live in a cold place, you can place the bowl in the oven with the oven lights on (but oven should be off).
- Then get to rolling!
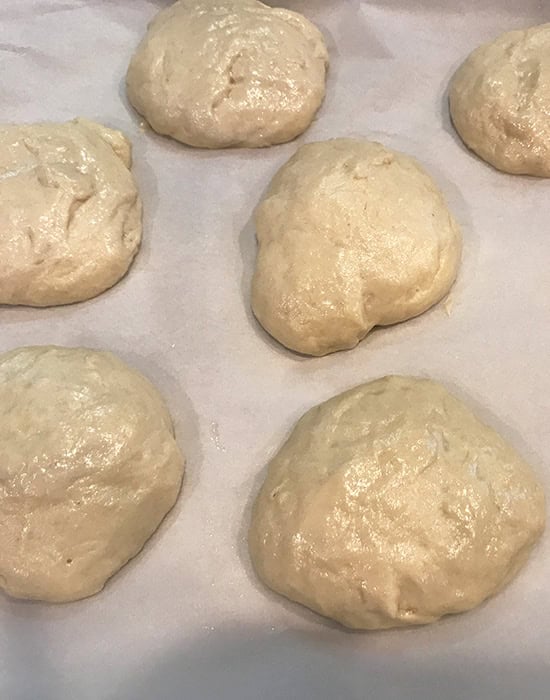
Give the dough rest after each step. After dividing the dough into 8 equal parts, let the dough balls rest for a while before rolling them. Roll the dough gently using a rolling pin.
- Cook on a hot pan!
Once rolled, cook them on a cast iron skillet and and finish by cooking them on direct heat for that smoky flavor. Brush with more garlic butter before serving.
Freezing the naan
You can easily freeze these garlic naan- both cooked and uncooked.
Freezing cooked naan: You can freeze the naan after cooking them completely, just skip the step of brushing them with garlic butter. Let the naans cool down completely and then store (with layers or parchment paper in between each naan) in a zip lock bag for up to 3 months. Reheat in the microwave or pan and then brush with garlic butter before serving.
Freezing uncooked naan: To freeze the naan uncooked, make the dough and let it rise. Then divide the dough into equal parts and roll all the naan. Place a piece of parchment paper and then place a rolled naan on top of it. Now place another piece of parchment paper on top of the rolled naan and then place another naan on top. Basically, you stack them one by one, with a layer of parchment paper in between each naan. Once you have stacked them all, place them in a freezer bag, squeeze out as much air as possible and freeze. Cook on the skillet directly from the freezer when you want to eat them and brush with garlic butter before serving.

Restaurant Style Garlic Naan (Soft & Pillowy)
Ingredients
- 3 & ¼ cups + 3-4 tablespoons all purpose flour, 423 grams + 27-36 grams , also known as maida
- 1 teaspoon salt
- 1 cup water, lukewarm, 8 oz
- 1 tablespoon sugar, 12 grams , I used granulated white sugar
- 2 teaspoons active dry yeast
- ⅓ cup milk, 80 ml lukewarm, I used whole milk
- 2 tablespoons plain yogurt, I used plain whole milk yogurt
- 3 tablespoons oil, 45 ml , I used vegetable oil
- 2 large garlic cloves, grated
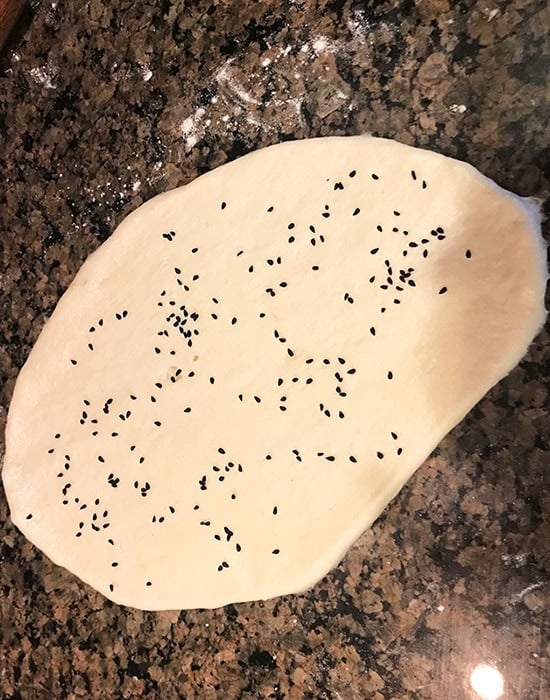
- nigella seeds/kalonji, optional, to sprinkle on top of naan
Garlic Butter, to brush on naan
- 3 tablespoons butter, I used unsalted
- 3 tablespoons chopped cilantro
- 2 teaspoons minced garlic
Instructions
- In a bowl whisk together 3 & ¼ cups all-purpose flour (423 grams) with 1 teaspoon salt. Set it aside.
- To the steel bowl of your stand mixer, add 1 cup lukewarm water (8 oz) and then add 1 tablespoons sugar and 2 teaspoons active dry yeast. Give it a quick stir and let it bloom for 5-10 minutes. You will know the yeast is activated when it’s all bubbly and frothy on top.
- Once the yeast is activated, add 1/3 cup milk (lukewarm), 2 tablespoons plain yogurt and 3 tablespoons oil. Add the flour mixture and mix using the paddle attachment on your stand mixer until combined. Also add 2 garlic cloves (grated).
- Start adding the remaining 3-4 tablespoons of flour (27-36grams). Add 1 tablespoon at a time and add more if the flour feels very sticky. The dough will always be a little sticky, so do not add more flour to make it dry. I ended up adding extra 4 tablespoons flour (36 grams) at this point.
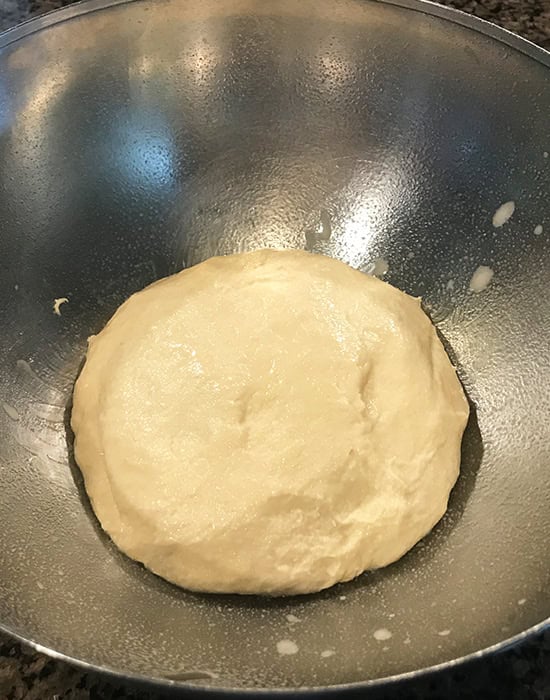
- Knead with hands or with the dough hook attachment of your stand mixer for 1-2 minutes until the dough is smooth. Transfer the dough to a greased bowl.
- Cover the bowl with a kitchen towel and let the dough rise in a warm place for 60-90 minutes. If it is cold where you live, pre-heat your oven for few minutes and then turn it off. Then place your dough inside the oven (remember the oven should be off!)After around 90 minutes, the dough will be more than double in size. Punch the dough gently to release the air.
- Divide the dough into 8 equal parts (around 100-105 grams each). Dough will be sticky so oil your hands while dividing the dough. Cover the dough balls with a kitchen towel and let them rest for 10-15 minutes.
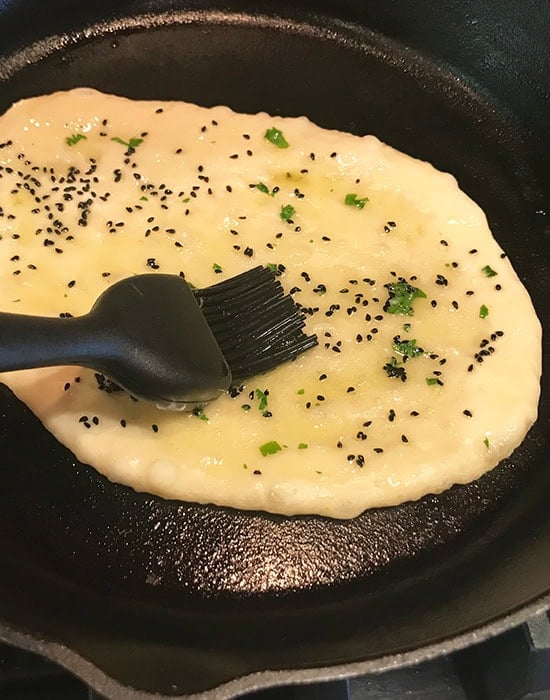
- Meanwhile melt 3 tablespoons butter, add 2 teaspoons minced garlic and 3 tablespoons cilantro (chopped) to it. Mix well and keep the garlic butter ready to brush on the naan.
- Heat up a cast iron skillet on medium-high heat. I highly recommend using an iron skillet to make these naans. Take a dough ball and roll it into an oval shape, around 10 to 11 inches long and 6 inches wide. Apply a little oil on top of the dough before you try to roll it. Also oil your rolling pin. Do not try to roll the dough like you roll a tortilla/roti/paratha. Simply stretch it length wise and then width wise.Dip your finger in water and then sprinkle some nigella seeds on top. This is optional.
- Transfer the rolled naan onto the hot skillet. Let it cook for a minute or two until you see bubbles on top. Brush the naan at this point with the prepared garlic butter. You can skip the step of applying butter at this point and apply it directly once the naan is cooked. I like applying it twice –>more garlic flavor!
- With the help of a tong, remove the naan from skillet, flip and transfer directly to the gas. There will be a little mess as the butter will pour down (cover the sides of the burner with aluminum foil to make cleaning easier if you want). Cook the garlic naan for 15-20 seconds (directly on gas) until nicely golden brown from both sides.
- Remove from heat and brush with more garlic butter. Serve these homemade garlic naans with dal makhani or butter paneer!
To Cook Garlic Naan in Oven
- To cook the garlic naan in oven – pre-heat oven to 500 F degrees. Arrange rolled naan on a baking tray and then bake for 4-5 minutes or until golden brown. Remove naan from oven and apply the garlic butter. If you want, you can then place the naan in the oven under broiler to get them charred.
Notes
- You can make smaller naans if you want, these are pretty big, like the ones you get in restaurants.
- The cast iron skillet needs to really hot before you add the naan on it. This way the dough rises faster and you get puffy naan!
Nutrition
Nutrition information is automatically calculated, so should only be used as an approximation.
 Your feedback is valuable!Please share your comments, ratings, and any suggestions or adaptations below to help us improve and make our recipes more successful.

Hello Manali me and my friends enjoyed your naan recipe. Even without any garlic on top just plain naan was also so much 😋 tasty. However It was difficult to shape naan properly. Can you please help me solve this problem. Thank you.
Hi Kalp! the dough is very soft (which is what makes the naan less doughy), you need to lest the dough rest for a few minutes (for it to relax) and then try rolling it with gentle hands. Roll in one strike up then sideways using a rolling pin. don’t try to roll it like a chapati/roti.
Ok I will try tonight and cannot wait to share photos of naan with you. Just excited 😆. Thank you.
water not in mls!
that’s 240 ml/8z water.
Hi, Tried for the first time. Is it really 2 cups of water going with 6,5 cups of flour?
Dough becomes very very liquid with this combination….
you mean when you double the recipe? Yes its 6.5 cups + around 1/2 cup more (it’s 3-4 tablespoons extra for 1 x, so if you do 2x, it’s 6-8 tablespoons extra which is around 1/2 cup) and 2 cups water. Follow the recipe is grams, will be more accurate. And yes it’s a sticky dough but that’s what makes the naan fluffy. too much flour makes them doughy.
I’ve been using this naan recipe for 2 years now. It’s still the best naan I’ve ever eaten (and we often try out different naan breads at restaurants). This recipe has turned out to be such an unexpected treasure, everybody loves this naan. I always make sure to credit you and direct them to this site when someone asks for the recipe. Thank you so much <3
Thank you so much Kokolino for this lovely feedback, I appreciate it 🙂
Hi Will this work in a pizza oven at a very high temperature?
yes it should!
Adding garlic killed the yeast. The dough didn’t rise. Resulted in dense bread. What a waste of time
Hi Varun, thanks for trying the recipe. I have never had that experience with garlic killing the yeast personally. I would pay more attention to the water temperature and if the yeast was active to begin with. Also, this recipe has been successfully tried by hundreds of people on the blog so I am pretty confident about it.
I LOVED this! What a great recipe! The fluffiest garliciest full of flavor naan i have ever had!!! I paired it with butter chicken, veggies and rice. The naan was gone in seconds having the whole family in awe!
so glad to know! Thanks for trying!
I have made this recipes many times now and it is absolutely delicious. Better than any naan that I have gotten at a restaurant or premade at the grocery store. Thank you so much for this recipe.
Werent fluffy, very sticky dough recipe
Hi Chantelle, I am sorry you had trouble. The dough is sticky, adding more flour makes the naan dense. Grease your hands with oil, let the dough rest after every step and then it does become manageable. I have used this recipe for many years and it has always worked so hope you will try it again. Thanks!
Can I substitute sour cream in place of the yogurt?
Thank you!
I think it should work
Hey I would like to try this as well, did this work for you?
Absolutely delightful. I’ve been using this recipe for about 4 years. Everyone loves it. I like to knead for 5-6 minutes, I use black seeds just like Manali. I also do a second rise for 30 minutes after making the balls — the tops of the dough balls get slightly dry in the air, which actually works in my favor because I can put the side of the ball that was exposed to the air on the counter to form the shape, since the dough is a bit sticky. Then on to the hot pan. Pillowy, soft soft soft. Tasty.
glad you enjoy it Mary!
I made it today. Perfect garlic naan! Love it!
It is fluffy and full of taste!
Thank You For sharing.
Thanks so much for trying! 🙂
Hi!
I tried this recipe and it is absolutely perfect, thank you SO much for sharing.
Special thanks to your instructions on freezing – I have always been reluctant to freeze dough but tried it this time and it worked perfectly.
So, thanks again!
so glad to hear!
hi, hope youre well. i absolutely love this recipe. however i was wondering whether it is possible to make the naan & then freeze it. make as in ‘fry’ it & butter it up & then freezing it? i have seen people do this with rotis.
yes you can, should be okay
Hello Manali, thanks for your recipe, it tastes awesome!
Since I didn’t have a gas burner, I put it on a stainless baking sheet preheated in an oven at 500 °F, and the naans were ready in about 6-7 min keeping the temperature at 500 °F.
However, the dough split to make a pocket. Any tips on how to avoid that? Was my dough too liquid?
Thanks in advance!
you mean there was a pocket like in pita bread? That is okay, I mean I don’t see that as a problem if the naan puffs up in the oven.
AMAZING! My husband and I made these today and it was not only fun, but it came out great! We have an electric stove, so we used an iron skillet and then finished them off on a griddle…these are so good! Thank you so much for sharing this recipe.
welcome Leslee!
Perfect and delicious!
I have tried this recipe and loved it!
Tastes just like the naans you would get at Indian restaurants.
I want to make more and store them for a longer period. Please instruct on how to use the frozen naan bread.
Thanks so much for sharing this delicious recipe. 🙂
Hi Ash! Thanks for trying the recipe, glad you like it. You can either roll the naans, stack them between layers of parchment paper and freeze or you can cook the whole naan (don’t apply the butter) and freeze. Re-heat in a pan and brush generously with the garlic butter.
Have tried making Naan bread twice before from scratch but this hit a home run. It is made for my favorite cast iron. Thanks for the recipe.
glad to know!
Such a superb naan recipe !! Had to make mine in a regular pan I just chose the thickest pan that I had. If you roll it, fold it, roll it again wait for it to rise and then roll it out one last time you will get that nice flaky restaurant style
So good 😊. I won’t buy naan bread at the grocery store anymore…
I tried to do Naan Bread so many times but this is hands down the best recipe I ever tried. My family was fighting over the Naan Breads like wolves, the plate was empty in a second. Thank you so much! I have saved this recipe forever. I made sure to keep the dough sticky (by NOT adding too much flour at the end), and the naan turned out soft and delicious instead of dry or dense. Amazing!
glad to know! 🙂 Thanks for trying