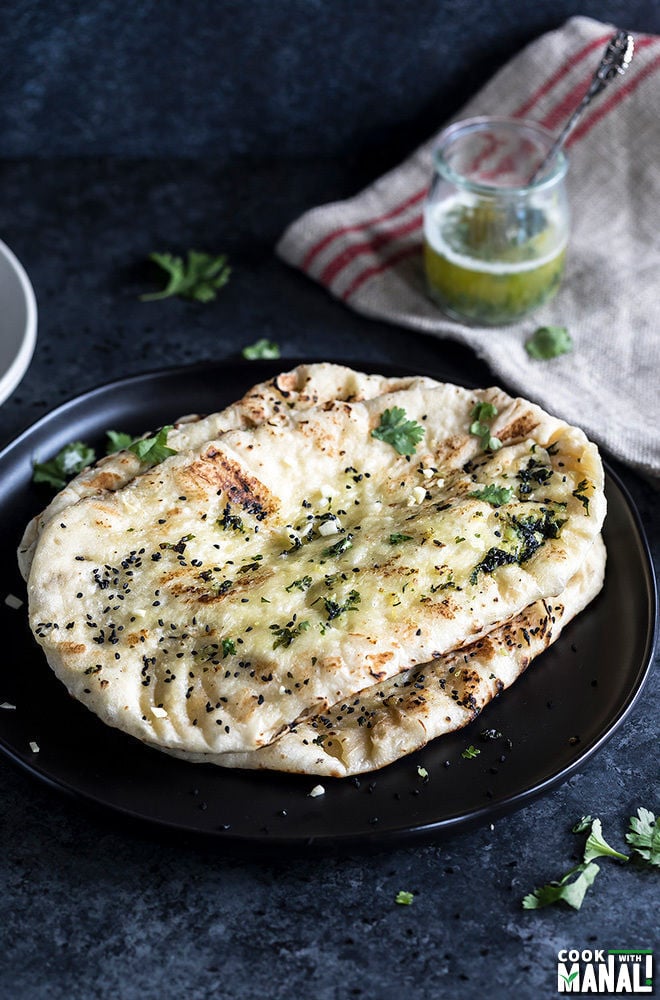
Making garlic naan at home, from scratch is easier than you think and I am going to show you exactly how with my easy, foolproof, step-by-step recipe. These garlic naans are soft, pillowy and perfect for dunking into my creamy dal makhani or restaurant style butter paneer. They also freeze well, so that you can enjoy one whenever you crave it!
You only need a few basic ingredients to make these naans at home, and I am pretty sure you have them already in your pantry. Once you make these, you would never want to buy frozen ones again.
We grew up eating warm homemade roti at home on a regular basis, and naan was something we enjoyed at restaurants and parties too. I know, a lot of folks in the US think that Indians eat naan everyday but that’s simply not the case. In India, it was easier to get good naan from outside but once I moved to the US, I quickly realized that I need to make naans at home. The frozen, rubbery naans were just not making the cut.
After making these naans multiple times over the years, and multiple rounds of recipe testing, it’s safe to say these are my favorite homemade garlic naans. They are not chewy, or stretchy or rubbery. They are just perfectly soft to enjoy with your favorite curries.
My Garlic Naan Secret Ingrdient: Yogurt~
Like most breads, naan is made with basic ingredients like flour, yeast, water/milk, sugar. I like adding some yogurt to keep them soft (I make my butter naan the same way too!). I have tested this recipe with and without yogurt and the one with yogurt always yields softer naans.
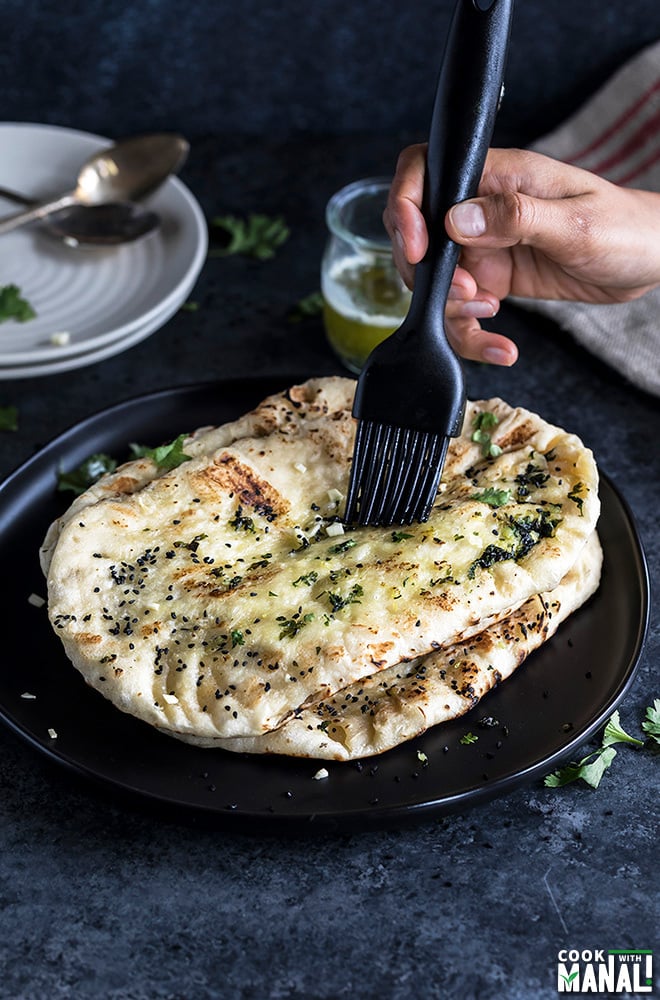
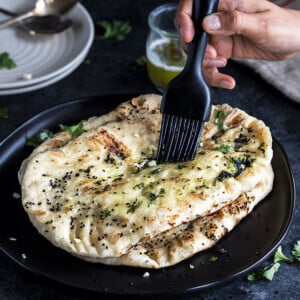
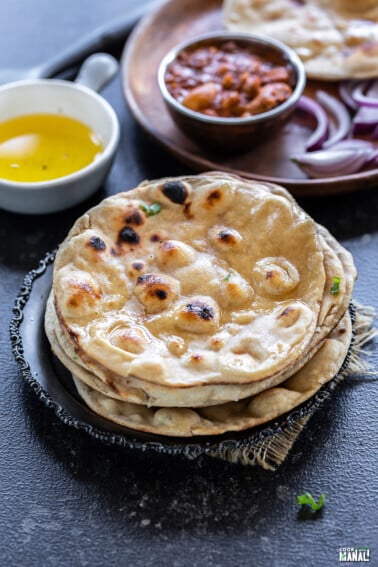
Since this recipe is for garlic naan, I also add some grated garlic to the dough and then brush the naan with lots of garlic butter. The additional garlic butter on top takes them to the next level.
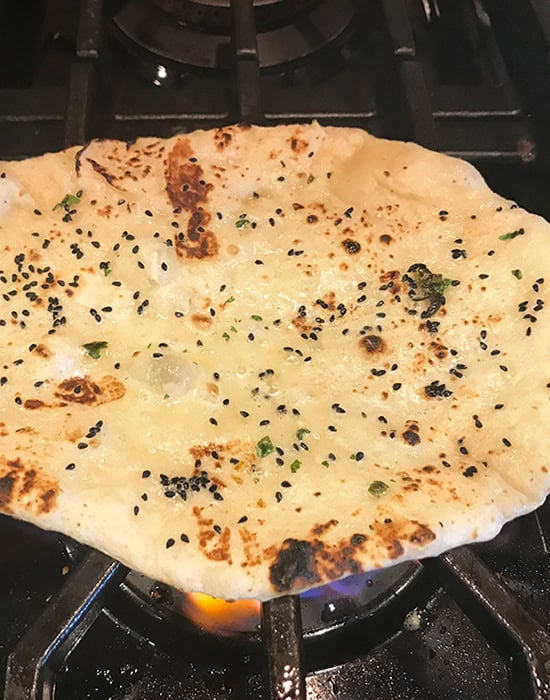
I made this garlic naan on the stove top. Traditionally naan is made in a tandoor (clay oven) but at home, I prefer the stove-top method because they are much softer and better when cooked on a stove-top compared to when cooked in an oven.
I highly recommend cooking these on a cast iron skillet. I have made these on non-stick and other pans; they taste so much better when made on a cast iron because the cast iron gets really hot (like tandoor) and retains heat (and distributes heat evenly), making the naan chewy. It also gives the naan a smoky flavor which you don’t get with non-stick pans.
Troubleshooting My Garlic Naan Recipe
- Dough too sticky: my recipe results in a sticky dough, but resist the temptation to add more flour as this will make then naans dough-y. Let the dough rest if it’s becoming difficult to roll and then roll gently. Apply some oil on your hands while handing the dough- it helps.
- Yeast not rising: If there’s no froth after 5 to 10 minutes of adding active dry yeast to warm water, discard the mixture and start over again. It most probably means either your yeast is old or the water you added was too hot (hence killed the yeast) or too cold (yeast couldn’t activate). Optimal range for active dry yeast to activate is between 105-115 F degrees.
- Unable to roll the naan: the dough is sticky so rolling the naan can feel tricky. Let the dough rest and then roll gently. Apply some oil on your rolling pin also while rolling these naans. Roll lengthwise first and then roll sidewise.
Let’s See How I Make Garlic Naan At Home!
- Let’s activate the yeast first
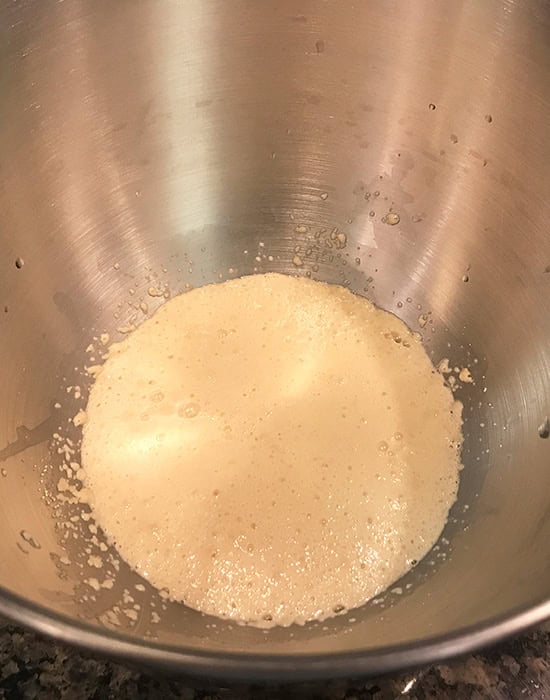
Since I use active dry yeast for the recipe, it needs to be activated first. Mix the yeast with warm water and some sugar and let it bloom. It should be nicely frothy within 5 to 10 minutes. Only then add milk, yogurt and oil.

- Mix in the dry ingrdients
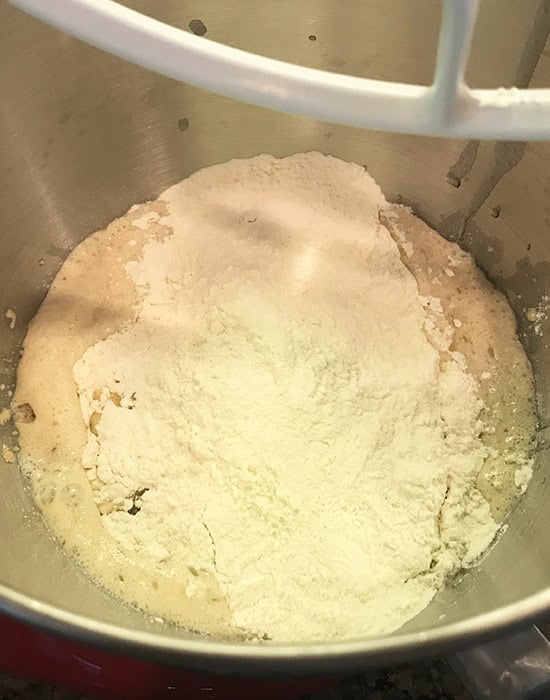
Once the yeast is activated, add the flour and salt and make a sticky dough. This is a sticky dough, so do not try to add more flour at this point. I also add some grated garlic to the dough.

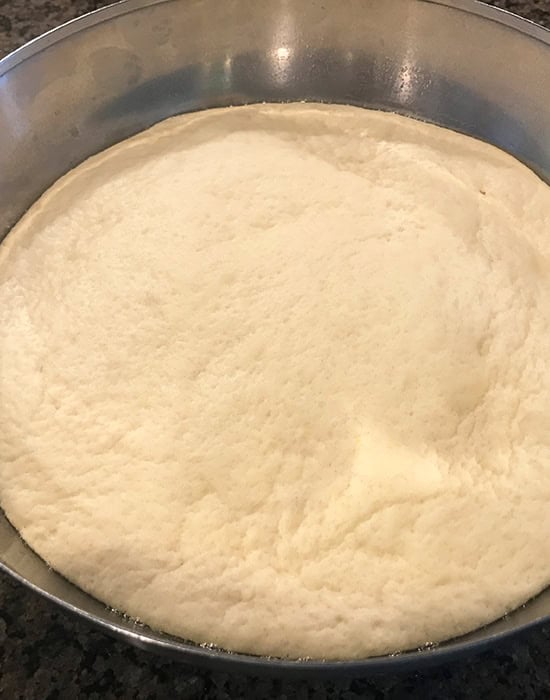
- Wait for the dough to rise
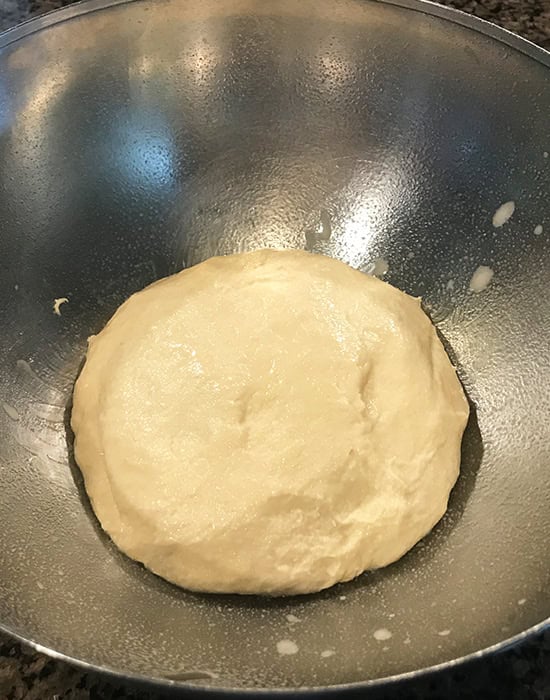
It will take around 60 to 90 minutes for the dough to double in size. If you live in a cold place, you can place the bowl in the oven with the oven lights on (but oven should be off).
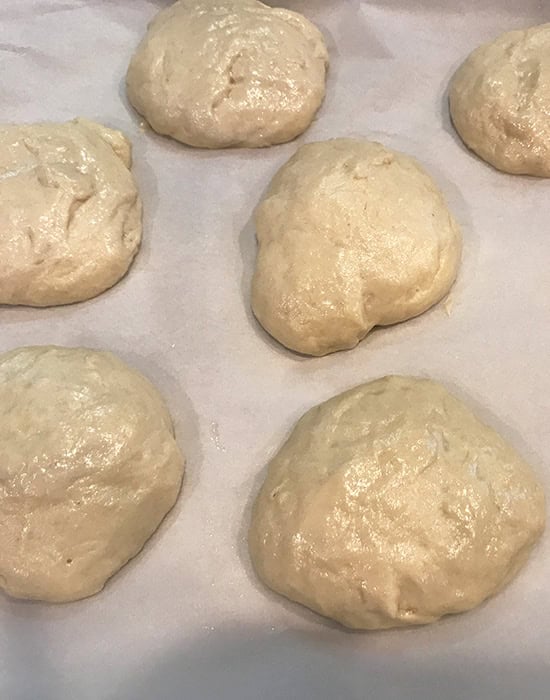
- Then get to rolling!
Give the dough rest after each step. After dividing the dough into 8 equal parts, let the dough balls rest for a while before rolling them. Roll the dough gently using a rolling pin.
- Cook on a hot pan!
Once rolled, cook them on a cast iron skillet and and finish by cooking them on direct heat for that smoky flavor. Brush with more garlic butter before serving.
Freezing the naan
You can easily freeze these garlic naan- both cooked and uncooked.
Freezing cooked naan: You can freeze the naan after cooking them completely, just skip the step of brushing them with garlic butter. Let the naans cool down completely and then store (with layers or parchment paper in between each naan) in a zip lock bag for up to 3 months. Reheat in the microwave or pan and then brush with garlic butter before serving.
Freezing uncooked naan: To freeze the naan uncooked, make the dough and let it rise. Then divide the dough into equal parts and roll all the naan. Place a piece of parchment paper and then place a rolled naan on top of it. Now place another piece of parchment paper on top of the rolled naan and then place another naan on top. Basically, you stack them one by one, with a layer of parchment paper in between each naan. Once you have stacked them all, place them in a freezer bag, squeeze out as much air as possible and freeze. Cook on the skillet directly from the freezer when you want to eat them and brush with garlic butter before serving.
Restaurant Style Garlic Naan (Soft & Pillowy)
Ingredients
- 3 & ¼ cups + 3-4 tablespoons all purpose flour, 423 grams + 27-36 grams , also known as maida
- 1 teaspoon salt
- 1 cup water, lukewarm, 8 oz
- 1 tablespoon sugar, 12 grams , I used granulated white sugar
- 2 teaspoons active dry yeast
- ⅓ cup milk, 80 ml lukewarm, I used whole milk
- 2 tablespoons plain yogurt, I used plain whole milk yogurt
- 3 tablespoons oil, 45 ml , I used vegetable oil
- 2 large garlic cloves, grated
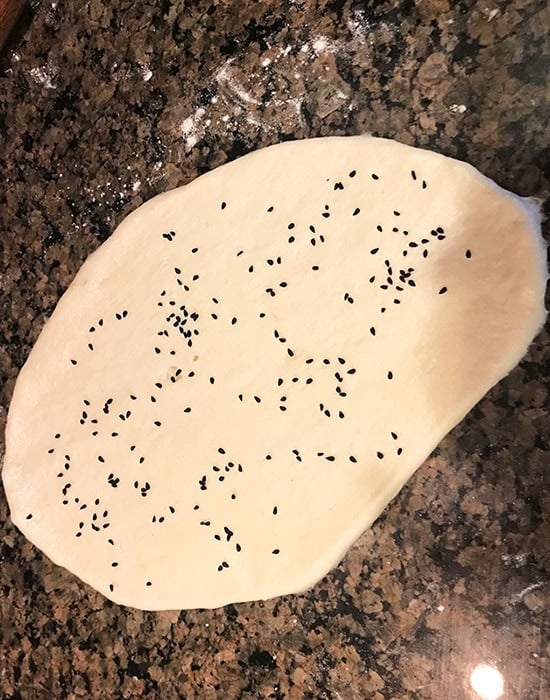
- nigella seeds/kalonji, optional, to sprinkle on top of naan
Garlic Butter, to brush on naan
- 3 tablespoons butter, I used unsalted
- 3 tablespoons chopped cilantro
- 2 teaspoons minced garlic
Instructions
- In a bowl whisk together 3 & ¼ cups all-purpose flour (423 grams) with 1 teaspoon salt. Set it aside.
- To the steel bowl of your stand mixer, add 1 cup lukewarm water (8 oz) and then add 1 tablespoons sugar and 2 teaspoons active dry yeast. Give it a quick stir and let it bloom for 5-10 minutes. You will know the yeast is activated when it’s all bubbly and frothy on top.
- Once the yeast is activated, add 1/3 cup milk (lukewarm), 2 tablespoons plain yogurt and 3 tablespoons oil. Add the flour mixture and mix using the paddle attachment on your stand mixer until combined. Also add 2 garlic cloves (grated).
- Start adding the remaining 3-4 tablespoons of flour (27-36grams). Add 1 tablespoon at a time and add more if the flour feels very sticky. The dough will always be a little sticky, so do not add more flour to make it dry. I ended up adding extra 4 tablespoons flour (36 grams) at this point.
- Knead with hands or with the dough hook attachment of your stand mixer for 1-2 minutes until the dough is smooth. Transfer the dough to a greased bowl.
- Cover the bowl with a kitchen towel and let the dough rise in a warm place for 60-90 minutes. If it is cold where you live, pre-heat your oven for few minutes and then turn it off. Then place your dough inside the oven (remember the oven should be off!)After around 90 minutes, the dough will be more than double in size. Punch the dough gently to release the air.
- Divide the dough into 8 equal parts (around 100-105 grams each). Dough will be sticky so oil your hands while dividing the dough. Cover the dough balls with a kitchen towel and let them rest for 10-15 minutes.
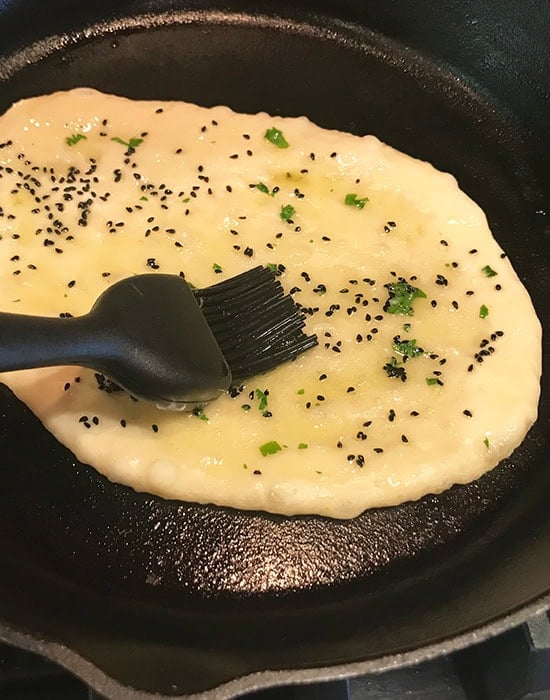
- Meanwhile melt 3 tablespoons butter, add 2 teaspoons minced garlic and 3 tablespoons cilantro (chopped) to it. Mix well and keep the garlic butter ready to brush on the naan.
- Heat up a cast iron skillet on medium-high heat. I highly recommend using an iron skillet to make these naans. Take a dough ball and roll it into an oval shape, around 10 to 11 inches long and 6 inches wide. Apply a little oil on top of the dough before you try to roll it. Also oil your rolling pin. Do not try to roll the dough like you roll a tortilla/roti/paratha. Simply stretch it length wise and then width wise.Dip your finger in water and then sprinkle some nigella seeds on top. This is optional.
- Transfer the rolled naan onto the hot skillet. Let it cook for a minute or two until you see bubbles on top. Brush the naan at this point with the prepared garlic butter. You can skip the step of applying butter at this point and apply it directly once the naan is cooked. I like applying it twice –>more garlic flavor!
- With the help of a tong, remove the naan from skillet, flip and transfer directly to the gas. There will be a little mess as the butter will pour down (cover the sides of the burner with aluminum foil to make cleaning easier if you want). Cook the garlic naan for 15-20 seconds (directly on gas) until nicely golden brown from both sides.
- Remove from heat and brush with more garlic butter. Serve these homemade garlic naans with dal makhani or butter paneer!
To Cook Garlic Naan in Oven
- To cook the garlic naan in oven – pre-heat oven to 500 F degrees. Arrange rolled naan on a baking tray and then bake for 4-5 minutes or until golden brown. Remove naan from oven and apply the garlic butter. If you want, you can then place the naan in the oven under broiler to get them charred.
Notes
- You can make smaller naans if you want, these are pretty big, like the ones you get in restaurants.
- The cast iron skillet needs to really hot before you add the naan on it. This way the dough rises faster and you get puffy naan!
Nutrition
Nutrition information is automatically calculated, so should only be used as an approximation.


I have made this recipe a couple times already, and as a first-generation Indian, I was so impressed with how easy everything came together! The flavours and textures were spot-on! My entire family was so impressed!
The only thing I did differently, was make smaller portion sizes, as that is the way Naan is typically served in my household!
glad to hear Jasmine!
worked well for me but aren’t those pics from pinterest.. did you actually end up making them, if so why not put it in the website?
Hi Sophia, I think you are misunderstanding. These are my pictures, clicked by me, on my website. I pin them on Pinterest so that people can find this recipe and come to my blog. So these pictures are not from Pinterest. They are just my pictures, pinned to Pinterest. We bloggers get traffic from Pinterest so we pin our images there. Hope that clears things. Thanks for trying the recipe!
I am making naan for a dinner party and I’d like to do it ahead of time; what would you suggest? I was thinking of making them earlier in the day and then just reheating them in the oven right before we eat. I don’t want them to dry out but I don’t want to be frying them fresh while I have guests. Thanks!
yes I have done that, make them and re-heat in oven before serving
Can I make this in the bread machine?? Also can I make a double batch and freeze it for later?? If so is it better to freeze the dough (after rising and rolling) and cooking it frozen/thawed or better to freeze it already cooked and just reheat in the oven??
I don’t have experience with bread machine so I really can’t say sorry. Yes you can double the recipe, I would suggest dividing the dough into ball and then freeze. You can also roll and freeze (between layers of parchment paper). I have tried this way and it works fine.
The worst naan recipe ever! Dough was unmanageable- it was so sticky I could not do anything with it – DNOT TRY THIS RECIPE, YOU WASTE PRECIOUS TIME.
Hi John, sorry it didn’t work for you. The recipe has lots of amazing 5 star reviews so it’s definitely not the worst recipe. So many people love it. Did you weigh the ingredients or used cups, that can make a difference. Yes it is a sticky dough because that’s what makes the naan fluffy and nice. Too much flour and naan becomes dense. You could have definitely added more flour if it was too sticky (since every flour brand is different and it can absorb more or less water depending on the flour brand you use). You need to grease your hands well, let the dough rest. I can promise you that this recipe works, I wouldn’t share otherwise. Thanks for trying!
its not the recipe, its the cook!
I have to disagree with this comment, the dough is supposed to be sticky when you put it in the skillet, otherwise, you end up with a dry piece of dense bread. Just make sure to put enough flour on your hands when handling the dough. It seems the commenter has not had much experience handling different types of doughs/flour-based products. Adding more flour would turn the naan bread into some type of pizza bread and change the taste/texture completely.
you know it! 🙂
Hi!
I have a glass bowl for my mixer. Should I change anything for measurements?
Thanks!
no should be same
How to best cook the frozen stretched dough.
you mean rolled frozen naan? you can transfer it directly to oven, add few minutes extra since it’s straight from the freezer
Hi….just making these as I text you… once thw dough has risen, and I have separated into 8 balls, can I freeze them and then use when I need them??
sorry for the late response I was on vacation. Yes you can do that or roll them and then freeze.
This recipe has become a staple for my house! I make it once every couple of weeks and it is a favourite! It is also a really good base/dough recipe to make cheese naan with mozzarella.
the addition of cheese sounds delicious!
Very delicious, my husband said it tasted better than the local indian restaurant! 😊l
glad to hear!
Made this last night and they turned out so delicious! A couple things I had to do differently – I don’t have a stand mixer, so I had to knead by hand. I did about 5 or 6 minutes of hand kneading. I also have a flat electric stove, so I just did both sides in my little cast iron. I ended up closer to 16 mini-naans because my skillet was smaller. Only problem there is that I ran out of garlic cilantro butter at the end 😀
Super easy recipe to follow and I’m so glad I found this delightful blog.
thanks for trying!
Just wondered if there are any tips for cooking the nan in a tandoori oven?
I don’t have a tandoori oven, but there was instructions for regular oven!
I do not have a tabletop mixer, so unfortunately I had to use a wooden spoon (as I normally do when cooking/baking.) the dough was so incredibly sticky, even after adding the extra 3-4 tablespoons of flour. I had to add another cup (including the extra 3-4tbsp) of flour for it to be a slightly sticky, but formed dough ball. It has still risen properly, and baked great. I used parsley on top rather than cilantro (just a personal preference) and it was delicious. This is a really lovely recipe, but I would recommend anyone mixing by hand to use a little more flour than the recipe calls for.
This was easy and delicious
glad to know!
If I want to double the recipe, do I have to do anything different or just double everything?
Hmm I have never doubled it but yes I think everything double should work
If I freeze leftover dough, how do I cook it later? Thaw it first and then cook it the same way with the skillet?
yes I would suggest rolling and then freezing (between layers of parchment paper).
Delicious! The best Naan recipe I have tried! Thank you! I am wondering…it’s just two of us, so for the remaining dough….should I roll it first and then freeze? Or freeze in the ball stage? wonder if there is the best way to do this? thank you!
Roll it place on baking tray, let it harden, then stack between layers or parchment paper and into a ziplock!
Hi Manali…please share notes if cooking with an induction/electric stove. How to work the last step?
I love your blog!!
Thank you
use a wire mesh rack please on top and then cook the naan over it!
This was so good! It was quite simple and did not take long to make. I think I did something wrong because my dough was extremely sticky even after adding more flour, plus a little more. I left it how it was, because it was easier to handle when coated with oil. Next time I’ll use a dough mixer. Other than that it was delicious!
glad to know Addison!
Delicious. I used the skillet for both sides rather than directly on the gas, and they worked out fine. Charred outside and lovely soft centre. Served with lamb, pumpkin and chick pea curry. The other half of the dough is rolled in the freezer waiting for next time.
I made this today and it came out perfect. Thanks so much.
glad to know Marilyn!
Hi Manali, if I make smaller naans, how thick should they be? Thanks
hmm the thickness can vary depending on how you roll. For smaller naans, make them 5 inches long and 3 inches wide maybe.
Can I use greek yogurt?
yes!
Thanks so much for the delicious recipe! Thank you for also including the nutrition attributes at the bottom! 🙂
I made this last night and it was a hit! I paired it with Minimalist Baker’s Kale salad with Tandoori chickpeas. My teens ate it up! Thank you for the recipe!
Hi! When taking the dough out of the freezer do you have to thaw it out before you put it in the oven?
Put straight in oven, add some extra time
Looking forward to trying to make these at the weekend – if I prepared them in the morning will they be ok to cook in the evening?
yes should be okay
Hello! This recipe looks delish, can’t wait to try it!
I unfortunately only have an electric stovetop and no iron skillet. Am I able to use a regular frying pan and if so should I have the heat on high?
Thanks!
no worries, just cook naan on the pan itself, follow steps here: https://www.cookwithmanali.com/vegan-naan/
Have made this so many times, absolutely love this recipe!
glad to know Cassie!
Wow the naan turned out superb..kids loved kid..i replaced multipurpose flour with whole wheat 1:3 and still it turned awesome…thanks for the recipie plz keep posting new
so happy to hear!
Hi! If you roll and freeze the dough like the recipe mentions, do you have to thaw it before cooking? Or can you take pieces out of the freezer and stick them straight into your cast iron? Thank you!
straight on the pan
Ahh that’s perfect! It will make it so easy for me to have fresh naan all the time! Thank you again!
The wetness of the dough may be affected by the type of flour you use. Some flour absorbs more water.
Very good recipe. Bread is nice and soft.
agree! glad you liked it
These come out perfectly every time! I skip the step of flipping them over on the burner, and instead just flip them over in the cast iron skillet and brush with cilantro garlic butter afterwards. They’re a hit with everyone who has tried them!!
so glad!
I made this baked in oven on a big Lodge cast iron griddle. Baked very fast, but my oven is old and I can’t pull rack out with heavy cast iron on it without rack falling down. Was tricky getting dough onto griddle without burning myself, dough ended up like very long and maybe 4-5 inches wide. Used a wide spatula to retrieve cooked naan. Plenty left to freeze and use later, then i would just chuck it on gas grill to warm up or in toaster oven. I’ll never buy store bought again if I have time to make this. Quality!
hi could you substitute flour for gram flour
you mean with besan (gram flour)? No not at all, besan is a gluten-free flour and works very differently. It cannot be substituted 1:1 with all purpose flour
I just made a batch today for guests who had never had curry. OMG, they loved this naan. I made a bunch and froze some for another time.
awesome!
Are you sure the measurements for the flour are correct?? I checked my scale and measured exactly but needed A LOT more flour.
Hi Sima, it’s absolutely correct. This recipe has been tried several times not only by me but also by so many readers who really love it. 🙂 I use a US standard size cup, if you measure the flour correctly, not scoop it but fill with a spoon and level it out then 1 cup all purpose flour comes to around 130 grams. so 3.25 cups as mentioned in the recipe – 3 cups (130 x 3 = 390 grams) + 1/4 cup (32.5 grams)is 423 grams. This dough is sticky, you can add more flour around 1/4 cup more if you not able to handle it but resist the temptation to make it dry else naan won’t turn out that nice.
I had the same issue, the original is extremely soupy! After working it out, I now use 500g of flour and 153g of water and that ratio is perfect.
I think the original is absolutely fine, tried and tested several times. You can additional flour but this dough is on the wet side just needs to be handled well.
These turned out so good. It tastes delicious. Had it with hummus. The dough was kinda hard to work with. But it was worth it. Thank you for the amazing recipe
Hi there
Can u freeze it when u done baking it?
yes you can try!
Hey have you tried making them with wheat flour.
I have not but some readers have and they liked it
Hi. Made this using a bread machine… worked like a charm. So yummy! Thank you for sharing.
Hi there, just wondering if you can freeze some of the dough to use later? Would it be best to do that after the proofing?
Thanks!
yes freeze after proofing. I would suggest making individual dough balls and then freeze.
Just to clarify, when you say the dough should be sticky but not too sticky, should it still be clinging to my hands when I transfer to an oiled bowl? Btw, I’ve tried the recipe before and it came out great. I just want to check if I’m doing it right. Thank you!
yes it will cling to hands, that’s okay
Hi Manali
This recipe is great. We are in England so we used plain flour which worked perfectly. The cast iron skillet worked well. We have tried them on a tawa before but it wasn’t hot enough.
We halved the recipe and made 4 naans.
Thanks
Ann
glad to know 🙂
Can’t wait to try this! I was always under the impression that I had to have a Tandoor for this. But, will it work if I’m stuck with an electric stove 🙁
yes just cook on the skillet itself 🙂
First time making this, it came out mostly like I wanted, though not quite the same texture as the kind I’ve had in restaurants. Probably just need to practice working the dough. I don’t have a mesh or gas stove so I just stuck them in the oven on the top rack on broil for a couple minutes, that seemed to work well.
Really delicious, and the instructions were really clear 🙂 I made them in the oven and they came out great! Thanks for sharing 🙂
glad to know!
This is so good! I made it last night to go with chicken tika masala. The dough is really soft and a bit difficult to handle but after a couple, I got the hang of it. For half the batch I baked in the oven and then char them on the stove. It’s a bit easier that way, but once you get the hang of handling the dough, it’s really not that difficult. Use oil liberally for sure. The husband loves it. Keeper for sure!
glad you liked it Trang!
These were AMAZING! I paired them with paneer butter masala and it was a HUGE hit at dinner!
Hi can I use instant yeast and if yes do I steel need to add the water?
probably use less of it though, around 1 & 1/4 to 1 & 1/2 teaspoons in place of 2 teaspoons that the recipe calls for. you will skip the proofing but will use the same liquid amount, that doesn’t change. IF you skip the water, that changes the recipe since you are reducing the liquid ingredients in the recipe. Having said that, I have not tested this recipe with instant yeast, so if you try it let me know how it goes.
Love this recipe!! I used instant yeast and followed the recipe exactly as it was directed and the naans turned out perfect!
if you dont have a gas range can you still cook over element with tin foil ?
you can use a wire mesh, place over induction and then place naan over that wire mesh.