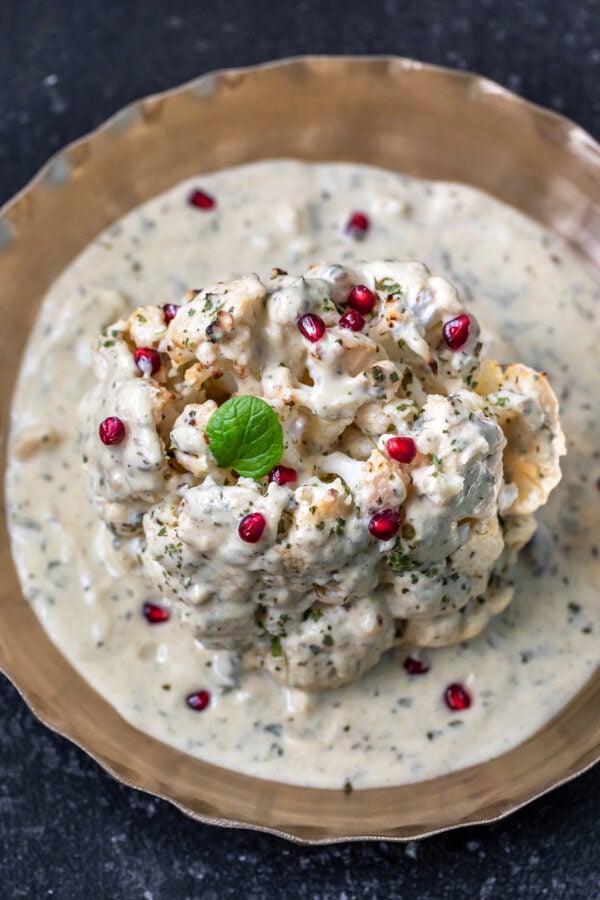
There’s nothing quite like a good plate of aromatic biryani. This Vegetable Biryani hits all the right spots with its wonderful aroma and exotic flavors! Loaded with veggies, crunchy cashews, warm spices like saffron, herbs like cilantro and mint, this biryani is a delight to the taste buds in every bite! For this restaurant-style veg biryani, the rice, vegetables, and herbs are layered in a large heavy bottomed pan and then slowly cooked (what we call “dum”) over low heat to infuse all the flavors together.
I love to eat mine with mirchi ka salan or cucumber raita.

Disclosure: This post contains affiliate links. For more information on my Affiliate and Advertising Policy, please click here.

My Go To Biryani Recipe That I Swear By!
A lot of people would argue that there’s no such thing as veg biryani. I would respectfully disagree! Let’s not confuse biryani with pulao. When I think of pulao, I think of it as a one-pot dish where I toss with rice with spices, vegetables and cook until done – mostly using a pressure cooker.
Whereas when I make biryani, it’s a multi-step process, involving multiple pots and pans and then bringing all the ingredients together into a big pot for the final process of dum. This is not a recipe that I make on a busy weekday (for those days, I end up making my one-pot instant pot biryani) rather I reserve it for special occasions, it takes time to put everything together but it’s totally worth the extra effort.
The vegetables and rice are layered, and the biryani is then cooked on low heat with some heavy object placed on top of the pot of biryani. This process is called “dum” and hence it’s also known as Vegetable Dum Biryani.
To make sure your vegetable biryani stands out, I swear by these tips:
- Choose the right rice: long-grain aged basmati rice is what gives the best results when it comes to biryani. I use Sella Basmati Rice, extra-long grain and it works great for this recipe.
- Pan-frying the veggies before cooking them: I like to pan fry them a little before cooking them completely and tossing them with biryani masala. This extra step gives the veggies a nice texture and makes sure that vegetables don’t get over-cooked or mushy.
- Using fresh ingredients: freshly minced ginger-garlic paste, fresh cilantro and mint, they all make a difference to the final aroma and taste of the biryani.
- Not cutting down on fat: the flavor of the biryani enhances when you use a good amount of fat in this recipe. So, don’t cut down on steps like frying the onions in ghee.
And when you scoop out the biryani, make sure to scoop it from the bottom so that you get all the layers in your plate. Then sit back, and enjoy your biryani!

Use a Steel Pot to Cook This Biryani!
I like to make this biryani in a 6 qt stockpot, even if you triple this recipe, it will still easily fit into this big of a pan. You probably don’t need a 6qt to make this recipe, but whatever pot you choose make sure it’s a deep one. Biryani involves layering of rice, vegetables and other ingredients and so it’s important to use a deep pan.
It’s also important to use a thick bottom pan, because we slow cook it on low heat towards the end by placing it over another flat pan. If you use a light bottom pan, the biryani might get burnt from the bottom during the process of “dum”. I would recommend using a steel thick and deep bottom pot to make biryani.
Let’s Make Vegetable Biryani
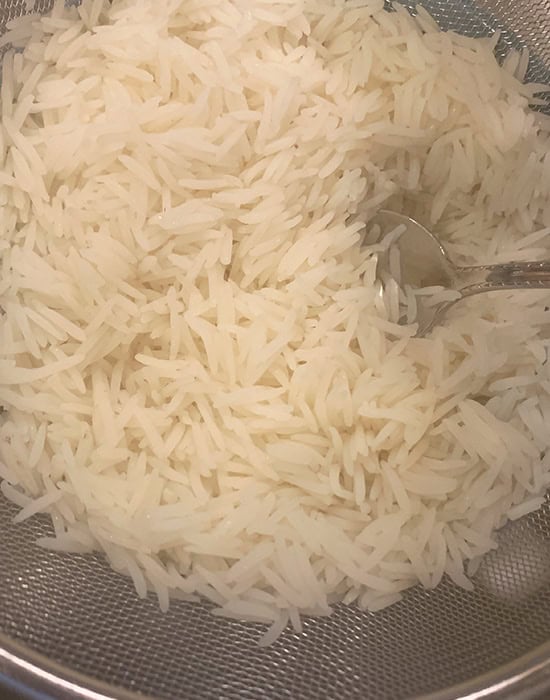
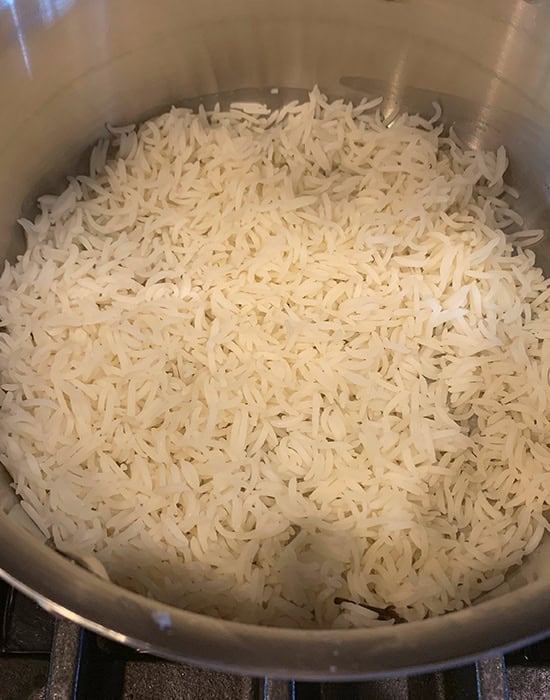
- Cook the rice only about 70-75%
Boil the rice with whole spices in a large pot of water, the key thing here is to not cook the rice completely. Cook them until they are around 70-80% cooked, there should be a bite to the rice grain at this point of time.

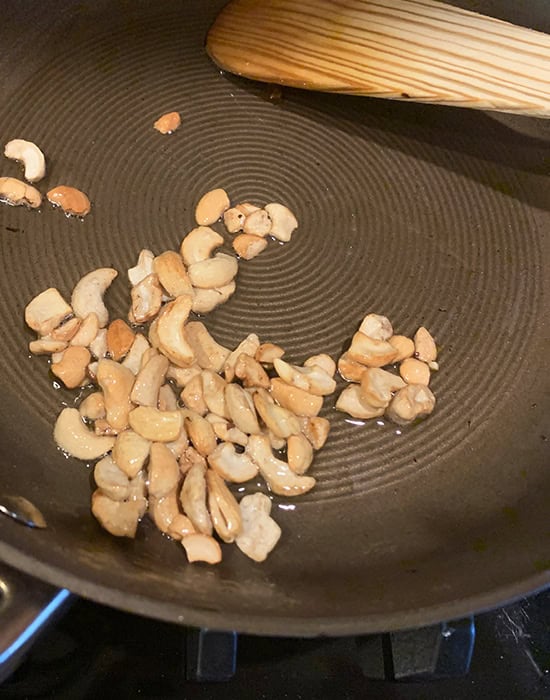
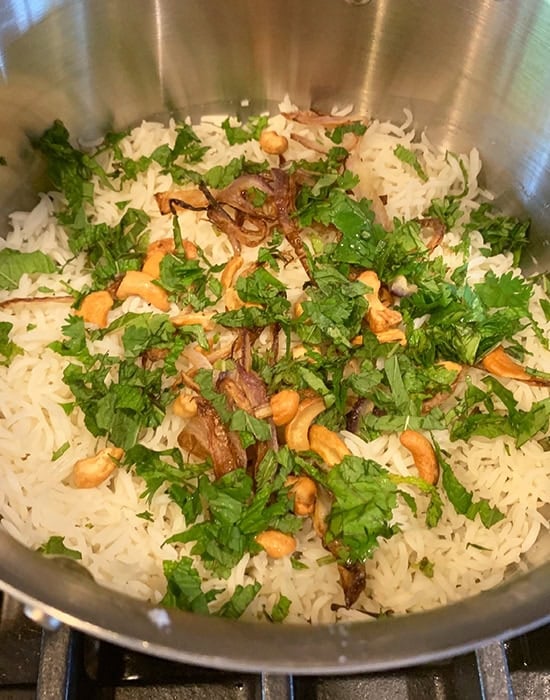
- Caramelized onions and fried cashew add crunch & extra flavor
Fried onions are essential in a biryani. I like adding cashews for the crunch, you can also use raisins, or almonds.

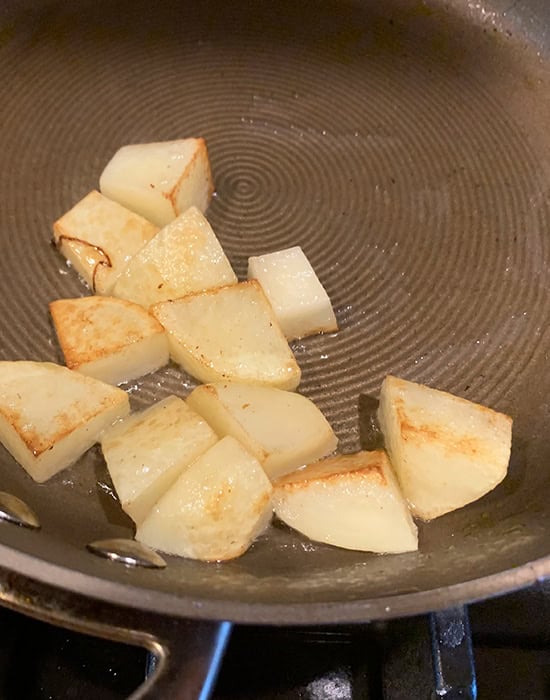
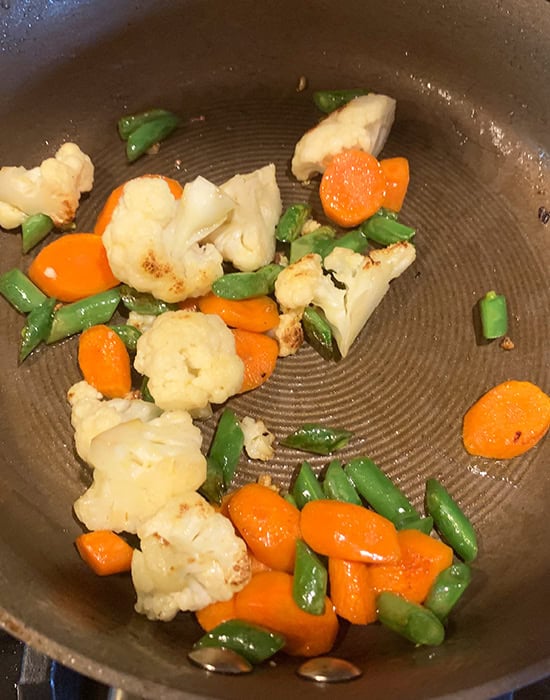
- Make it colorful with veggies
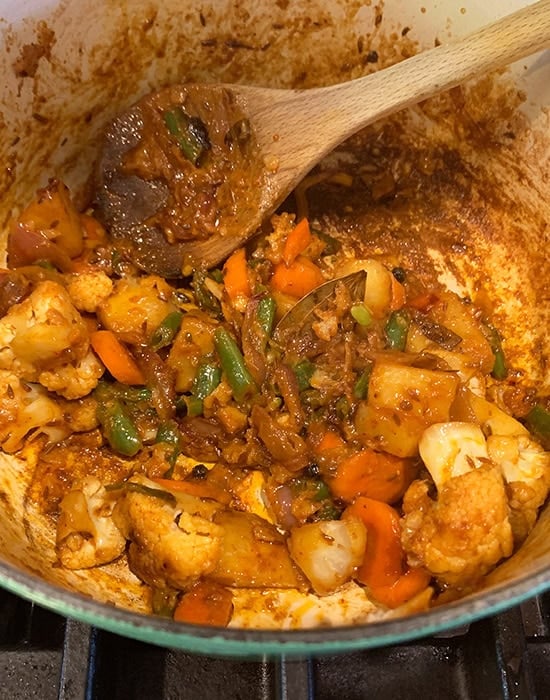
Pan fry the potatoes, cauliflower, beans and carrots first. You can also use mushrooms or even add tofu or paneer for extra protein.
Crush the saffron between your palms before adding it to milk, this helps in developing that beautiful color & aroma
- Use fresh ginger-garlic paste for best results
Whenever I crush fresh ginger, garlic using mortar and pestle, the dish instantly tastes 5 times better, the aroma is unmatchable.
- Yogurt and biryani masala are the flavor enhancers
Yogurt does not only bring the veggies together but also gives them flavor. The last step in cooking vegetables involves adding biryani masala, you can use your favorite brand.
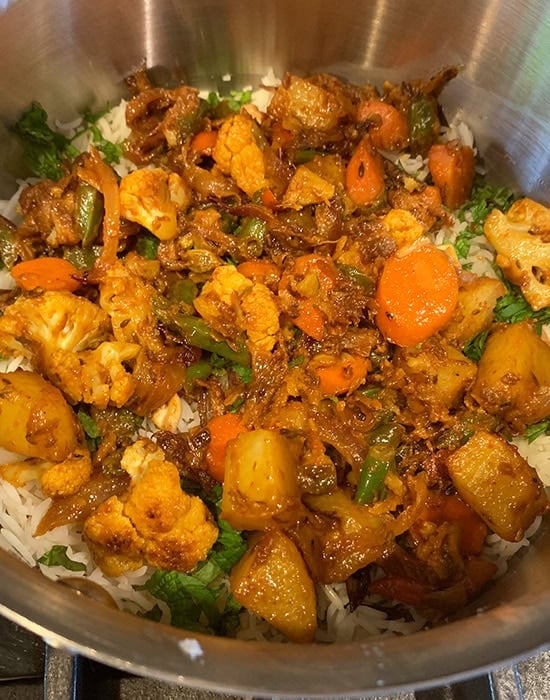
- Let’s layer the biryani!
I always like to spread a layer of ghee at the bottom first and then add a layer of rice. Remember to use a thick bottom pan for this recipe.

- Build layers for maximum flavor
After the rice comes the layer of fried cashews, onion, fresh herbs and followed by a layer of aromatic vegetables.
- Dum the biryani
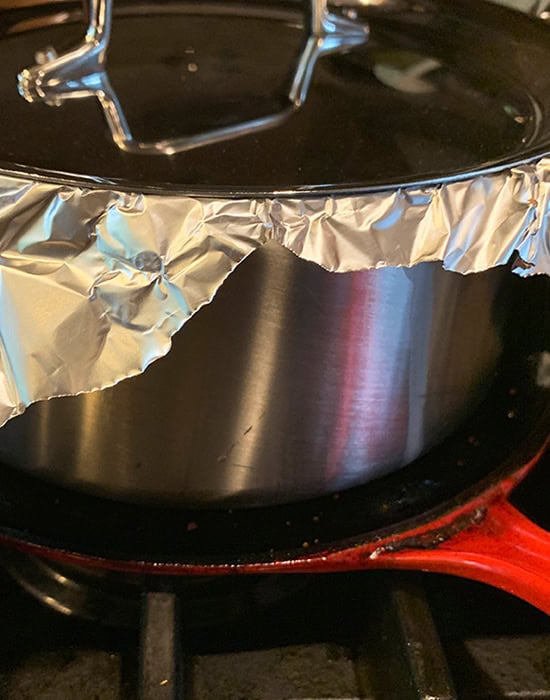
Once all the layers are organized, pour the saffron milk, ghee and seal the pot. Some people use atta dough for this, but I just cover it with aluminum foil and then place a tight lid on top. Remember to place the pot over a pan and then dum on low heat.


Can you make this biryani vegan?
It’s actually very easy to do so! Only make these three changes, the rest of the recipe remains the same.
- skip the ghee
- replace plain yogurt with non-dairy yogurt (like almond milk yogurt) or with coconut milk
- use non-dairy milk to make saffron milk
Storage & Re-heating
Store any leftover biryani in an airtight container. To reheat, transfer the biryani to an oven safe bowl and reheat at 350 F degrees F for around 20 minutes. You can also reheat in the microwave until heated through.
Make Ahead Option
If you wish to make this biryani for a party, here are few steps that you can do in advance which will save you time on the day when you wish to serve it:
- Cook the vegetables and keep them ready.
- Fry the cashews and onions and get them ready.
- Cook your rice on the day you want to serve the biryani, then layer and dum the biryani. Keep it warm in the oven at 250 F degrees until it’s time to serve.


Restaurant Style Vegetable Biryani (Veg Biryani)
Ingredients
- 1 cup basmati rice, 200 grams , soaked in 3 cups (24 oz) water for 30 minutes
- 6 whole green cardamom, divided
- 4 cloves, divided
- 1 teaspoon salt, divided
- 2 tablespoons + 2 teaspoons ghee, divided
- 2 medium red onion, thinly sliced, divided
- 2 tablespoons broken cashews
- 1 small potato, cubed
- ½ cup cauliflower florets, medium sized florets
- 1 medium carrot, cut diagonally
- 5-6 green beans, cut diagonally
- 2 tablespoons milk, I used whole milk
- saffron strands, generous pinch
- 1 inch ginger, crushed
- 4-5 large garlic cloves, crushed
- 2 green chilies, crushed
- 1 & ½ tablespoons oil, I used avocado oil
- ½ teaspoon cumin seeds, I used shahi jeera
- 1 inch cinnamon stick
- 1 bay leaf
- 3 whole black peppercorns
- ⅓ cup plain yogurt, I used whole milk plain yogurt, whisked and at room temperature, can add ¼ teaspoon cornstarch and whisk to prevent curdling
- 1 & ½ teaspoon biryani masala, or use 1 teaspoon garam masala
- ½ teaspoon kashmiri red chili powder, or use regular chili powder for heat
- ¼ cup water
- 2 tablespoons chopped cilantro
- 2 tablespoons chopped mint
- 1 & ½ teaspoon rose water or kewra water
Instructions
Cook the rice
- Soak 1 cup basmati rice in 3 cups water for 30 minutes. After the rice has soaked, drain the water using a colander.Heat a pot full of water (I use a 6 qt stockpot and fill it until it’s ¾th full), add 3 green cardamom, 2 cloves and ¾ teaspoon salt to it. Let it come to a boil on medium high heat). Now, add rice and stir with a spoon.
- Let the rice cook uncovered (don't lower the heat) until it's almost cooked, the rice needs to be around 70-75% cooked but not fully cooked. When you bite the rice grain, it should not be completely soft at this stage, there should be a nice bite to it. This takes around 6 to 7 minutes.
- Once done, remove pan from heat and drain rice using a colander. Add 1 teaspoon ghee to the rice at this point and toss it with the rice. Set this aside.
Caramelize onion & cashews and pan fry the veggies
- Heat 1 & ½ tablespoons ghee in a pan on medium heat. Once hot, add 1 medium onion (sliced) to it and cook until it turns golden brown in color and caramelizes. This takes around 8 to 9 minutes. Remove it on a plate.
- To the same pan, now add 2 tablespoons cashews (broken) and cook until golden brown, around 1 to 2 minutes. Remove on plate and set aside.
- To same pan add ½ tablespoon ghee more and then add 1 small potato (cubed), cook for 2 minutes until light brown. Remove it on a plate.Now, add ½ cup cauliflower florets, 1 medium carrot (cut diagonally), and 5-6 green beans (cut diagonally). Sauté for 2 to 3 minutes until veggies appear light brown in color. Remove them on the same plate with potatoes.
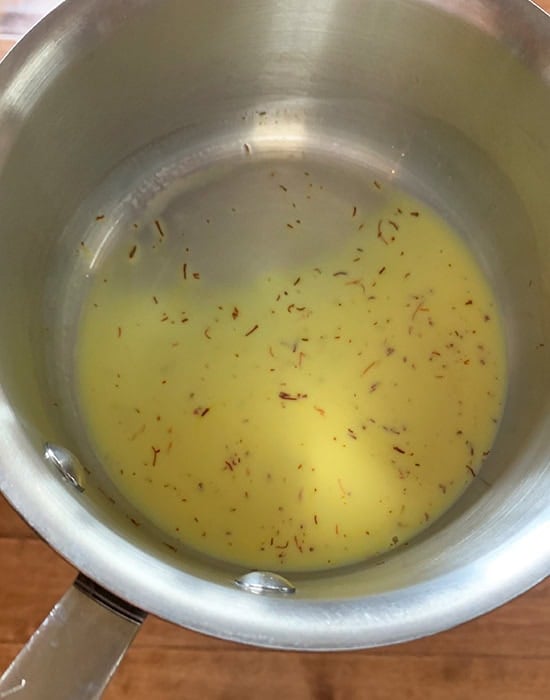
Make saffron-milk and flavor the vegetables
- Heat 2 tablespoons milk in a small pan on medium heat. Once warm, add generous pinch saffron strands (crush it before adding) to it. Let it sit for 10 minutes for that beautiful yellow color to develop. Saffron milk is ready, set it aside.
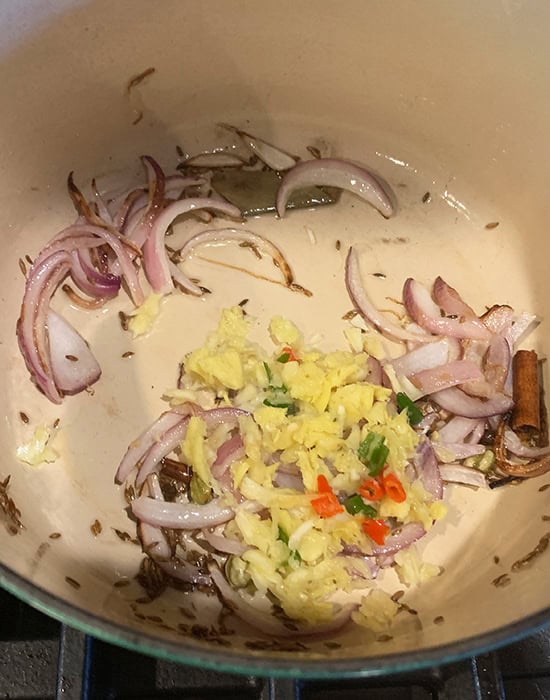
- Crush 1-inch ginger, 4-5 large garlic cloves and 2 green chilies using a mortar and pestle. Set aside.
- Now, it's time to cook the pan-fried vegetables with yogurt and spices. Heat 1 & ½ tablespoons oil in a pan/pot on medium heat. Add ½ teaspoon cumin seeds, 1-inch cinnamon stick, 1 bay leaf, 3 whole black peppercorns, remaining 3 green cardamom and remaining 2 cloves.
- Stir and let the spices sizzle for few seconds. Add 1 medium onion (sliced) and add ¼ teaspoon salt. Cook for 3 to 4 minutes until onions turn light brown. Then add the crushed ginger-garlic and green chili paste that we had prepared earlier.
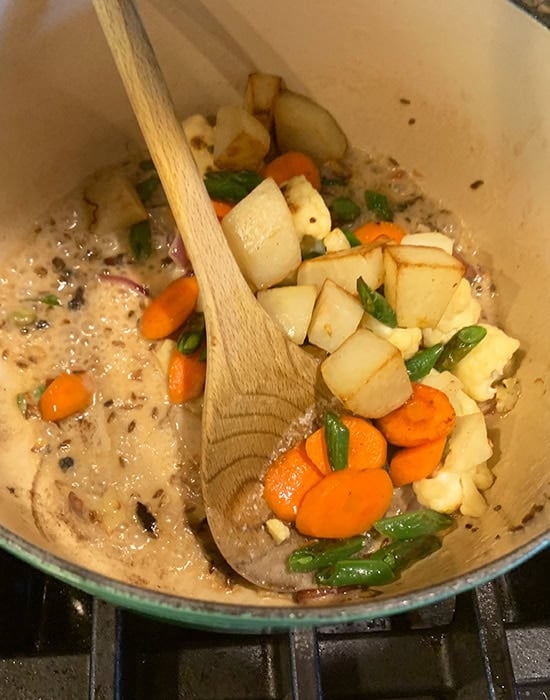
- Cook for 2 minutes until the raw smell goes away. Remove pan from heat and whisk in ⅓ cup plain yogurt, whisking continuously until it's all absorbed. Put the pan back on heat. Add all pan-fried veggies to the pot now and toss to combine.
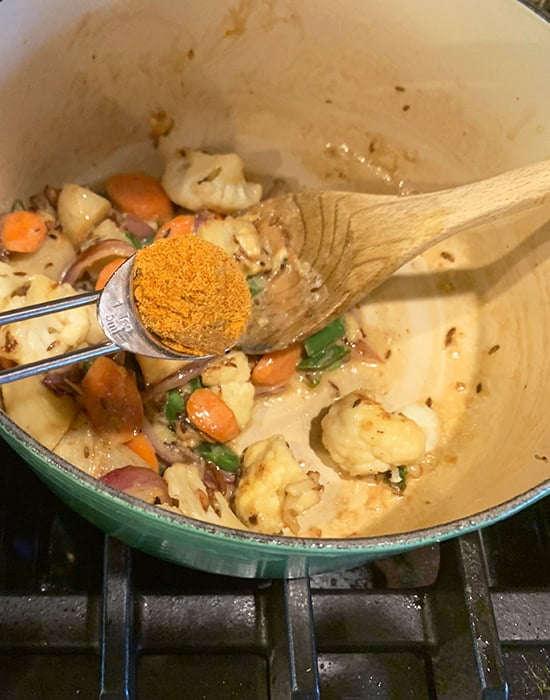
- Add 1 & ½ teaspoon biryani masala and ½ teaspoon Kashmiri red chili powder and mix. Then add around ¼ cup water. Cook for around 6 to 7 minutes until veggies are almost cooked but not overcooked. They should be firm to bite.You may also cover the pan; I usually cook uncovered. There shouldn't be much water left, it should be kind of a thick mixture. Remove from heat.
Layer the biryani
- Now take a heavy bottom deep pan (I use a 6qt stockpot). I first grease the bottom of the pan with a little ghee. Then add a layer of rice (half of the rice). Top with half of fried onions, half of fried cashew, 1 tablespoon cilantro (chopped) and 1 tablespoon mint (chopped). Add ½ teaspoon rose water. Now layer the veggies on top of this (all of it).Then add another rice layer (remaining rice) on top of the veggies. Then top it with remaining fried onion and cashews, remaining 1 tablespoon chopped cilantro and remaining 1 tablespoon chopped mint.
- Add the prepared saffron milk and the remaining 1 teaspoon rose water on top. And finally drizzle the last remaining 1 teaspoon ghee on top. Sprinkle some biryani masala (optional). I did 2 layers of rice and 1 layer of veggies. If your pan is small, you may do more layers, but the end layer should always be of rice.
Dum the biryani
- Cover the pan tightly with aluminum foil. Then cover with a fitted lid. Heat a flat pan on medium heat. Once hot, reduce the flame to lowest. Place your biryani pot on top of the pan and let it cook for 25 to 30 minutes on lowest heat (dum).
- Scoop out the biryani from the bottom of the pan so that each serving has both the veggies and the rice. Serve vegetable biryani with a side of raita.
Notes
- I have used potato, beans, carrots and cauliflower in this recipe, you can use mushrooms, peas as well.
Nutrition
Nutrition information is automatically calculated, so should only be used as an approximation.
 Your feedback is valuable!Please share your comments, ratings, and any suggestions or adaptations below to help us improve and make our recipes more successful.


Wow. That was delicious! I had to heavily dial down the heat for my Swiss guests but it did not hurt it at all. They thought it was wonderful and found the flavouring excellent. Everyone had a second serving. Yes, the recipe is complex – but it is worth taking the time and following every step. Thank you Manali, you’ve got a new fan.
Thanks Robbi, glad you enjoyed!
Which store brought the best biryani masala? Could you please suggest
there are so many! use the one you like, the one I used here was shaan
I took another commenter’s remark about the dish being bland to heart and added flavor at 3 points:
– cooking the rice; I added 1/2 t of cardamom powder and used 1.5 C of spice stock (from the Curry Guy’s recipes) in 6 C of water
– 1 t of “mixed powder” in each batch of onions ((from the Curry Guy’s recipes)
– using 6 black peppercorns in the dry spices
Also, I have never cooked basmati rice on the stove before (I’ve always used a rice cooker), so I had no idea at what time the rice would be par-cooked. The answer was at 3-4 minutes. When I tested the rice at 6 minutes (per the recipe), it was fully cooked. So, I had to adapt the rest of the recipe. I cooked all of the vegetables to about 3/4 doneness, and instead of using the dum method to finish the cooking, I layered the biryani into an 11 C glass, food storage container and put it in and 1100 W microwave, covered with cling film, for 7 min. It came out fine, with the added benefit of not needing to transfer the dish to a storage container for refrigeration.
Thanks for sharing your feedback.
This looks so good! How does it hold up to freezing?
Hi Purva, I have never tried freezing it so can’t comment on how it holds up. If you try freezing it, let me know how it worked out!
Thanks so much for your recipe. I’m going to try it this weekend 🙂
Jut to let you know, when one scales up the recipe 2x or 3x the metric measurements remain the same.
hope you enjoy it Amy, I am aware of the 2x, 3 x problem, it’s a recipe card issue
Awesome recipe. Thank you for sharing it and presenting the steps so clearly. It was definitely the best biryani that I have made at home. I generally think of biryani as a meat dish, but the cauliflower, potatoes, and carrots provided such a delicious chewiness that I did not miss the meat at all. For making it vegan, I used yogurt made from almonds and I used a heavy Dutch oven for the “dum” part of the cooking, which worked out beautifully. Your instructions for browning the vegetables before the cooking, as well as timing of cooking the rice and vegetables were spot on! The biryani turned out to have just the right moisture content. The vegetables were tender and not soggy and the rice had lovely long grains that were slightly crisp on the bottom layer.
Thanks Nikhil! I am glad you enjoyed the recipe. I appreciate you taking the time to leave this feedback 🙂
It was plain and didn’t have a lot of flavour. The recipe wasn’t very well written and I had to keep scrolling up and down, if you do it exactly the order it is written in it will take an unnecessary amount of time it is better to say cook the rice WHILE preparing the saffron milk WHILE frying the vegetables but to be able to do this requires going back and forth on the instructions. This recipe also uses A LOT of pots and pans which wouldn’t be necessary if it were structured better. Definitely requires far more seasoning.
Sorry you didn’t like it. Traditional dum biryani is not an easy or straight forward recipe. It involves multiple steps and pots and pans. Here’s an easy one pot recipe to make biryani: https://www.cookwithmanali.com/easy-instant-pot-vegetable-biryani/. However when made in one-pot, it’s usually called “pulao” and not biryani. Biryani does involve multiple steps. Thanks for trying
Hi Manali! Thanks for this recipe! Is it possible that in place of rice, I can use quinoa in the recipe?
You can, but the whole process will kind of change, quinoa might turn out mushy in this whole process. I would make a one-pot quinoa pulao rather than going for this layering process with quinoa because I am not sure it will work the same way.
I often see “green chilies” listed as an ingredient in Indian recipes. Can you tell me what kind of chilies are intended? Does this mean raw jalapenos? Or another type of pepper?
use Thai chili peppers when an Indian recipe calls for green chilies, hope this helps!
This recipe tasted amazing but I used the 3x ingredient calculator setting…. sadly the instructions didn’t update accordingly. Which made the whole process excruciating.
Hi Sarah, thanks for trying! The instructions won’t update unfortunately nor the measurements on the right side, it’s a plugin thing and there’s recipe no plugin which would update the instructions when you do 2x, 3x. Glad you liked the taste!
Hello
I don’t have a flat pan
So, can I place the Biryani pot on top of a pre-heated cookie sheet and cook/steam the Biryani in the oven?
Ta
Holley
yes should work!
Is it possible to double this recipe to serve more people? Would that change the cooking time?
It is possible to double, the time it takes to cook the vegetables will change a bit (more) but the end step of keeping the biryani on low heat and giving it “dum” will remain same.
Came out perfectly delicious.
i make this Vegetable Biryani today at home to follow your steps, and the result was awesome!
I love biriyani.
Very well Explained for a novice cook like me.
Trying it out today – keeping fingers crossed.
Hi Manali thanks for the awesome recipes ..just a request that can you post cups for onion, potatoes or carrots.. it’s very easy and perfect measurements. Bcos medium or small potatoes don’t know how small or medium I should consider.
Thanks
I will try and do that Pooja!
Hi Manali – we are vegans and yours is my favourite all time biryani! I use a mix of coconut milk and yoghurt and it works really well. plus – I make it ahead and put in oven (as you suggest) in an old lacruset pot with well fitting lid. many compliments including from non vegetarians! dawn
Thanks Dawn, so glad you all enjoy it!
This was very good. Definitely worth the time to individually pan fry the vegetables & follow all the steps. I substituted the ghee for avocado oil. For the sauce I used coconut oil. I used sliced almonds toasted in the pan instead of cashews. The final dish was excellent. Rice cooked perfectly & beautifully spiced. The vegetables were delicious. Served with warm naan bread. Everyone came back for more 10/10! Thank you!
welcome Marie, glad you liked it!
Hi Manali. Thanks for sharing your recipe. I am looking forward to trying it. After layering the biryani, you instruct to place your biryani pot on top of a pre-heated flat pan and let it cook for 25 to 30 minutes on lowest heat (dum). What is the purpose of putting the pot on top of the pan? Would it be okay to just put the pot directly on the stove and cook it at the lowest temperature for the 25 to 30 minutes?
Hi Debi, this process is called “dum” and this is how its traditionally done for biryani. We need very low heat so basically we need a layer in between for this process. The vapors from the spices, herbs everything mixes together with the rice this way. Hope this helps!
Thanks for explaining “dum”. I will follow your instructions exactly as written.
Hi Manali,
Is it possible to make this ahead of time and then reheat using the same method? i.e. placing the biryani saucepan on top of a flat hot pan and steaming? If yes, how long would you recommend steaming it for to warm it up? Open to other suggestions too, thanks!
I would make the whole recipe using an oven safe container (like all clad steel pot i have used here or a dutch oven). Then next day, just place the entire thing in oven. 250-300 F for 20-25 mins should be good!
Hi Manali. I’m looking forward to making this recipe. Had a question though. Is there a ratio for the rice to water for cooking the rice?
there’s no ratio but you can fill the pot with 6-8 cups of water. You only need to boil the rice until its 75% cooked so the ratio doesn’t matter here