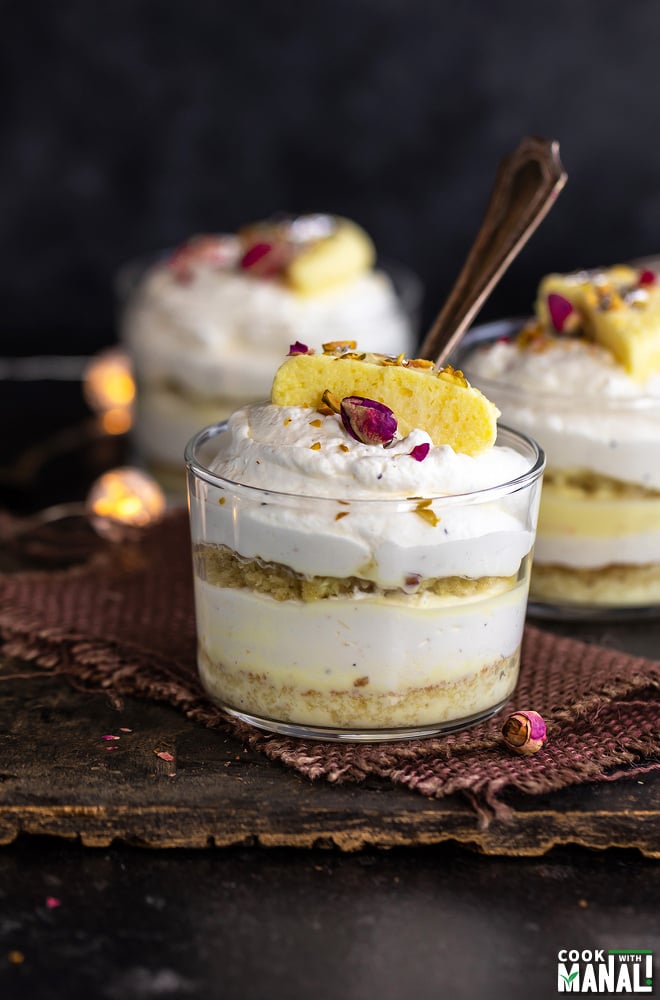
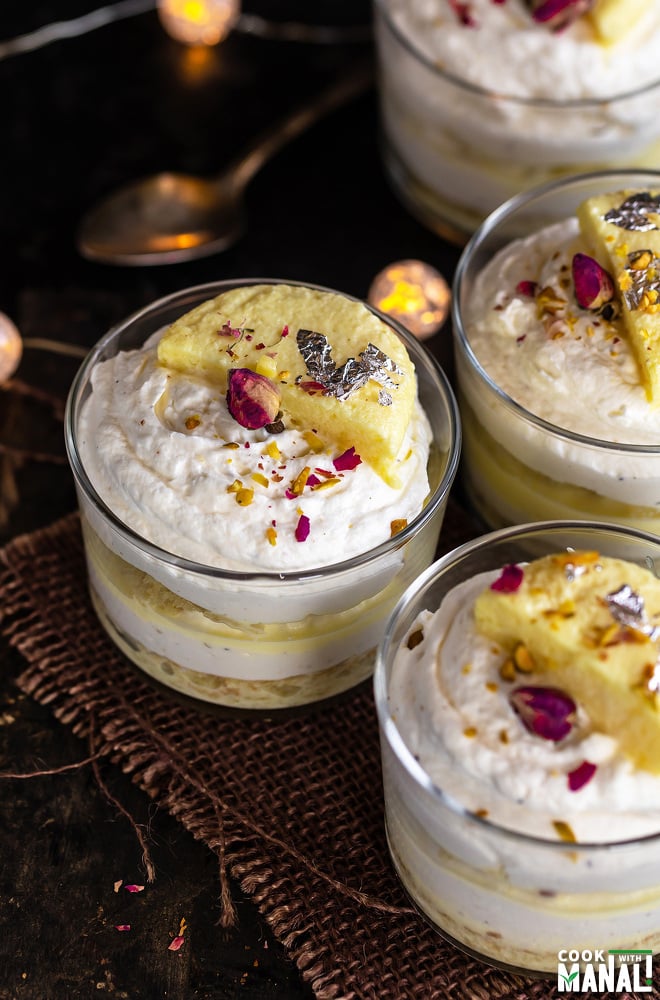
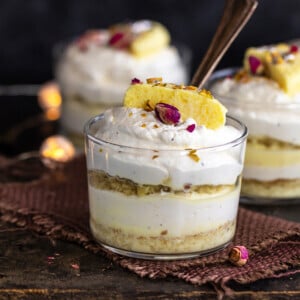
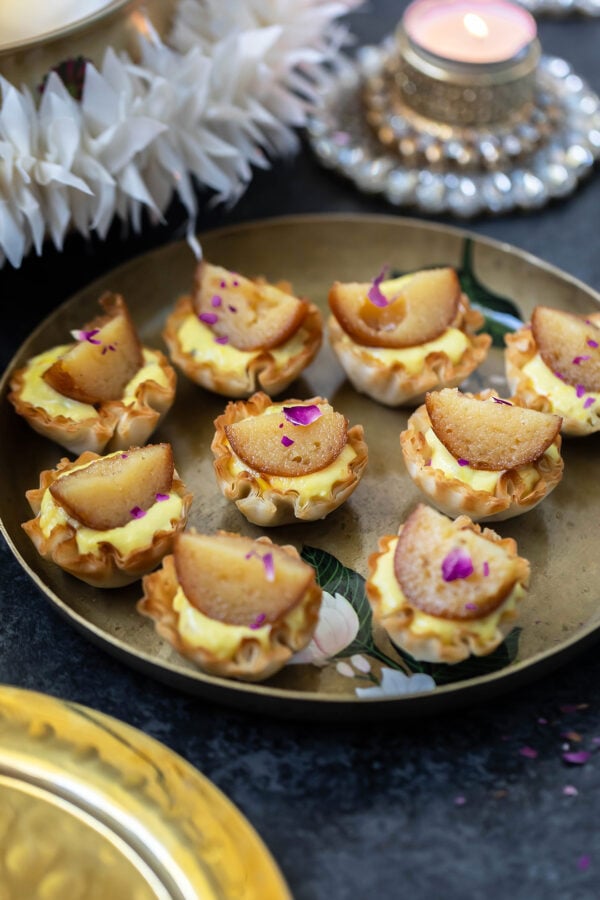
Rasmalai Cake Jars with layers of soft eggless cake, flavored milk and rasmalai flavored whipped cream.
Topped with rasmalai, these make a pretty festive treat and also a fun way to serve rasmalai.
Fusion dessert recipes in a jar are my thing. Whenever I have a dinner party at home, I always end up making Indian fusion desserts and serve them in jars.
There are few reasons for it- one, they are so much fun to eat and serve than the traditional mithai.
For example these motichoor ladoo cheesecake jars will definitely grab more eyeballs than just motichoor ladoo on the table. Right?
Second, it’s so much easier to serve desserts in jar. And last but not the least, these can be made in advance thus saving time on the day of the party.
So, are you guys sold on the idea now?
Well, this year I have these beautiful Rasmalai Cake Jars to share with you guys. This dessert combines the traditional rasmalai and pairs it with an eggless cardamom flavored vanilla cake and rasmalai flavored whipped cream.
Rasmalai is my favorite Indian sweet. When I was little, it was the only mithai that I liked other than my nani’s besan ladoo and motichoor ladoo. It was also the first Indian mithai that I mastered to make at home.
This time around for Diwali, I wanted to share rasmalai in a creative way and that’s how these jars were made.
These Rasmalai Cake Jars
✔makes a fun fusion dessert for the festive season.
✔easy to make and can be made in advance.
✔perfect to serve at your Diwali party!
How To Make Rasmalai Cake Jars
So there are 3 main components of this recipe!
1. Rasmalai: start by making Rasmalai (that is if you are going to make it at home). I have a in-depth post written on how to make soft rasmalai at home.
Many years back when I learnt how to make rasmalai, I made it so many times that I would joke that I could make this in my sleep too.
So, that’s what prompted me to write that post. It has all tips and tricks needed to make the perfect rasmalai.
Of course, a good option (and also time saving) is to buy it from store.
2. Eggless sponge cake: once you have the rasmalai ready to go, the next thing is to make an eggless cake or any basic vanilla cake that you want.
I flavor the basic vanilla cake with cardamom powder and bake it in a 9 x 13 inch sheet pan and then cut it into rounds for the jar.
You can make any cake recipe that you like, just flavor it with little cardamom powder.
3. Whipped cream: the whipped cream is the third integral part of this recipe. The cream is sweetened with the ras (the thickened milk) from the rasmalai.
And it’s also flavored with cardamom powder and rasmalai essense (if you have it).
Once you have these 3 components ready, it’s all about layering the dessert and then enjoying it.
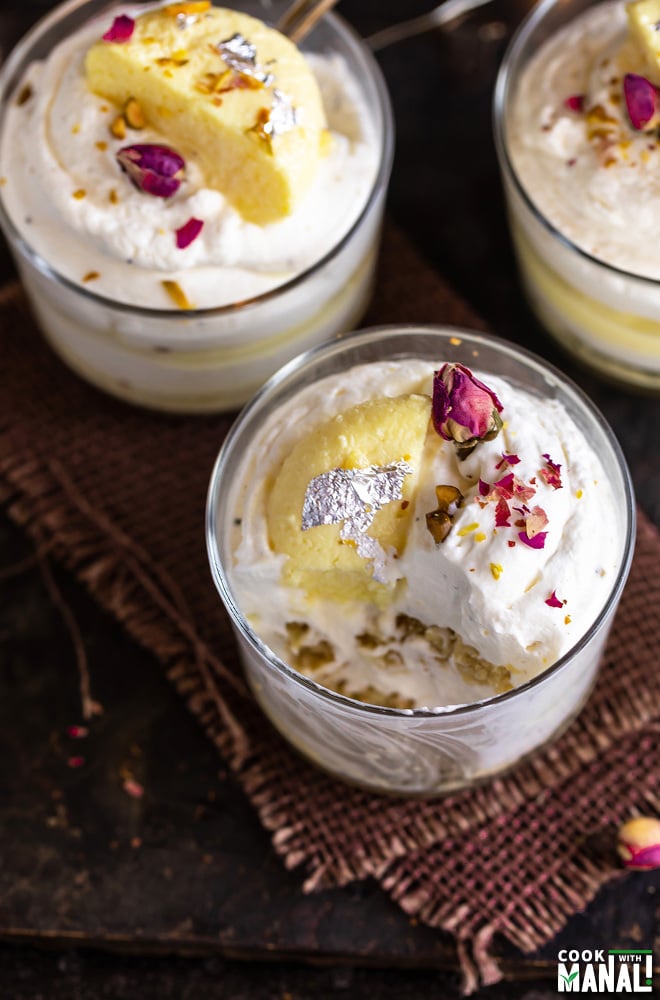
I garnished these jars with some nuts, dried rose petals/buds and edible silver leaves to make it look festive.
Using Shortcuts
If you do not want to make everything from scratch for this recipe (and that totally makes sense considering how busy our lives are), here are few things that you can do to cut short the whole process.
Buy store bought rasmalai: it’s easily available and will save you so much time! In India of course you get such good rasmalai at various sweet shops.
In US, if you have a local Indian sweet shop then you can find it there else you can find frozen rasmalai at Indian stores and even at Costco. So, you can totally use that here.
Make cake from a box: again, if you do not want to bake a cake from scratch, buy a vanilla cake box mix and flavor it with cardamom and bake according to instructions on the package.
You may also use cool whip or ready to use whipped cream, just flavor it with the thickened milk from the rasmalai. I personally think that you should make the fresh whipped cream at home, it tastes so much better. But there’s always an option if you don’t want to do it.
Prepare in advance: so these jars can be made ahead. You can make them the night before your party and they will be fine on the day of the party.
Since there’s fresh whipped cream, rasmalai (milk based dessert), I find that these are best for 2 days after you have assembled them.
More than that, you can try but it’s best to consume within 2 days.
How many servings this recipe makes? I have used 6-oz glasses here to make these rasmalai cake jars and I was able to get 8 jars.
If you use smaller glasses you will be able to get more, and if you use bigger glasses, the quantity will be less.
Method
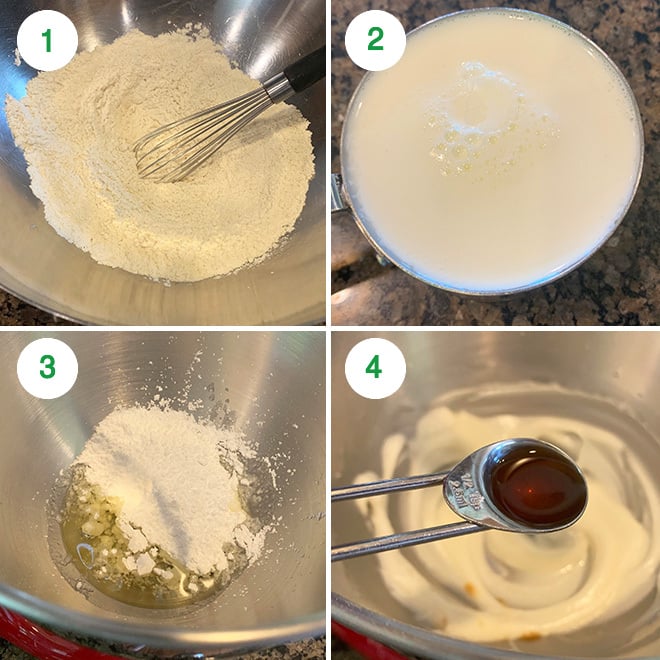
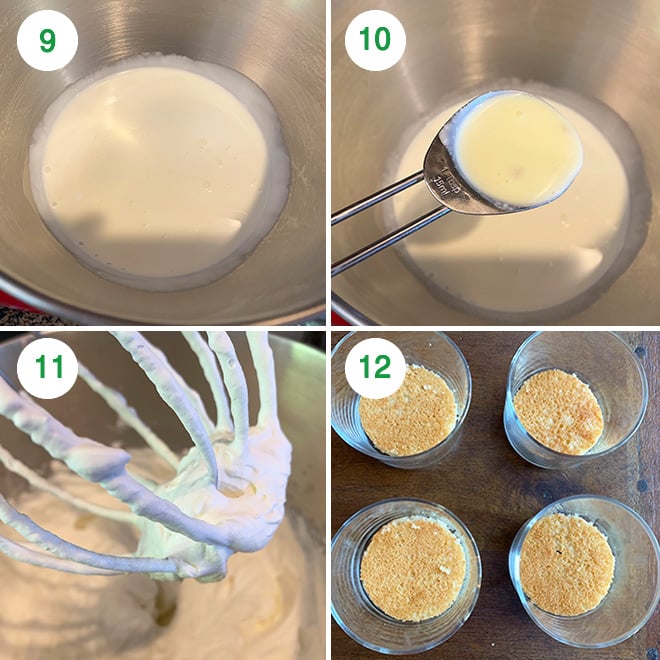
1- To make the eggless cake, in a large bowl, whisk together all purpose flour, cornstarch, baking powder, baking soda, 3/4 teaspoon cardamom powder and salt. Sift this mixture once and set aside.
2- Meanwhile mix 1 cup milk with 1 tablespoon white vinegar and set aside for 5 minutes while it curdles. (or use 1 cup buttermilk)
3- Using paddle attachment of your stand mixer or use your hand mixer, beat together oil and powdered sugar. Mix until creamy and well combined.
4- Then add in the vanilla and mix.
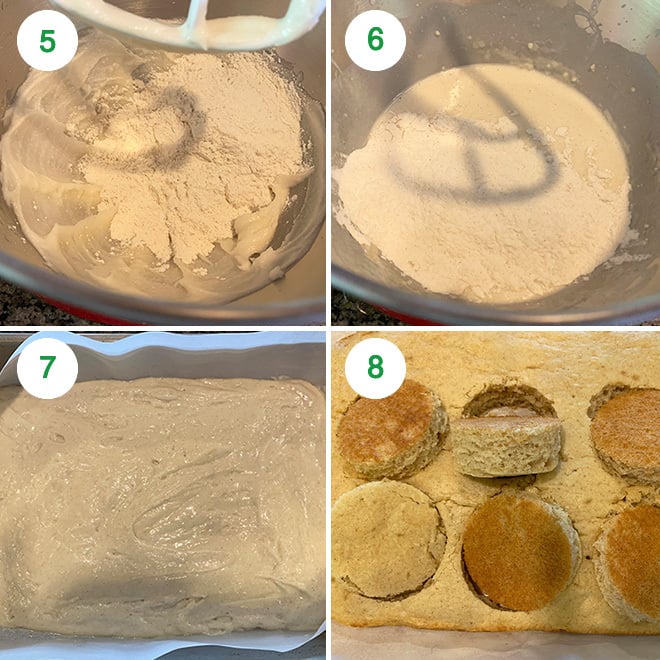
7- Transfer batter to a 9 x 13 inch pan. Baked 350 F degrees for around 15 to 18 minutes. This is a thin cake layer so it bakes quickly. If using a 8-inch square pan, this will take around 25 minutes or so check accordingly.
8- Let the cake cool down, and then using a round cookie cutter, cut the sheet cake layer into 8 rounds. Choose the cookie cutter size according to the size of your serving glasses/jars. You will not need to use all of these cake layers in the recipe.
Further slice each round into two layers, we will arrange these slices into the jars. Set this aside and then work on the whipped cream.
9- To the steel bowl of your stand mixer (or use your hand mixer) add 2 cups of heavy whipping cream. Make sure the cream is cold, you can also chill the bowl and whisk attachment before.
10- Add 3 tablespoons ras (thickened milk from the rasmalai), powdered sugar, cardamom powder and rasmalai essence (if you have it).
11- Beat using the wire whisk attachment until it forms still peaks. Remember to not over-beat else cream will separate.
12- Now, it’s time to assemble the rasmalai cake jars. Take your serving glasses and add a single sliced cake layer at the bottom (single layer from the two layers that we had cut from the rounds).
13- Add around 3 teaspoons of ras (thickened milk from the rasmalai) on top of the cake layer. You can also sprinkle some nuts here and also add a splash of kewra water.
14- Pipe some of the prepared whipped cream on top. You can now add a sliced/cut rasmalai piece here (that will double the rasmalai layer in the jar) but I did not.
15- Top with the other half of the sliced cake layer (from the cut rounds) and then add 3 more teaspoons of ras.
16- Finally top with more whipped cream. Place a full or half rasmalai on top (I used a cut rasmalai).
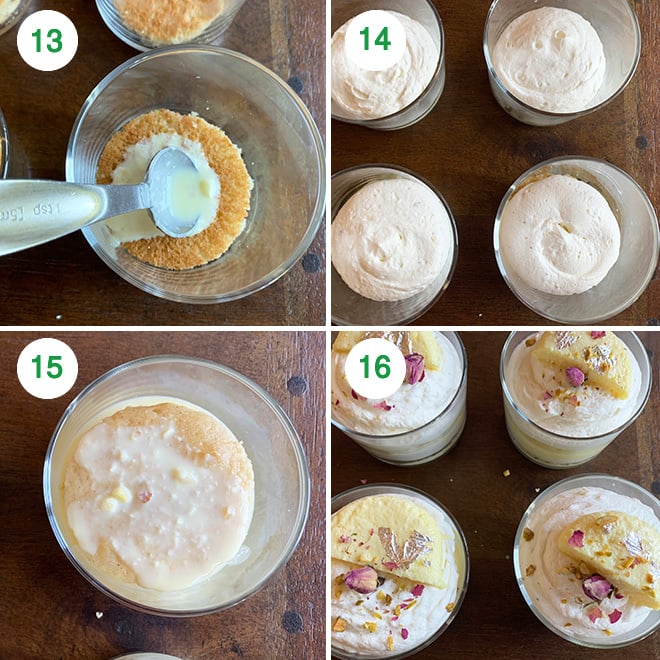
Garnish with crushed nuts, dried rose petals/buds and chandi ka vark (edible silver leaves). Chill these Rasmalai Cake Jars for couple of hours before serving.
If you’ve tried this Rasmalai Cake Jars Recipe then don’t forget to rate the recipe! You can also follow me on Facebook and Instagram to see what’s latest in my kitchen!
Rasmalai Cake Jars
Ingredients
Eggless Cardamom Cake
- 1.25 cups all purpose flour, 163 grams
- 2 tablespoons cornstarch, 22 grams
- 1 teaspoon baking powder
- 1/4 + 1/8 teaspoon baking soda
- 3/4 teaspoon cardamom powder
- 1/4 teaspoon salt
- 1 cup buttermilk, 8 oz/240 ml or use 1 cup milk mixed with 1 tablespoon white vinegar
- 1/3 cup oil, 80 ml, I used canola oil
- 3/4 cup powdered sugar, 75 grams
- 1/2 teaspoon vanilla extract
Rasmalai Whipped Cream
- 2 cups heavy whipping cream, 16 oz
- 3 tablespoons thickened milk from the rasmalai, 45 ml
- 3 tablespoons powdered sugar, or add more to taste
- 3/4 teaspoon cardamom powder
- 1/2 teaspoon rasmalai essence, optional
4 Rasmalai (homemade or store bought) or 8 if you want to double the rasmalai layer
nuts, for garnishing
dried rose petals, for garnishing
edible silver leaves, for garnishing
Instructions
- To make the eggless cake, in a large bowl, whisk together all purpose flour, cornstarch, baking powder, baking soda, 3/4 teaspoon cardamom powder and salt. Sift this mixture once and set aside.
- Meanwhile mix 1 cup milk with 1 tablespoon white vinegar and set aside for 5 minutes while it curdles (or use 1 cup buttermilk).
- Using paddle attachment of your stand mixer or use your hand mixer, beat together oil and powdered sugar. Mix until creamy and well combined.Then add in the vanilla and mix.
- Start adding the flour mixture and milk-vinegar mixture in parts. First add the flour mixture and mix, followed by the milk-vinegar mixture. Add the flour-mix in 3 parts and milk-vinegar mixture in 2 parts, starting and ending with the flour mix. Do not over-mix. The batter is now done.
- Transfer batter to a 9 x 13 inch pan. Baked 350 F degrees for around 15 to 18 minutes. This is a thin cake layer so it bakes quickly. If using a 8-inch square pan, this will take around 25 minutes or so check accordingly.
- Let the cake cool down, and then using a round cookie cutter, cut the sheet cake layer into 8 rounds. Choose the cookie cutter size according to the size of your serving glasses/jars. You will not need to use all of these cake layers in the recipe.Further slice each round into two layers, we will arrange these slices into the jars. Set this aside and then work on the whipped cream.
- To the steel bowl of your stand mixer (or use your hand mixer) add 2 cups of heavy whipping cream. Make sure the cream is cold, you can also chill the bowl and whisk attachment before.Add 3 tablespoons ras (thickened milk from the rasmalai), powdered sugar, cardamom powder and rasmalai essence (if you have it).
- Beat using the wire whisk attachment until it forms still peaks. Remember to not over-beat else cream will separate.
- Now, it's time to assemble the rasmalai cake jars. Take your serving glasses and add a single sliced cake layer at the bottom (single layer from the two layers that we had cut from the rounds).Add around 3 teaspoons of ras (thickened milk from the rasmalai) on top of the cake layer. You can also sprinkle some nuts here and also add a splash of kewra water.
- Pipe some of the prepared whipped cream on top. You can now add a sliced/cut rasmalai piece here (that will double the rasmalai layer in the jar) but I did not.
- Top with the other half of the sliced cake layer (from the cut rounds) and then add 3 more teaspoons of thickened rasmalai milk.
- Finally top with more whipped cream. Place a full or half rasmalai on top (I used a cut rasmalai). Garnish with crushed nuts, dried rose petals/bud and chandi ka vark (edible silver leaves). Chill these Rasmalai Cake Jars for couple of hours before serving.
Notes
- The cake, the whipped cream everything is lightly sweetened. If you want you can increase the amount of sugar in the recipe.
- You can use full rasmalai on top or cut each rasmalai in 2 and make two layers of rasmalai in the jars. I have used only one on top.
Nutrition
Nutrition information is automatically calculated, so should only be used as an approximation.
 Your feedback is valuable!Please share your comments, ratings, and any suggestions or adaptations below to help us improve and make our recipes more successful.

Can we use Betty Crocker cake mix. Vanilla flavour
yes!
Made these last night for a Diwali party and they came out amazing!! Thank you so much. I would post a picture if I could
Happy Diwali! 🙂 you can always email me the picture or tag on social media. Glad you liked it!
Hi Manali, thank you for the delicious dessert recipe. Can I assemble this in 5oz Parfait Cups instead of round cups?
sure you can use any cup!
Can we use ice-cream instead of whipped cream
sure your wish
Hello! Love your recipe, I just made these for Thanksgiving dessert tomorrow but I am concerned about storage. I’m freezing them for now but do you think they will thaw okay for tomorrow night? I used mini mason jars to seal them up too. Thank you!
hey you didn’t need to freeze them. They would have stayed okay for 48 hours in the fridge. I have never tried freezing them but they should be okay (I hope so)! 🙂
Yay! I popped them in the fridge so I’m sure they’ll be perfect for tonight 😊 thank you!
How can we make fresh whipped cream at home?
Hi Reshma, please check the recipe card. The recipe has instructions for that.
I’d love to make rasmalai from scratch, I am not a big fan of pre mix. It would be great to learn how to make it. Thank you!!!
sure, follow this recipe: https://www.cookwithmanali.com/make-soft-rasmalai-home/
Hi Manali can I use self flour instead of palin flour thanks
sorry recipe not tested with self raising flour, and self raising flour replacement works okay if recipe has baking powder, but this has baking soda so it might not work
Where can I buy edible silver leaf, here in the US? Thanks
I have always got them from India 🙂 but you can get them on amazon, search “edible silver leaves”.
How much vanilla is needed for the cake?
1/2 teaspoon
Thank you for posting this delicious looking recipe. Will definitely try it. May I ask you where you purchased your glass jars from. Would you mind sharing the link please?
They are from Crate & Barrel https://www.crateandbarrel.com/bodega-glass-7-oz/s313326?localedetail=US&storeid=450&a=1552&campaignid=9986587406&adgroupid=100019505999&targetid=pla-905325682003&pla_sku=313326&pcat=HSW&ag=adult&gclid=CjwKCAjwoc_8BRAcEiwAzJevtZ2xXaqDRGmRLucX7n1dpO0sOl0HroAuo80YhtUNGByo6v3lesZUghoCuHwQAvD_BwE