With this step-by-step samosa recipe, you will be able to make the perfect crispy and flaky samosa right in your kitchen. These potato samosas are filled with a spicy potato filling and are also vegan. I grew up in India, eating a lot of samosas, there were street vendors selling samosa at literally every corner of my hometown.
Whenever we had guests over for evening chai, my mom would always make onion pakora and order samosa from the street vendor. Honestly, we didn’t make too many samosas at home growing up, because literally they were available everywhere but once I moved to the US and started missing the samosas I enjoyed in India, is when I got into learning the tips and tricks behind making the perfect samosa.
Over the years, I have played around with this recipe and experimented several times to come up with an easy, foolproof recipe. I also learnt a few tricks from a street vendor during one of my India trips where he was gracious enough to share his knowledge with me. This is one of those treats that you should make for special occasions or over a weekend when you want to have some fun in the kitchen because it does take some time to put it all together.
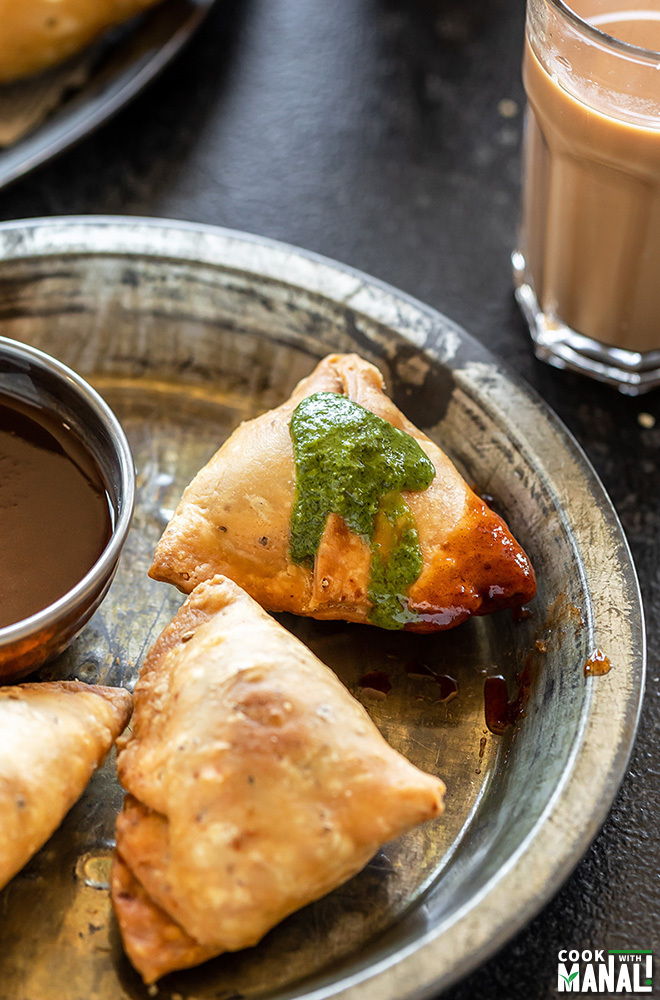
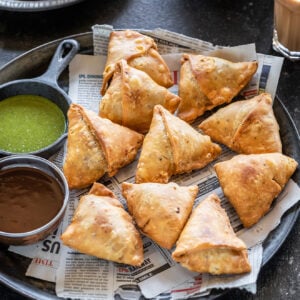
Popular Indian snacks are often deep fried like pakora, kachori, and of course samosa! I love traditional deep-fried samosa; nothing beats munching on a good crispy samosa on a rainy evening with a cup of chai. But over the years, I have also baked samosas in the oven, made them with puff pastry and even air fried them. However, I always keep coming back to this traditional samosa recipe simply because there’s nothing quite like it.
Because samosa is so popular in India, I always assumed samosa was an Indian dish. Only later I read that it has its origin in Middle East and it was introduced to India during the Delhi Sultanate rule. It was later adapted as a vegetarian snack with spicy potato filling in India and thus aloo/potato samosa became the most widespread snack in India
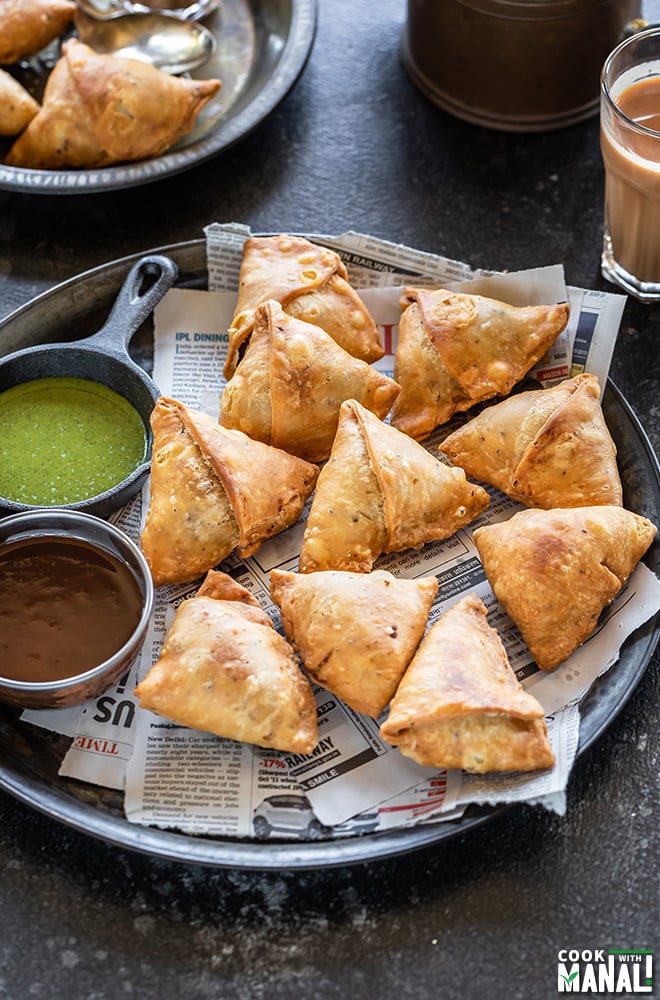
I like adding peas to my samosa, if you don’t like it, you may skip it. But what you can’t skip is dunking hot samosa into spicy green chutney and sweet and sour tamarind chutney.
Tips to Make the Perfect Samosa
Here’s what I have learned over the years experimenting with making samosa in the kitchen and I am excited to share all my tips with you guys to make the perfect samosa at home!
Fry the samosa on low heat – the most important thing first- always fry the samosa on low heat (around 285 F degrees), that way they will turn crisp. Once they have become light brown in color and their crust is firm (after 10 minutes or so), then you can increase the heat and fry on medium heat.
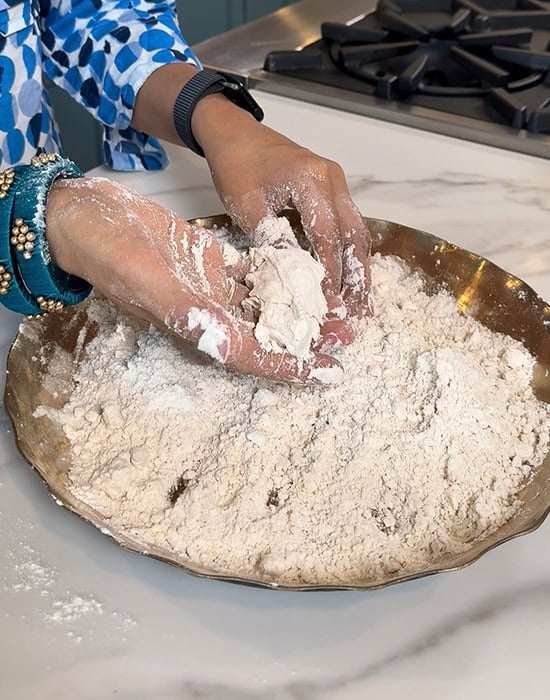
- Mixing the oil with flour is important– rub the oil with the flour using your fingers for a good 3 to 4 minutes, this incorporates the oil well into the flour and makes the dough flaky.
- Don’t overwork the dough– you only need to bring the dough together. If you overwork it, and knead it a lot, the samosas will turn out hard.
- Dough should be stiff– soft dough will not give crispy samosa.
- Let the dough rest for around 40 minutes– always remember to let the dough rest for at least 30 to 40 minutes before you start making the samosa. A relaxed dough is much easier to work with.
- Roll the dough evenly and roll it thin–roll the dough thin for that crunchy samosa with thin edges- ideally around 1/16-inch or less and roll it evenly.
- Do not use any flour while rolling the samosa, you can apply little oil on your rolling pin.
Troubleshooting common Samosa problems
Why is My Samosa Not Crispy?
This happens when you fry the samosa in hot oil. You need to fry the samosa on low heat always, around 285-300 F degrees. Once the outer coating becomes firm, you can then increase the heat to medium at fry at 320-350 F degrees.
Another reason is that your dough wasn’t stiff enough. The dough should be pliable but stiff, it should not be soft like roti dough. It’s your dough is soft, you samosa will be soft as well.
Samosa isn’t flaky enough
The way to fix this problem is to make sure that the oil is well incorporated into the flour. Rub the flour with oil using your fingers for 2 minutes and they will be flaky/khasta (as we say in hindi).
Samosa crust has bubbles on top
This happens from dropping them in hot oil, drop the samosa in oil on low heat. That will prevent the formation of bubbles.
How to Make Samosa (from scratch)
- Start making the dough
After adding the oil, rub the oil with your fingers into the flour, this is an important step for flaky samosa.
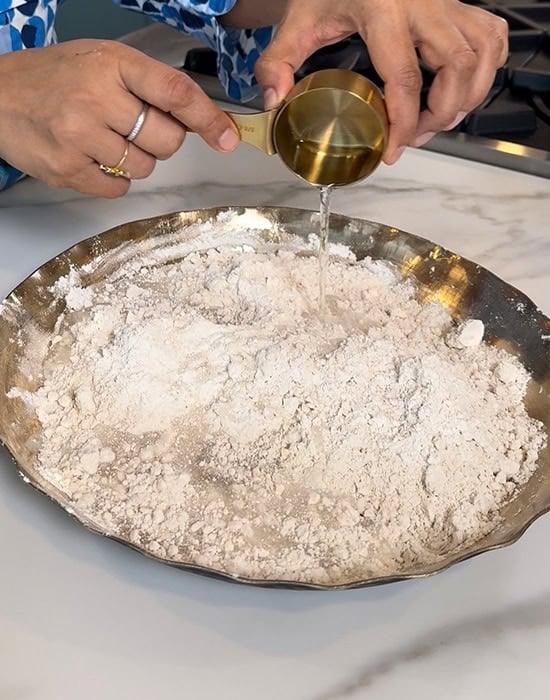
- Make a stiff dough
The samosa dough should not be soft. And once you knead it to a stiff dough, cover it with a cloth and let the dough rest for 30-40 minutes.


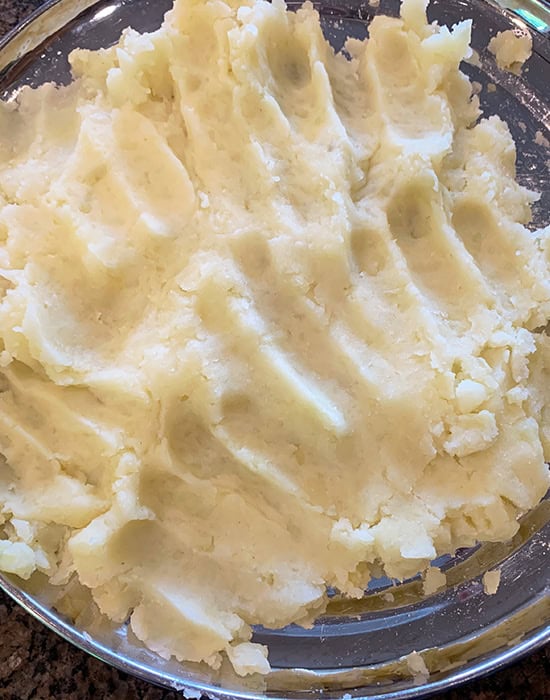
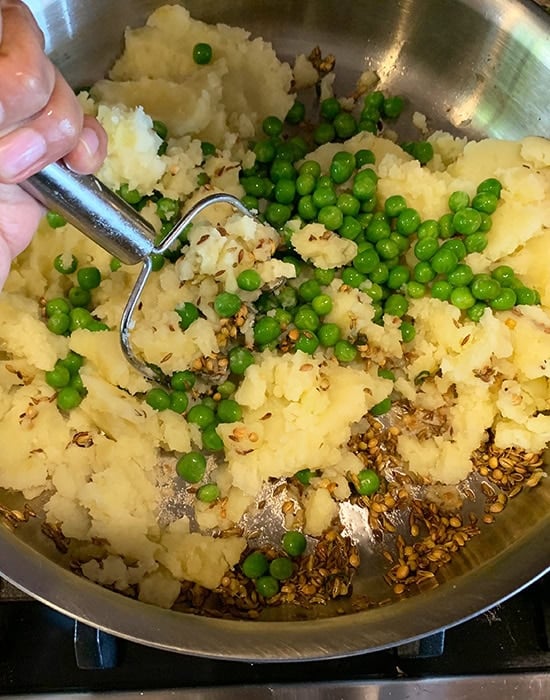
- Boil and mash potatoes
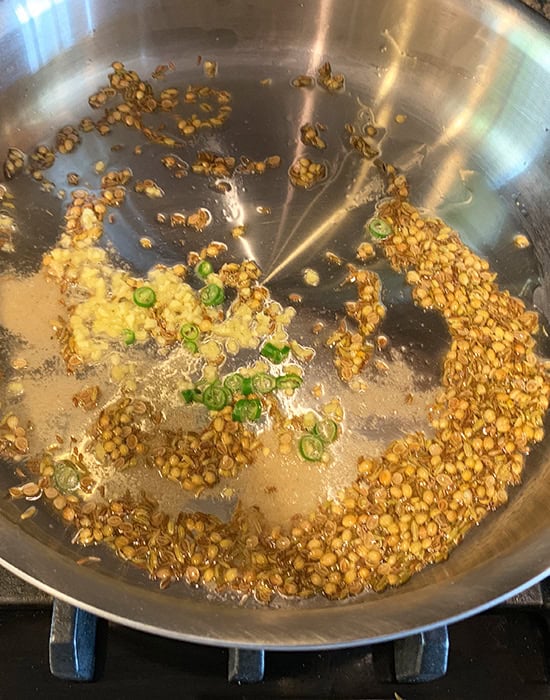
First boil the potatoes and then mash them. Then start working on the samosa filling, first crackle the cumin seeds, then add crushed coriander seeds, ginger and chopped green chili.
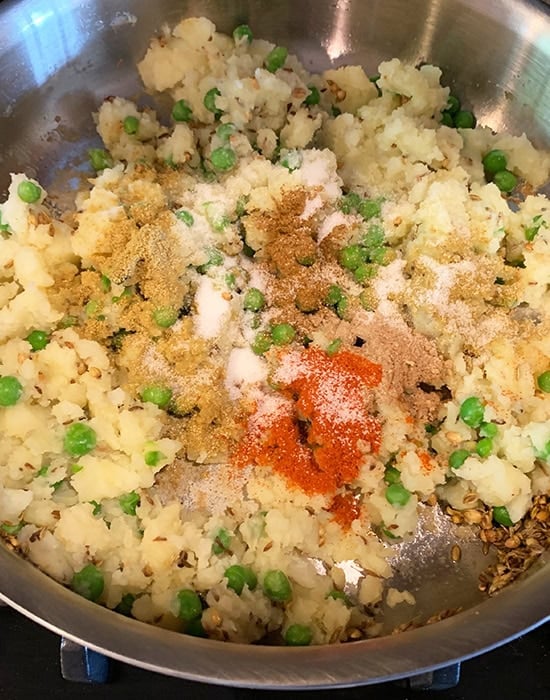
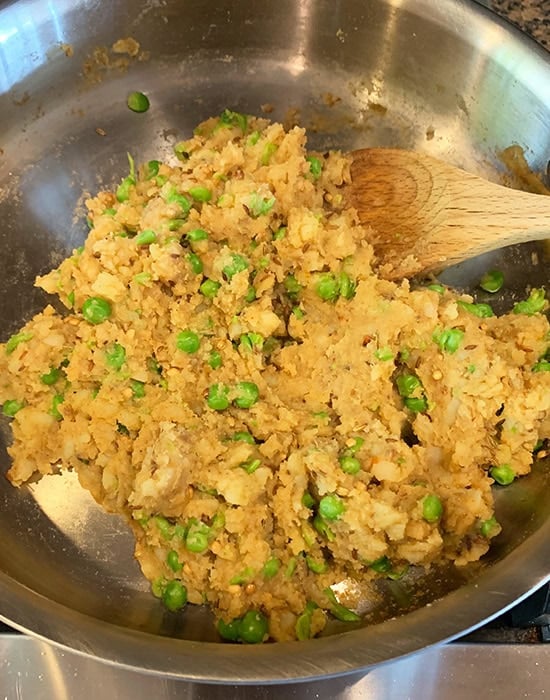
- Finish making the samosa filling
Once the seeds crackle, then add the mashed potatoes along with green peas and ground spices like chili powder, coriander powder, amchur, and garam masala.
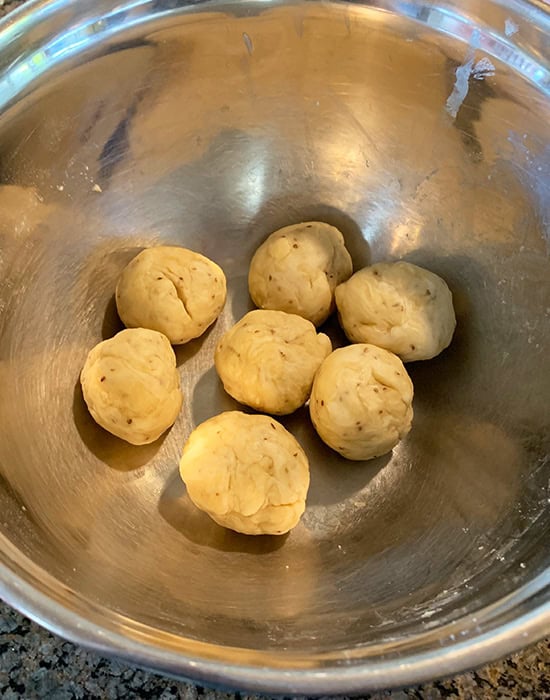
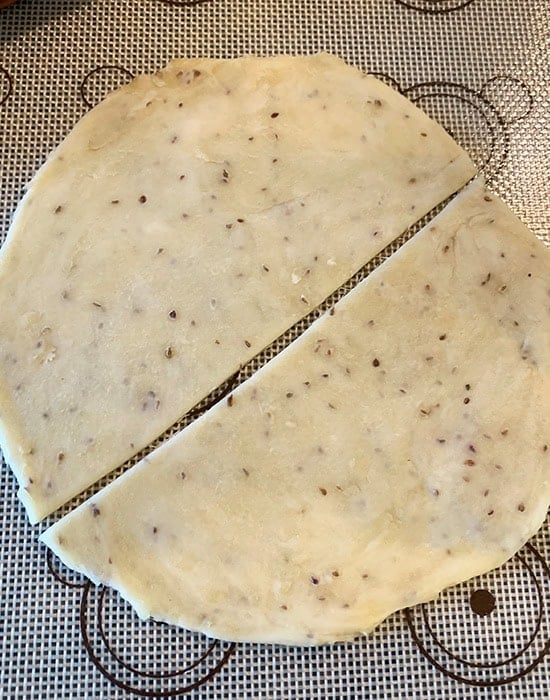
- Divide and roll samosa dough
Divide the prepared dough into 7 equal parts of 58-60 grams each. Then roll each ball into a circle (start with 1 dough ball) and cut into half. You are going to make samosas with each half.
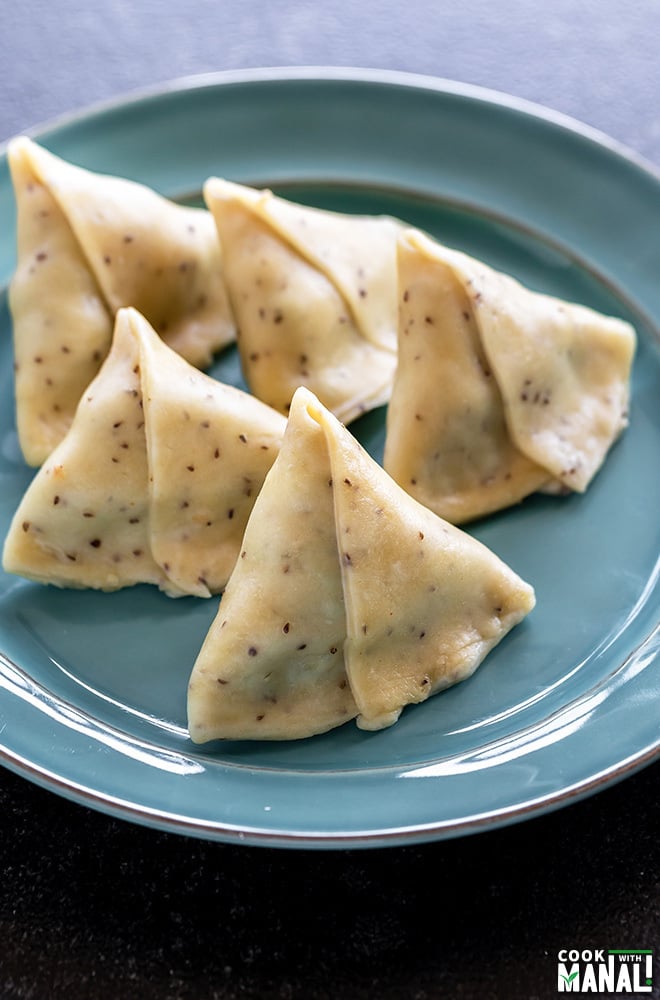
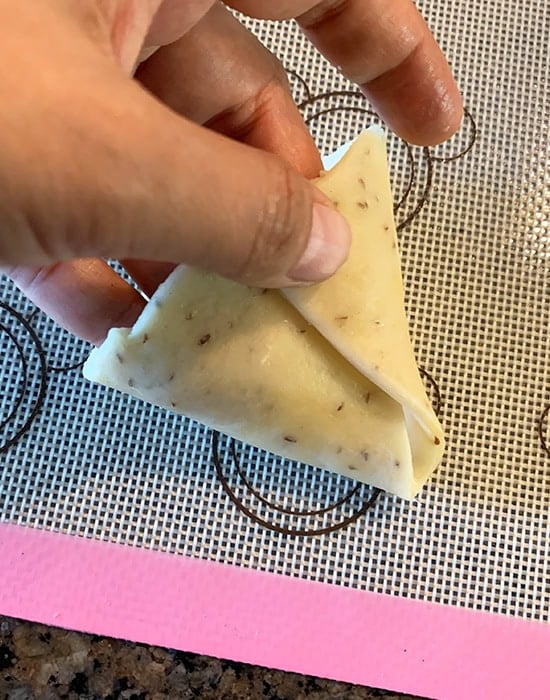
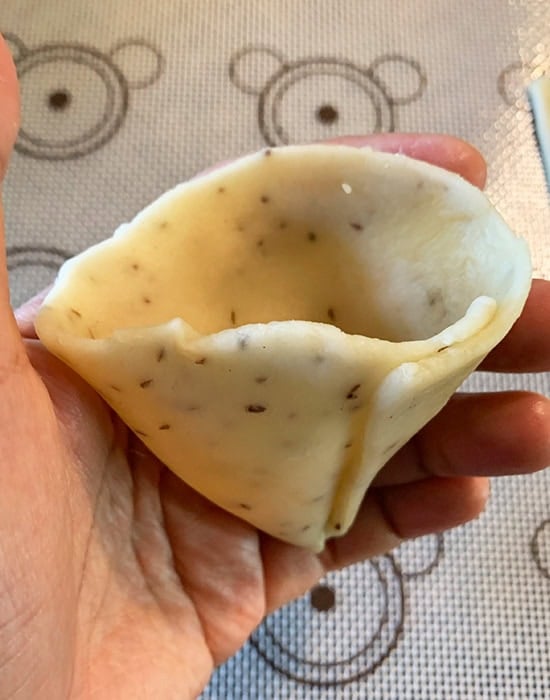
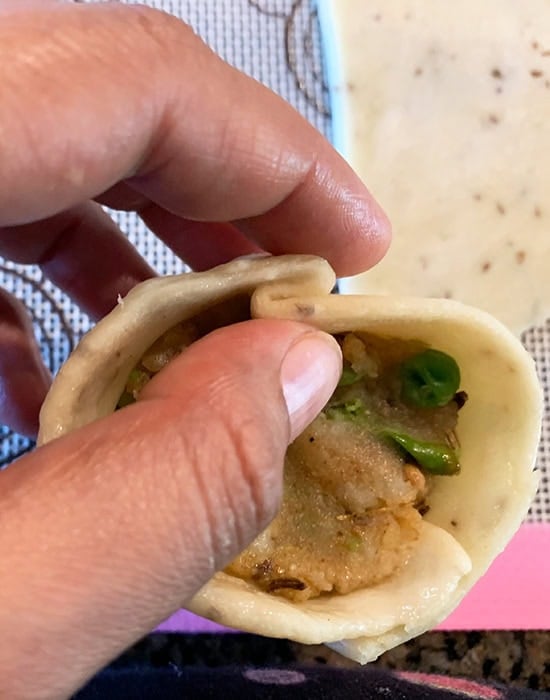
- Shape the dough into a cone shape
Apply water to seal the edges and then fold as shown in the pictures by bringing the two edges of the flat side together. Pinch and seal to bake a cone.

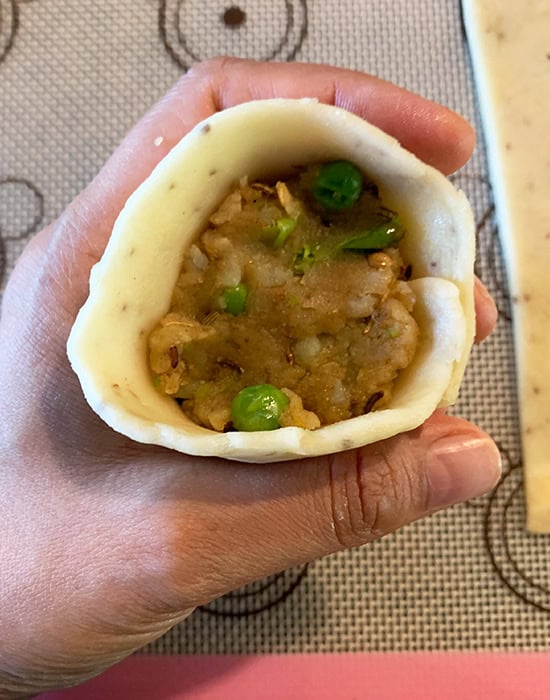
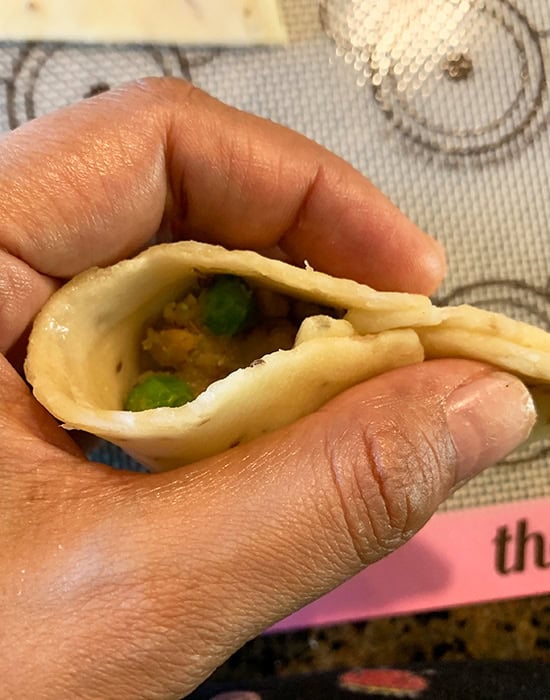
- Fill the samosa
Fill the samosa now with the prepared filling but do not overfill.
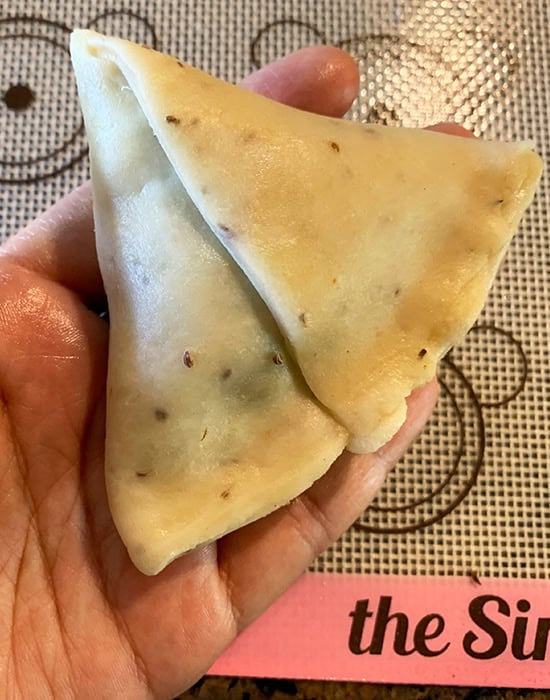
- Seal the samosa
And make all the samosas similarly. Keep them covered with a cloth to prevent them from drying.
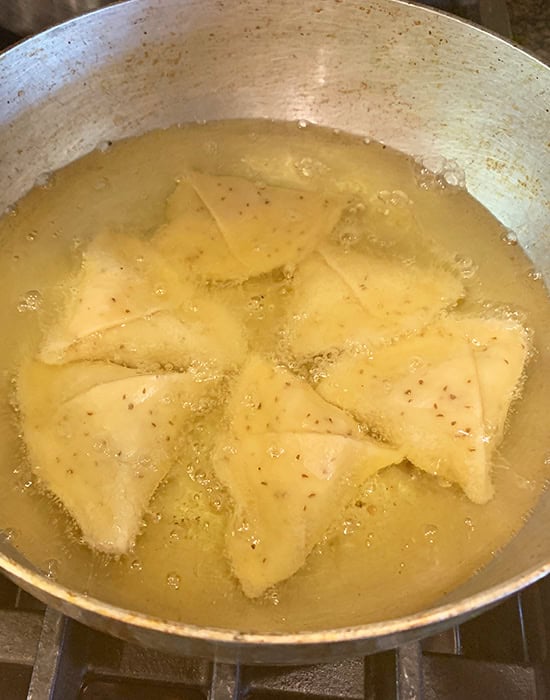
- Deep fry in oil on low heat
It is very important to fry on low heat for crispy samosa. Fry until they are crisp golden brown.

Can I Bake Samosas?
Yes, you can definitely bake these samosas. Line a large baking sheet with parchment paper and then place the samosa on it. Brush the samosas with oil and then bake at 350 F degrees for 30 to 35 minutes or until browned.
Leftover Samosa Ideas
If you have leftover samosas, you can use them in different ways. Like make, Samosa Chaat where you pair the samosas with chole and chutneys.
You can also make Samosa Sandwich, apply chutneys on bread and place a samosa in between. You can even put some sev on top and enjoy.
How to Make Homemade Samosa (Crispy & Flaky!)
Ingredients
Samosa Dough
- 2 cups all purpose flour (maida), 260 grams
- 1 teaspoon ajwain, carom seeds
- ¼ teaspoon salt
- 4 tablespoons + 1 teaspoon oil, 65 ml
- water, to knead the dough, around 6 tablespoons
Samosa Filling
- 3-4 medium potatoes, 500-550 grams
- 2 tablespoons oil, I used avocado oil
- 1 teaspoon cumin seeds
- 1 teaspoon fennel seeds
- 2 teaspoons coriander seeds, crushed
- 1 teaspoon finely chopped ginger
- 1 green chili, chopped
- ¼ teaspoon hing, asafoetida
- ½ cup +2 tablespoons green peas, I used frozen green peas which I soaked in warm water for 10-15 minutes before using
- 1 teaspoon coriander powder
- ½ teaspoon garam masala
- ½ teaspoon amchur, dried mango powder
- ¼ teaspoon red chili powder, or add more to taste
- ¾ teaspoon salt, or to taste
oil, for deep frying
Instructions
Make Samosa Dough
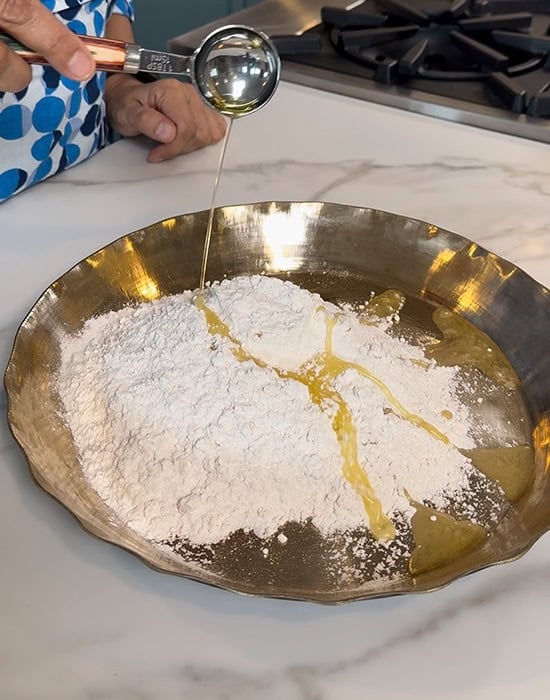
- Start by making the samosa dough. To a large bowl, add 2 cups flour (260 grams), 1 teaspoon ajwain and ¼ teaspoon salt. Mix well using a wire whisk or your hands. Add 4 tablespoons +1 teaspoon oil (65 ml) to the bowl and then start mixing the oil into the flour.
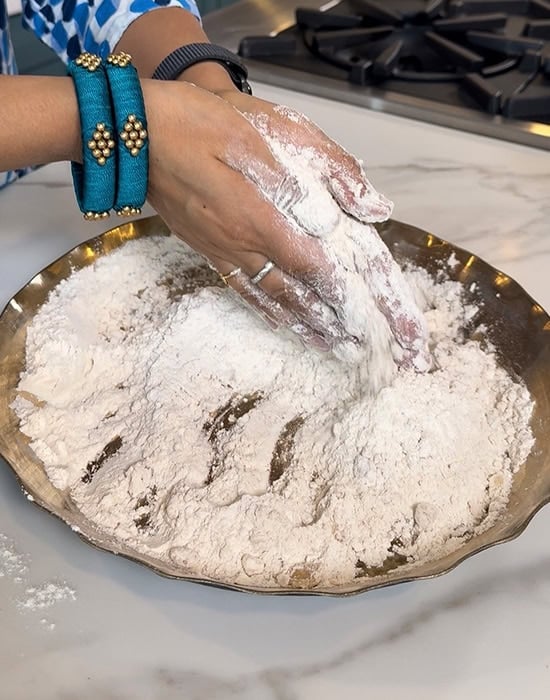
- Rub the flour with the oil using your fingers until the oil is well incorporated into the flour. Do this for 2 to 3 minutes, you don’t want to rush this step because this will make your dough crispy.Once the oil is incorporated, the mixture will resemble crumbs. Press some flour between your palm- it should form a shape (& not crumble) – that means oil is enough and well incorporated.
- Now, start adding water, little by little and mix to form a stiff dough. I used around 6 tablespoons water here, but it can vary. The dough needs to be stiff and not soft. Don’t knead the dough much.
- Cover the dough with a moist cloth and let the dough rest for 40 minutes. I usually soak a paper towel in water and then squeeze out all the water and then cover the dough with that. While the dough is resting, start working on the filling.
Make the potato filling
- Boil 4-5 medium potatoes (500-550 grams) until done- 8 to 9 whistles on high heat with natural pressure release if using stove-top pressure cooker or if using Instant Pot, add 1 cup water to the steel pot and then place a trivet inside, place the potatoes on top of the trivet and cook on high pressure for 12 minutes with natural pressure release.Once the potatoes are boiled, let them cool down a little and then carefully peel the skin of the potatoes and mash them using a potato masher. Set them aside.
- Now, heat 2 tablespoons oil in a pan on medium heat. Once the oil is hot, add 1 teaspoon cumin seeds, 1 teaspoon fennel seeds and 2 teaspoons coriander seeds (crushed using mortar pestle).Let the seeds sizzle for few seconds and then add 1 teaspoon chopped ginger, 1 green chili (chopped) and ¼ teaspoon hing. Cook for 1 minute.
- Add the boiled & mashed potatoes to the pan along with ½ cup + 2 tablespoons green peas to the pan. Turn heat to low-medium.Then add 1 teaspoon coriander powder, ½ teaspoon garam masala, ½ teaspoon amchur, ¼ teaspoon red chili powder (or to taste), and ¾ teaspoon salt (or to taste).
- Mix everything together using a spatula. I use my potato masher to combine the spices and seasonings well with the potatoes and peas.Once everything is well combined, remove the pan from heat and let the filling cool down a bit.
Shape & fry the Samosa
- Once the dough has rested, give it a quick knead and then divide the dough into 7 equal parts of around 58-60 grams each.Take one piece of dough and roll it into a thin circle, around 6 to 7 inches in diameter and 1/16 inch (or less) thickness, then cut the dough into two equal parts. Keep the remaining dough always covered with a moist cloth else the dough will dry out.
- Take one part of the cut circle and apply water on the straight edge/side. I usually mix some flour with water so that it forms a nice glue.Now bring the two ends of the straight edge together and pinch them to form a cone. Refer to step by step pictures in the post for a graphic representation which might be helpful. Pinch the pointed ends to make it a perfect cone shape.
- Fill the samosa with the prepared potato filling, around 1 to 2 tablespoons. Don’t overfill the samosa.Now again apply water all around the circumference of the cone as you must seal it. Pinch the opposite side (side opposite to where you pinched to form the cone) to form a plate (refer to step by step pictures in the post). Then pinch the edges and seal the samosa.
- Your samosa is now ready. Repeat with remaining dough and make all the samosas similarly. Always remember to keep the filled samosa covered with moist cloth while roll and fill the others.
- Now heat oil in a kadai on low heat (around 285-300 F). To check if oil is ready, drop a small piece of dough into the oil, it should take a few seconds to come up to the surface. That means the oil is ready. Or use a kitchen thermometer if you have one.
- Drop the shaped samosas into the oil. Fry on low heat. After around 10-12 minutes, the samosa will become firm and light brown in color. At this point, increase the heat to medium (around 350 F) and fry until it gets nicely browned.Don’t overcrowd the kadai/wok, fry 4-5 samosas at a time. And each batch will take around 15 to 20 minutes since we fry on low heat so be patient.
- Once you finish frying one batch, lower the heat again to low and wait until the temperature of the oil drops and then add the second batch. If you fry samosa on high heat, they will not get crispy and the dough will remain uncooked so regulating the oil temperature is crucial while making samosas.Fry all the samosa and then enjoy them hot with chutney!
Notes
- Can I Use Whole Wheat Flour?
- How to Store and Re-heat Leftover Samosas
- How To Freeze Samosas
Nutrition
Nutrition information is automatically calculated, so should only be used as an approximation.

the layout of this recipe (with excellent photos, tips and recipe card at the bottom) make it very clear and easy to follow. i used different ingredients based on what i have – an Indian coworker gave me some yummy curry he made from local venison (we live in MO Ozarks). i combined it with cabbage and used mild flavored dough – delicious way to use and stretch leftovers. Then I made an “Ozarks-style” samosa with my seasonal garden vege: potato, green bean, onion, garlic, sage, thyme, and wild foraged chanterelle mushroom with dough seasoned with cracked black pepper and rosemary. OMG!! this was almost too delicious as it is so easy to over-indulge! thank you, excellent !
that sounds amazing! 🙂
I am an absolutely newbie to cooking and wanted to make Samosas. Your instructions were very helpful and detailed. It came out pretty well for a newbie.
Thanks
Woow thanks a lot for the recipe..I tried it today and I’m loving the results?
glad to know!
Hi. I did not see in the recipe the amount of oil to mix with the dough.
Hi, it says very clearly under samosa dough- 4 tablespoons + 1 teaspoon oil, 45 ml + 5 ml
Thank you! It worked out for me. By the way, do you have a recipe for making chapatis?
yes! https://www.cookwithmanali.com/roti-recipe/
I’ve used this recipe a couple of times now (and messed with the filling just for fun).
This time I came back to check my dough ingredient quantities for a double batch, because, like you say, they freeze well.
One thing I noticed is that whilst you have included a function to double or triple the ingredients … not all numbers change with this function. I only point this out because you so obviously put a lot of work into your site and I am sure you want it to be perfect.
Thank You!
God bless.
It’s a recipe plugin issue and I am aware of it and looking into it, thanks Perry.
Thank you! Bless you, for your thorough and clear and generous instruction. I love samosas and craved them. I am so so so grateful to have this guide to making them! I made some tonight and my fingers are fragrant with these new-to-me spices: hing, amchur — what great flavors that all work together! I only cooked two potatoes and so halved the dough recipe but have enough filling to make more. I love love love the peas mashed in with the potatoes. I will make more tomorrow for the 4th of July. Very grateful!
Hi is it possible to use bread flour instead of all purpose since that’s what I have on hand right now.
worth a try!
Hi Manali,
Your receipts are great and I really like. I have tried so many things so far.
Could you please share sweet tamarind chutney recipe, I know they are available online but I would love to your way to make this.
Thanks
JKrishan
sure I will try to share that soon.
Being an ABCD (American born confused desi) I have eaten and made Samosas many times, following your recipe They come out almost as good as my Aunti”s. But I must admit I am often to lazy to make the dough and fry them, so it is not uncommon to just make and eat the filling.
good to know!
Hi Manali,
Thanks so much for the recipe…really looking forward to trying it here in Canada! How important is the Ajwain in the dough?
you can skip it! will still be good 🙂
Excellent results. Made for the first time ever and everyone loved them.
awesome!
Manali,
I tried this a couple of weeks back and it turned out fantastic. Thank you!!
awesome 🙂
Hi! What temperature is perfect for frying samosas?
Best regards!
Anders Svensson
sorry I did not measure the oil temperature, will try to do that next time I fry them. Just keep the heat to low else they won’t be crispy.
Manali, thank you so much for this recipe! I followed it to a T and it came out amazing! I made it for Mother’s Day and everyone enjoyed it. It’s definitely a labour intensive process, but so worth it!
Hello and thank you so much for posting this recipe, this is the best samosa recipe I have tried, and it really does taste as good and better than many of the ones you can buy at restaurants. It has just the right hint of sourness and a good level of sweet spices and the whole cumin and whole fennel seeds give beautiful bursts of flavour.
I had some puff pastry to use up which worked well, but I am really looking forward to trying the dough recipe soon. I didn’t have a few of the ingredients, so had to substitute a few things. Instead of fresh ginger, I used 1/2 teaspoon ginger powder, instead of Green chillies, I used extra red chilli powder and instead of Asafoetida, I used 1/4 teaspoon garlic powder and 1 teaspoon onion powder. It still tasted absolutely amazing but I am looking forward to try again in the future and not substituting anything.
Hey Manali.. according to your recipe, how many samosas can be made with 260gm dough?
hello everything is mentioned in the recipe card. It made 14 samosa.
Thankyou so much
Amazing and simple snack explained so well
I follow your recipe today step by step but Don’t know where i go wrong.. cover of samosa like Puri it’s not hard like street samosa ?… Stuffing was awesome ?
In cover have bubbles like we had in while frying Puri.. pls tell
Hi Anamika, looks like the temperature of oil was not right. You need to fry on low heat to get a crispy and hard cover.
Absolutely delish… I made doubles the quantity on everything and added minced beef to the filling mixture. Also because I was pressed for time I buy the flour, salt, ajwain and oil in the food processor with the dough blade, it easily made the fine crumb like texture in half the time It was a hit in my family… my boys who generally don’t like Indian food devoured the samosas like like hungry monsters.
glad to know! 🙂
Hi Manali
Thanks for the recipe… this may sound a bit silly but the peas are they fresh or frozen and do you boil them before adding to the mixture and also the water that you use for the dough is it hot or cold?
Thanks in advance
Hi Nishi, it’s mentioned in the recipe card “I used frozen green peas which I soaked in warm water for 10-15 minutes before using”. And water is room temperature (slightly on the colder side).
The samosa pastry recipe when followed,produced a shortbread type pastry. Normally samosa pastry is soft and pliable. So I’m not sure what was going on there. Think measurements need to be reviewed. The filling was nice though.
In India all the fried crispy snacks that we make like samosa, kachori etc. they never have soft dough. It’s always a stiff dough. You have to let the dough rest before rolling. This is a tried and tested recipe, sorry it didn’t work for you.
Tried it yesterday it was super amazing. I wanted to post the picture but can’t see an option. Every one loved it.
What type of oil are you using to fry them in?
Also what type of oil are you adding to the flour?
use vegetable or canola oil to fry and you can use same for adding to the flour
I made it and it was awesome… but i folded it in another way.. i will try thus way as well
glad to know 🙂
Can i use soft flour for samosa?
what’s soft flour?
Hello! I was wondering if I could bake the samosa, if yes, what temperature?
Yes I have mentioned in the post- Brush the samosas with oil and then bake at 350 F degrees for 30 to 35 minutes or until browned.
Can I use Besan flour instead? I need a gluten free option.
this is not a gluten-free recipe and won’t work with besan.
Hello,
Looking forward to trying this recipe! I definitely want to freeze some; what should I do when reheating the frozen ones? Do I need to let them stay in the fridge until thawed, or should I put them in the low heat oil for a bit longer? Thanks!
I would just fry them straight out of freezer. Fry on medium-low heat until golden brown.
I am such a samosa obsessed girl, I will defiantly will try your recipe.. but before trying, I wanted to ask a couple of questions to see if you can help me answer what went wrong in my past trail…(I also used melted ghee and flour) I fry mine low heat for almost 20 minutes, but I noticed my wrapper comes out crispy but kind of hard and not flaky, and crunchy bubbles throughout like your picture .. My dad said the pastry I make doesn’t taste like the ones back home, he said it kind of tastes like a pie crust, crunchy, flaky but a little soft… I appreciate your time.
hello. please follow all tips that I have mentioned and your samosa will be flaky. Adding enough oil to the dough and letting it rest for a bit, not over-working the dough are some important pointers for flaky and crispy dough. hope this helps
I tried this recipe and the dough was perfect, flaky and crispy on the outside. But the dough was raw on the inside. I’m assuming it’s not supposed to be like that.
Absolutely not. You didn’t fry the samosa enough. The heat needs to be low and samosa needs to be fried in that low heat until it gets golden brown. If you take it out of the oil sooner, the dough will obviously be raw from the inside.
Nice! Maybe I should try!
Hi Manali. I really want to try this recipe for a dinner I am doing. I don’t have much experience with deep drying things. I read in your recipe that you can bake it. How much of a difference in texture quality is there between baking and frying it? If there is a big enough of a difference I’ll go buy a wok to fry it in; otherwise, I’d prefer baking.
Also, if baking, do you flip them at a certain point in the 35 minutes?
Hey! If you are not very particular about your samosa, then go for baking! Flip them once in between and remember to keep the crust pastry thin so that it bakes nicely. Hope this helps!
Hi Manali,
Thanks for a nice and detailed receipe. I have a query.
You mentioned in receipe, “Fry on low heat. After around 10-12 minutes, the samosa will become firm and light brown in color. At this point, increase the heat to medium and fry until it gets nicely browned.”
What will be initial temperature of oil to fry on low heat? How hot/varm oil should be before we put first samosa then continue to fry on low heat?
Regards,
Archana
I didn’t measure Archana, it should just be low heat, around 250-300 F is my guess.
Hello sister can I make these samosa with mustard oil.
I would not do that, mustard oil has a strong flavor and the samosa will them smell of mustard oil. Just my 2 cents, rest is your preference
Why bubble is coming out from samosa how to prepare it nicely
sorry didn’t get your question? what kind of bubble?
What is the purpose of mixing the oil and flour together? You mention it is important but do not state why.
the process is called “moyan” in hindi, helps in making the pastry flaky and crispy
Really amazing recipe! It looks complicated but after making them you’ll realize that it isn’t bad, though it does take a while based on dough sit time and samosa fry time. The end result was incredibly delicious, even though I didn’t have 3 of the spices. Mine turned out a little dry, but I think I over-sauteed the potatoes. I could have added a little water and been fine. We used 4 large potatoes and ended up with enough filling for 28 samosas. I will make again!
awesome!
Brilliant recipe. I baked them in the oven and they came out beautifully crisp. I was nervous I’d overworked the dough as it took a bit of pressing to come together but after resting it came out great and was easy to work with. I’ve never made samosas before so thank you for such easy to follow instructions.
so glad to know! 🙂
HI , what was the tempeture and for how long?
This is a wonderful recipe and trust me, I have tried so many different recipes only to be disappointed. But this one rocks! Pastry was flaky, crumbly and perfect and the filling was delicious too. Definitely a keeper! Thanks so much ?
Hi, nice recipe. Very authentic. What is the specific temp on the oil?
I haven’t measured but I think it should be between 250-300 F
I tried making them tonight with cheese and onion, but the dough is not browning. What am I doing wrong?
why wouldn’t it brown if you will fry it? It will, if you are frying at low heat, it will just take some time. have patience.
Hello Manali,
Tried the recipe and it came out perfect. Just one doubt if I hv to make these samosas like an hour or two in advance n frying part is later then is it possible? And how do I store in this case then?
Of course, I would need them shaped at room temperature if it’s only 1-2 hours. If more, you can shape and keep them in fridge. You can also freeze for frying later.
Hi, Manali. If I want to make the samose the day before and fry before eating, can I store in the fridge overnight? Do I need to keep a damp cloth on them?
yes cover with a damp cloth, you can even freeze them
Hi for how long must the samoosa fry
hello it’s mentioned in the recipe “Fry on low heat. After around 10-12 minutes, the samosa will become firm and light brown in color. At this point, increase the heat to medium and fry until it gets nicely browned.
Don’t overcrowd the kadai/wok, fry 4-5 samosas at a time. And each batch will take around 20 minutes since we fry on low heat so be patient.”
We are doing an indian christmas eve dinner. I’d love to make these. Can I ask where you found your spices? Our town has an Arabic market, and a Asian market. Not sure if they’d have them.
Hi Emily, i find them all at Indian grocery store, you can also find everything on amazon. Check the asian market, they should have the spices.
Hello sister I am from Odisha. I prepared your recipe at my home with the help of my mom. It tests great yummy. I like to eat samosa all the day , love from Odisha.
Thank you for the recipe.
Can you please put a video on how to make Samosas cuz I won’t really understand if it’s written so can you put a video on.
Thankyou?
will do 🙂
Nice sis, I like it recipe
It tests awesome , I prepared at my home.
yes
Hi there am Nelly. The recipe really worked for me and it surely do tastes amazing. I would love the recipe for minced meat filling.
Tried the samosas today – followed your recipe to the T and they turned out simply mouth-watering! Thanx a ton Manali – waiting to try more of your recipes…
yay! so glad to hear that Archana 🙂
nice one
Sounds really tasty, but so complicated??
haha yes it’s not a everyday thing but for special occasions! definitely worth the effort though
Yes you can air fry the samosa I have tried many times just spray butter or olive oil on samosa its really good crunchy and perfect and healthy
This is helpful! Thank you!
Hello Manali,
First of all, thanks a lot for the recipe? 🙂 I have a question – instead of frying or baking the samosas, can we air fry them?
Hi Debo! I don’t have a air fryer and never used it so can’t comment 🙂
ofcourse you can! They come out as wonderful and crispy
Thanks so much for the recipe. I made these this afternoon and they were some of the best samosa we’ve ever had. I’m now off to make another batch for freezing.
awesome!
The recipe is awesome!
Actually I’m making it for the first time so kudos to me!!!
But after reading proper instructions I’m sure that the recipe will come out good!
Good work! Keep going
Hi deb, i don’t know if this has already been answered. We oil fried half and air fried half. The oil fried were much better. The air-frier gave the dough a harder shell like texture that wasn’t flakey and pleasant.
I air fried mine (preheat fryer to 400) for 10mins and whilst they were paler in color they were still delicious!