Boondi Raita is a popular Indian side dish made with yogurt, spices and boondi (fried balls made from besan aka gram flour). This raita is commonly served as an accompaniment to Indian meals along with rice, curries, roti. It’s also great with biryani or pulao and gets done in less than 15 minutes!

Table of Contents
About This Recipe
Boondi Raita is an Indian raita (Indian yogurt dip) made with yogurt, spices and boondi.
Boondi are deep fried tiny balls made from gram flour. I have shared a sweet boondi recipe on the blog and I love them so much. However, boondi raita is made with savory boondi.
As far as I can remember, this was the most common raita that was made in my house, definitely more common than cucumber raita or spinach raita. I think the reason was simple- it did not need any prep work or even chopping. You just had to mix store bought boondi with the yogurt and it was done. So mom often made it as side to our everyday meals along with rice, dal, roti and sabzi.
It was also always there at most birthday parties (along with chole, bhature) and also at weddings. It’s not only super easy to make but also a crowd pleaser. Almost everyone I know loves boondi raita and that explains it’s popularity.
Ingredients
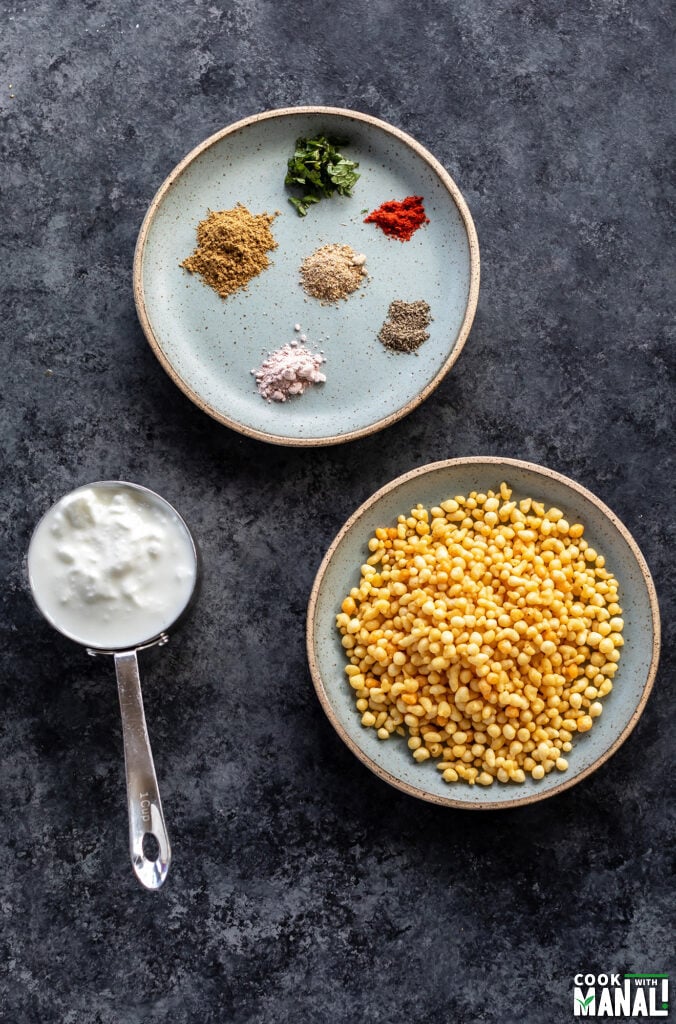
Yogurt: you can use any yogurt of choice for this recipe. I have used whole milk plain yogurt which makes the raita creamy.
Boondi: in the market, you will find 2 types of boondi, the plain boondi and masala boondi. For this recipe, I have used plain boondi but I also like using masala boondi at times. Since the masala boondi already has spices added to it, the raita turns our even more flavorful.
Can you make boondi at home? Yes, absolutely however everyone I know including myself just buys it from the store. It’s bit of process to make boondi at home and it’s so readily available in the market so it just makes sense to buy these packets from store.
Spices: for this recipe, I have used cumin powder, chaat masala and red chili powder. Black salt, fennel powder can also be added. To spice things up, you can add green chilies. For freshness, I like using fresh mint but you can also use chopped cilantro in place.
Soaking The Boondi or Not?
This is such a personal choice and depends on whether you like soft, melt-in-mouth boondi raita or crunchy boondi raita.
Some people are of the opinion that since boondi is fried, it needs to be soaked to get rid of the excess oil. In fact, most people I know make the raita this way. Personally, I love crunchy boondi! I straight away add it to my yogurt but I am sharing the more common version which is made by soaking the boondi.
But if you are like me, feel free to skip the soaking part and add boondi to the yogurt straight away.
Step by Step Method
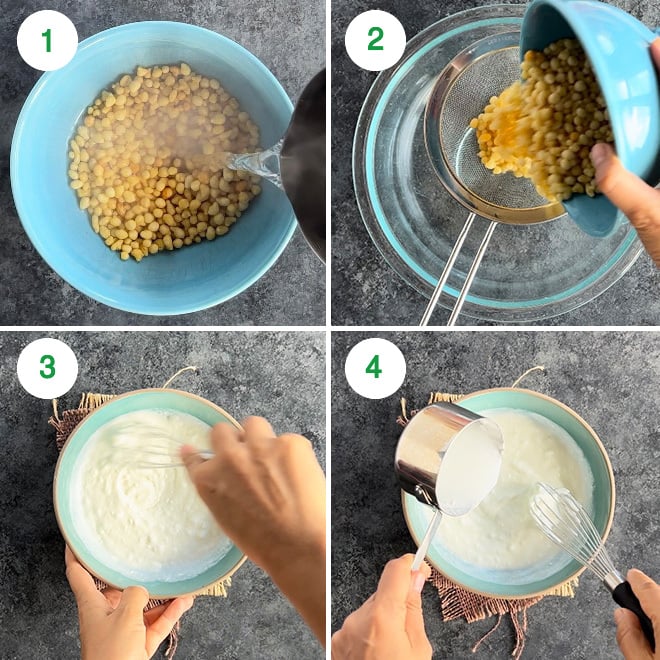
1- To a bowl add 1/2 cup boondi. Now pour hot water over the boondi. Let sit 5 minutes. Skip this step if you like crunchy boondi raita.
2- After 5 minutes, drain the water and set the boondi aside. Remember to not soak the boondi for more than 4 to 5 minutes for them to retain their shape.
3- To another bowl, add 1 cup of yogurt. I have used plain whole milk yogurt here. Mix it well using a wire whisk.
4- Add water to thin out the yogurt as needed. This might not be needed if using homemade yogurt but store bought yogurts are usually on the thicker side. Adjust the consistency of the raita as desired.
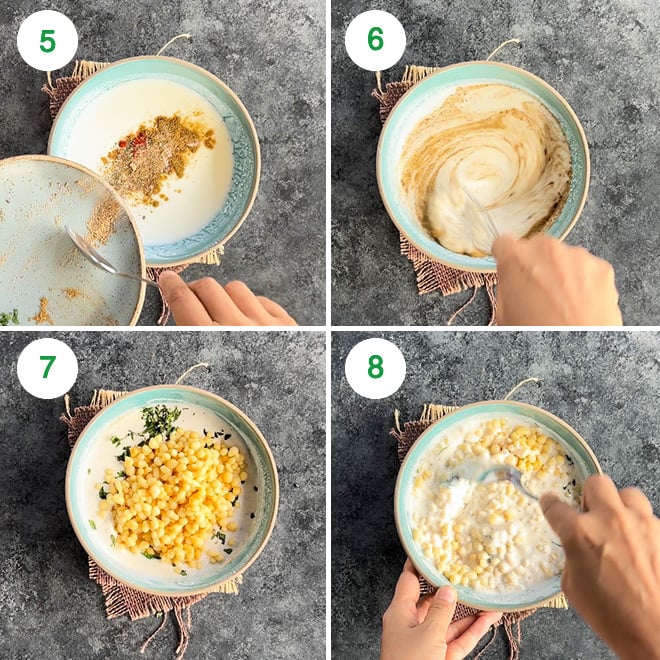
5- Now, add the following:
- 1/2 teaspoon cumin powder
- 1/4 teaspoon chaat masala
- 1/4 teaspoon red chili powder (or to taste)
- 1/4 teaspoon black pepper
- salt, to taste
6- Using a wire whisk, mix until the spices and salt are well combined with the yogurt. You can also add a little sugar if you want at this point.
7- Add 1 tablespoon freshly chopped mint and the soaked and drained boondi into the yogurt.
8- Mix until combined. Garnish with more mint, chili powder and you can even add some crunchy boondi on top for texture before serving.
Serving Temperature
Boondi Raita can be served at room temperature or cold. I personally always chill it in the refrigerator for couple of hours before serving.
I remember in Delhi, it was very common for people to even add ice cubes to their boondi raita. I guess it was so hot there that adding ice cubes made sense!
Storage
Leftover can be stored in the refrigerator for 2 days. I have to say though, the raita tastes best the day it’s made.

Important Tips
- Consistency: I feel consistency of not only boondi raita but any raita is such a personal preference. Some like it thick, some like it totally watered down. So adjust the consistency to your preference. If using homemade yogurt, you will likely not need to add much water.
- Vegan version: you can easily make boondi raita vegan by using vegan yogurt. I would recommend using plain almond milk yogurt since it has a neutral taste and will work well here.
- Adjusting spices levels: for a spicier raita, feel free to add some chopped green chilies or increase the amount of red chili powder in the recipe. Also, you can add 1/2 teaspoon sugar for a little sweeter raita.
- Serving suggestions: I love serving boondi raita as a side along with my simple meal of roti, dal and sabzi. You can also serve it with Aloo paratha, Gobi paratha or Veg Biryani.
If you’ve tried this Recipe then don’t forget to rate the recipe! You can also follow me on Facebook, Instagram to see what’s latest in my kitchen and on YouTube to watch my latest videos.

Boondi Raita
Ingredients
- 1 cup yogurt, I used plain whole milk yogurt
- 1/2 cup boondi, plain plus more for garnishing
- 1/2 teaspoon cumin powder
- 1/4 teaspoon chaat masala
- 1/4 teaspoon red chili powder, to taste
- 1/4 teaspoon black pepper, adjust to taste
- salt, to taste
- 1 tablespoon chopped mint
Instructions
- To a bowl add the boondi. Now pour hot water over the boondi. Let sit 5 minutes. Skip this step if you like crunchy boondi raita.
- After 5 minutes, drain the water and set the boondi aside. Remember to not soak the boondi for more than 4 to 5 minutes for them to retain their shape.
- To another bowl, add 1 cup of yogurt. I have used plain whole milk yogurt here. Mix it well using a wire whisk.Add water to thin out the yogurt as needed. This might not be needed if using homemade yogurt but store bought yogurts are usually on the thicker side. Adjust the consistency of the raita as desired.
- Now, add the following: cumin powder, chaat masala, red chili powder, black pepper and salt, to tasteUsing a wire whisk, mix until the spices and salt are well combined with the yogurt. You can also add a little sugar if you want at this point.
- Add 1 tablespoon freshly chopped mint and the soaked and drained boondi into the yogurt.
- Mix until combined. Garnish with more mint, chili powder and you can even add some crunchy boondi on top for texture before serving. Serve cold or at room temperature.
Video
Nutrition information is automatically calculated, so should only be used as an approximation.
 Your feedback is valuable!Please share your comments, ratings, and any suggestions or adaptations below to help us improve and make our recipes more successful.
The raita turned out to be delicious. Thank you.
Adding black salt a few pinches and sugar adds great flavor to the raita. I also give a tadka of rai. Zeera, curry leaves, whole red pepper.
thanks for sharing!